
LV050-CPU核
一、基本概念
我们在 windows 下可以看到这样的一些参数:
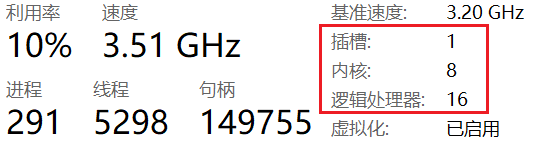
- 插槽:指主板上物理安装 CPU 的接口,一个插槽对应一个物理 CPU 芯片。对于大多数个人电脑来说,通常只有 1 个插槽。服务器或高端工作站主板可能有 2 个或更多插槽。任务管理器显示的数量就是主板上实际插着的 CPU 个数。
- 内核:每个物理 CPU 芯片内部包含的 物理核心 数量。例如“8 核” CPU 表示这个芯片里有 8 个独立工作的物理核心。核心是真正执行计算任务的硬件单元。多核能让电脑同时处理多个任务而不明显卡顿。
- 逻辑处理器:操作系统能调度的 最小执行单元。它的数量取决于 CPU 是否支持 超线程 技术。如果 不支持 超线程:逻辑处理器数 = 物理内核数。如果 支持 超线程(常见于 Intel 和 AMD):一个物理内核可以模拟出两个逻辑处理器,让操作系统认为有两个 CPU 可用。此时逻辑处理器数 = 物理内核数 × 2。
我们在创建 VMware 的时候需要为虚拟机分配 CPU,例如:
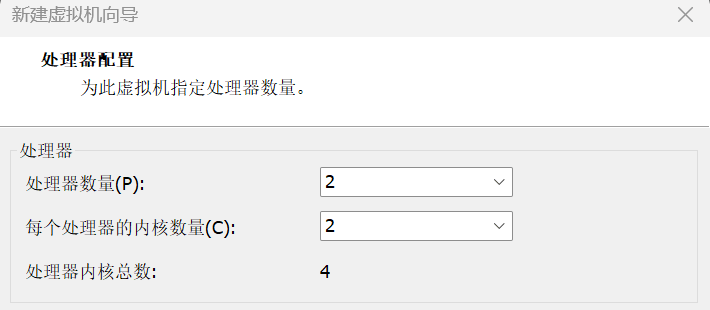
先要知道一个东西,就是 VMware 会通过硬件模拟,让虚拟机操作系统“以为”自己真的安装在了有这么多物理 CPU 插槽的主板上。上面我的 windows 一共是由 1 个物理 CPU,8 个核心,16 个逻辑处理器,那么对于 VMware 来说,处理器内核总数不超过 16 就可以了。若是配置为处理器数量 2,每个处理器内核数量 2,那么若是 VMware 中安装了 Windows 系统,那么资源管理器的 CPU 将会显示 2 个插槽了。
CPU 亲和性(CPU Affinity):也称为 CPU 绑定,指定一个进程或线程只能在某些特定的 CPU 核心上运行。默认情况下,Linux 调度器可以在任意可用的 CPU 上调度进程,但通过设置亲和性,可以将进程 "绑定" 到指定的核心上运行。合理配置亲和性可以减少缓存失效、降低跨核心调度的开销、避免资源竞争,从而显著提升系统性能
CPU 掩码(CPU Mask / Bitmask):是 Linux 内核中用于表示系统中 CPU 集合的一种位图。每个位代表一个 CPU 序号,通过这种方式,可以方便地管理和操作多个 CPU 的状态。
bit 0 (最低位) → CPU 0
bit 1         → CPU 1
...
bit N → CPU N该位 = 1 表示允许在该 CPU 上运行,该位 = 0 表示禁止在该 CPU 上运行。
二、CPU 核心数
1. 虚拟机设置
先来了解一下怎么查看 CPU 和操作 CPU 核的相关内容吧。
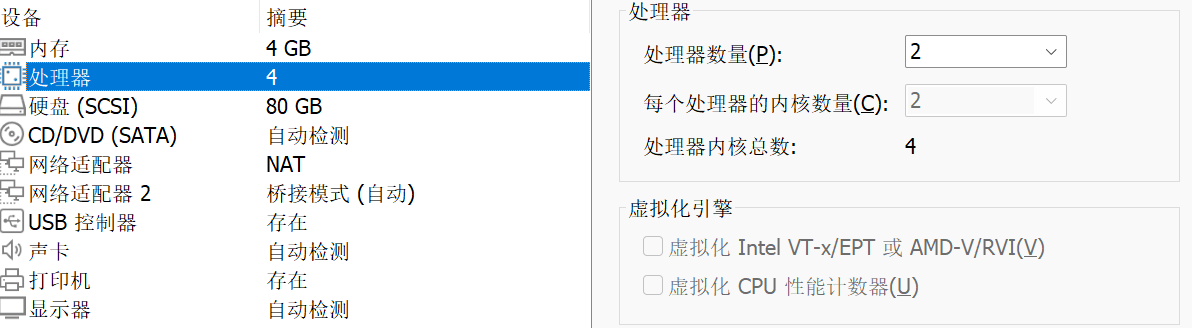
总核数 = 物理CPU个数 X 每颗物理CPU的核数
总逻辑CPU数 = 物理CPU个数 X 每颗物理CPU的核数 X 超线程数我的下边这些操作都是在虚拟机中进行,我的虚拟机参数如下,这就相当于有 2 个物理 CPU,每个 CPU 又有 2 个核心,一共就是有 4 个逻辑 CPU:
2. 查看 CPU 的核心数
2.1 查看物理 CPU 个数
cat /proc/cpuinfo| grep "physical id"| sort| uniq| wc -l
cat /proc/cpuinfo | grep "physical id" | uniq在终端输入以上命令可以看到:
hk@vm:/$ cat /proc/cpuinfo| grep "physical id"| sort| uniq| wc -l
2

hk@vm:/$ cat /proc/cpuinfo | grep "physical id" | uniq
physical id	: 0
physical id : 12.2 查看逻辑 CPU 个数
cat /proc/cpuinfo| grep "processor"| wc -l
cat /proc/cpuinfo | grep "processor" | uniqprocessor:指明每个物理 CPU 中逻辑处理器信息(序号:0~5 表示有 6 个逻辑 CPU)。在终端输入以上命令可以看到:
hk@vm:/$ cat /proc/cpuinfo| grep "processor"| wc -l
4

hk@vm:/$ cat /proc/cpuinfo | grep "processor" | uniq
processor	: 0
processor	: 1
processor	: 2
processor : 32.3 查看单个 CPU 核数
cat /proc/cpuinfo | grep "cpu cores" | uniqcpu cores:指明每颗物理 CPU 中总核数,在终端输入以上命令可以看到:
hk@vm:/$ cat /proc/cpuinfo | grep "cpu cores" | uniq
cpu cores : 22.4 直接查看 CPU 所有信息
cat /proc/cpuinfo在终端输入以上命令可以看到:
太多了,这里就不写了3. C 语言获取 CPU 核心数
我们在程序中使用可以使用系统调用 sysconf 获取 cpu 核心数。
3.1 函数说明
/* 需要包含的头文件 */
#include <unistd.h>
// 返回系统可以使用的核数,但是其值会包括系统中禁用的核的数目,因 此该值并不代表当前系统中可用的核数
int sysconf(_SC_NPROCESSORS_CONF);
// 返回值真正的代表了系统当前可用的核数
int sysconf(_SC_NPROCESSORS_ONLN);

/* 以下两个函数与上述类似 */
#include <sys/sysinfo.h>

int get_nprocs_conf (void);/* 可用核数 */
int get_nprocs (void); /* 真正的反映了当前可用核数 */3.2 使用实例
#include <stdio.h>
#include <unistd.h>
#include <sys/sysinfo.h>

int main(int argc, const char *argv[])
{
    int sc_nprocessor_conf = sysconf(_SC_NPROCESSORS_CONF);
    int sc_nprocessor_onln = sysconf(_SC_NPROCESSORS_ONLN);
    printf("sc_nprocessor_conf:%d\n", sc_nprocessor_conf);
    printf("sc_nprocessor_onln:%d\n", sc_nprocessor_onln);

    int nprocs_conf = get_nprocs_conf();
    int nprocs_onln = get_nprocs();
    printf("nprocs_conf:%d\n", nprocs_conf);
    printf("nprocs_onln:%d\n", nprocs_onln);
    return 0;
}编译执行后如下所示:
sc_nprocessor_conf:4
sc_nprocessor_onln:4
nprocs_conf:4
nprocs_onln:4四、多进程和多线程在 CPU 核上的运行
每个 CPU 核运行一个进程的时候,由于每个进程的资源都独立,所以 CPU 核心之间切换的时候无需考虑上下文。每个 CPU 核运行一个线程的时候,有时不同线程之间需要共享资源,所以这些资源必须从 CPU 的一个核心被复制到另外一个核心,这会造成额外的开销。
1. taskset 命令
1.1 测试程序
这里使用进程来进行测试。
#include <stdio.h>
#include <time.h>
#include <sys/types.h>
#include <unistd.h>

int main(int argc, const char *argv[]) {
    pid_t ppid = getppid();
    pid_t pid = getpid();

    printf("ppid %d, pid %d\n", ppid, pid);
    while (1) {
        sleep(5);
    }
    return 0;
}使用以下命令编译程序:
gcc main.c -Wall我们就会得到一个 a.out 的可执行文件,我们需要在后台运行这个进程方便后续测试使用:
./a.out &1.2 获取进程的 PID
ps -aux | grep "a.out"我们会得到以下输出信息:
sumu@sumu-vm:~/workspace/c-learning/03-os/05-pthread/03-cpu$ ps -aux | grep a.out
sumu       10522  0.0  0.0   2496   576 pts/0    S    20:19   0:00 ./a.out
sumu 10641 0.0 0.0 12132 712 pts/0 R+ 20:19 0:00 grep --color=auto a.out1.3 查看进程当前运行在哪些 CPU 上
taskset -p 10522我们会得到以下输出信息:
sumu@sumu-vm:~/workspace/c-learning/03-os/05-pthread/03-cpu$ taskset -p 10522
pid 10522 的当前亲和力掩码:f显示为 0x0f(十六进制) 转换为二进制为 1111(二进制),最右起第一个 1 表示 CPU 核心 0,第二个 1 表示 CPU 核心 1 依次类推。所以进程运行在 4 个 CPU 上。
1.4 指定进程运行在 CPU1 和 3 上
taskset -pc 1,3 10522我们可以看到以下输出:
sumu@sumu-vm:~/workspace/c-learning/03-os/05-pthread/03-cpu$ taskset -pc 1,3 10522
pid 10522 的当前亲和力列表:0-3
pid 10522 的新亲和力列表:1,3

sumu@sumu-vm:~/workspace/c-learning/03-os/05-pthread/03-cpu$ taskset -p 10522
pid 10522 的当前亲和力掩码:a0x0a 转化为二进制就是 0000 1010,就代表了 CPU1 和 3。
1.5 运行程序时绑定 CPU
taskset -c 3 ./a.out &可以看到以下信息
sumu@sumu-vm:~/workspace/c-learning/03-os/05-pthread/03-cpu$ taskset -c 3 ./a.out &
[4] 10913
ppid 2777, pid 10913

sumu@sumu-vm:~/workspace/c-learning/03-os/05-pthread/03-cpu$ taskset -p 10913
pid 10913 的当前亲和力掩码:80x08 转化为二进制就是 0000 1000,可以看到进程就运行在了 CPU3 上了。
2. C 语言中的绑定相关函数
CPU Affinity (CPU 亲合力),CPU 亲合力就是指在 Linux 系统中能够将一个或多个进程绑定到一个或多个处理器上运行。一个进程的 CPU 亲合力掩码决定了该进程将在哪个或哪几个 CPU 上运行。在一个多处理器系统中,设置 CPU 亲合力的掩码可能会获得更好的性能。
一个 CPU 的亲合力掩码用一个 cpu_set_t 结构体来表示一个 CPU 集合, 下面的几个宏分别对这个掩码集进行操作:
void CPU_ZERO(cpu_set_t *set);          // 清空一个集合
void CPU_SET(int cpu, cpu_set_t *set);  // 将一个给定的 CPU 号加到一个集合
void CPU_CLR(int cpu, cpu_set_t *set);  // 将一个给定的 CPU 号从一个集合中去掉
int  CPU_ISSET(int cpu, cpu_set_t *set);// 检查一个 CPU 号是否在这个集合中
int CPU_COUNT(cpu_set_t *set); // 返回集合中包含的 CPU 数量cpu_set_t 是一个数据类型,具体是啥样的没在内核源码找到,后边找到了再补充吧,反正我们操作的时候都是定义这样一个变量,然后用宏去进行操作。
2.1 sched_setaffinity()
在 linux 下可以使用 man sched_setaffinity 命令查看该函数的帮助手册。
/* 需包含的头文件 */
#define _GNU_SOURCE             /* See feature_test_macros(7) */
// 实际使用的时候加下边的宏
#define __USE_GNU
#include <sched.h>

/* 函数声明 */
int sched_setaffinity(pid_t pid, size_t cpusetsize, const cpu_set_t *mask);【函数说明】该函数用于设置进程号(线程)为 pid 的进程运行在 mask 所设定的 CPU 上。
【函数参数】
- pid :pid_t 类型变量,表示进程 pid,如果 pid 的值为 0, 则表示指定的是当前进程
- cpusetsize :size_t 类型,是 mask 所指定的数的长度,通常设定为 sizeof(cpu_set_t)。
- mask :cpu_set_t 类型指针变量,CPU 亲和力掩码,就是指定在哪几个 CPU 上运行。
【返回值】 int 类型,成功返回 0,失败返回-1,并设置错误号。
【使用格式】none
【注意事项】按照查阅的资料来看,可以设定进程和线程,后边发现有什么问题再更新。
2.2 sched_getaffinity()
在 linux 下可以使用 man sched_getaffinity 命令查看该函数的帮助手册。
/* 需包含的头文件 */
#define _GNU_SOURCE             /* See feature_test_macros(7) */
// 实际使用的时候加下边的宏
#define __USE_GNU
#include <sched.h>

/* 函数声明 */
int sched_getaffinity(pid_t pid, size_t cpusetsize, cpu_set_t *mask);【函数说明】该函数用于获取进程号(线程)为 pid 所指示的进程的 CPU 位掩码,并将该掩码返回到 mask 所指向的结构中。
【函数参数】
- pid :pid_t 类型变量,表示进程 pid,如果 pid 的值为 0, 则表示指定的是当前进程
- cpusetsize :size_t 类型,是 mask 所指定的数的长度,通常设定为 sizeof(cpu_set_t)。
- mask :cpu_set_t 类型指针变量,CPU 亲和力掩码,就是指在哪几个 CPU 上运行。
【返回值】 int 类型,成功返回 0,失败返回-1,并设置错误号。
【使用格式】none
【注意事项】按照查阅的资料来看,可以设定进程和线程,后边发现有什么问题再更新。
2.3 pthread_setaffinity_np()
在 linux 下可以使用 man pthread_setaffinity_np 命令查看该函数的帮助手册。
/* 需包含的头文件 */
#define _GNU_SOURCE             /* See feature_test_macros(7) */
#include <pthread.h>

/* 函数声明 */
int sched_setaffinity(pid_t pid, size_t cpusetsize, const cpu_set_t *mask);【函数说明】该函数用于设置线程为 pid 的进程运行在 mask 所设定的 CPU 上。
【函数参数】
- pid :pid_t 类型变量,表示线程 pid,如果 pid 的值为 0, 则表示指定的是当前线程。
- cpusetsize :size_t 类型,是 mask 所指定的数的长度,通常设定为 sizeof(cpu_set_t)。
- mask :cpu_set_t 类型指针变量,CPU 亲和力掩码,就是指定在哪几个 CPU 上运行。
【返回值】 int 类型,成功返回 0,失败返回-1,并设置错误号。
【使用格式】none
【注意事项】none
2.4 pthread_getaffinity_np()
在 linux 下可以使用 man pthread_getaffinity_np 命令查看该函数的帮助手册。
/* 需包含的头文件 */
#define _GNU_SOURCE             /* See feature_test_macros(7) */
#include <pthread.h>

/* 函数声明 */
int sched_getaffinity(pid_t pid, size_t cpusetsize, cpu_set_t *mask);【函数说明】该函数用于获取线程为 pid 所指示的进程的 CPU 位掩码,并将该掩码返回到 mask 所指向的结构中。
【函数参数】
- pid :pid_t 类型变量,表示线程 pid ,如果 pid 的值为 0, 则表示指定的是当前线程
- cpusetsize :size_t 类型,是 mask 所指定的数的长度,通常设定为 sizeof(cpu_set_t) 。
- mask :cpu_set_t 类型指针变量,CPU 亲和力掩码,就是指在哪几个 CPU 上运行。
【返回值】 int 类型,成功返回 0,失败返回-1,并设置错误号。
【使用格式】none
【注意事项】none
2.4 绑定实例
2.4.1 使用实例 1
#include <stdio.h>
#include <sys/types.h>
#include <sys/sysinfo.h>
#include <unistd.h>

#define __USE_GNU
#include <sched.h>

#include <pthread.h>

#define MAX_THREAD_NUM 200 // 1 个 CPU 内的最多进程数

int   cpu_cores_num = 0; // cpu 中核数
void *thread_test(void *arg) {
    cpu_set_t mask;     // CPU 核的集合
    cpu_set_t get_mask; // 获取在集合中的 CPU
    int      *cpu_index = (int *)arg;

    printf("the thread is:%d\n", *cpu_index);            // 显示是第几个线程
    CPU_ZERO(&mask);                                     // 置空
    CPU_SET(*cpu_index, &mask);                          // 设置亲和力值
    if (sched_setaffinity(0, sizeof(mask), &mask) == -1) // 设置线程 CPU 亲和力
    {
        printf("warning: could not set CPU affinity, continuing...\n");
    }

    CPU_ZERO(&get_mask);
    if (sched_getaffinity(0, sizeof(get_mask), &get_mask) == -1) // 获取线程 CPU 亲和力
    {
        printf("warning: cound not get thread affinity, continuing...\n");
    }
    for (int cpu_core_index = 0; cpu_core_index < cpu_cores_num; cpu_core_index++) {
        if (CPU_ISSET(cpu_core_index, &get_mask)) // 判断线程与哪个 CPU 有亲和力
        {
            printf("this thread %d is running processor : %d\n", cpu_core_index, cpu_core_index);
        }
    }

    return NULL;
}

int main(int argc, char *argv[]) {
    int       tid[MAX_THREAD_NUM] = {0};
    int       cpu_core_index = 0;
    pthread_t thread[MAX_THREAD_NUM];

    cpu_cores_num = sysconf(_SC_NPROCESSORS_CONF); // 获取核数
    if (cpu_cores_num > MAX_THREAD_NUM) {
        printf("cpu_cores_num of cores[%d] is bigger than MAX_THREAD_NUM[%d]!\n", cpu_cores_num, MAX_THREAD_NUM);
        return -1;
    }
    printf("system has %i processor(s). \n", cpu_cores_num);

    for (cpu_core_index = 0; cpu_core_index < cpu_cores_num; cpu_core_index++) {
        tid[cpu_core_index] = cpu_core_index; // 每个线程必须有个 tid [i]
        pthread_create(&thread[cpu_core_index], NULL, thread_test, (void *)&tid[cpu_core_index]);
    }
    for (cpu_core_index = 0; cpu_core_index < cpu_cores_num; cpu_core_index++) {
        pthread_join(thread[cpu_core_index], NULL); // 等待所有的线程结束,线程为死循环所以 CTRL+C 结束
    }
    return 0;
}通过以下指令编译并运行:
gcc main.c -Wall -lpthread
./a.out然后可以看到以下输出信息:
sumu@sumu-vm:~/workspace/c-learning/03-os/05-pthread/03-cpu$ gcc 050-c-api-demo1.c -lpthread
sumu@sumu-vm:~/workspace/c-learning/03-os/05-pthread/03-cpu$ ./a.out
system has 4 processor(s).
the thread is:0
this thread 0 is running processor : 0
the thread is:1
the thread is:3
this thread 1 is running processor : 1
the thread is:2
this thread 2 is running processor : 2
this thread 3 is running processor : 32.4.2 使用实例 2
#define _GNU_SOURCE
#include <pthread.h>
#include <stdio.h>
#include <stdlib.h>
#include <errno.h>

#define handle_error_en(en, msg) \
    do                           \
    {                            \
        errno = en;              \
        perror(msg);             \
        exit(EXIT_FAILURE);      \
    } while (0)

int main(int argc, char *argv[])
{
    int err, i;
    cpu_set_t cpuset;

    pthread_t thread = pthread_self();
    /* Set affinity mask to include CPUs 0 to 7 */

    CPU_ZERO(&cpuset);
    for (i = 0; i < 8; i++)
    {
        CPU_SET(i, &cpuset);
    }

    err = pthread_setaffinity_np(thread, sizeof(cpu_set_t), &cpuset);
    if (err != 0)
    {
        handle_error_en(err, "pthread_setaffinity_np");
    }

    /* Check the actual affinity mask assigned to the thread */
    err = pthread_getaffinity_np(thread, sizeof(cpu_set_t), &cpuset);
    if (err != 0)
    {
        handle_error_en(err, "pthread_getaffinity_np");
    }
    printf("Set returned by pthread_getaffinity_np() contained:\n");
    for (i = 0; i < CPU_SETSIZE; i++)
    {
        if (CPU_ISSET(i, &cpuset))
            printf("CPU %d\n", i);
    }

    exit(EXIT_SUCCESS);

    return 0;
}通过以下指令编译并运行:
gcc 02_cpu.c -Wall -lpthread
./a.out然后可以看到以下输出信息:
Set returned by pthread_getaffinity_np() contained:
CPU 0
CPU 1
CPU 2
CPU 3