
LV020-tftp环境
一、开发环境
1. Windows
版本	       Windows 11 专业版
版本号	      23H2
安装日期	  2024/9/16
操作系统版本  22631.4169
体验 Windows Feature Experience Pack 1000.22700.1034.0其中 Windows 通过连接路由器的 WiFi 上网。
2. Ubuntu
Ubuntu 安装在 Windows 中的 VMware 中。
- VMware
产品:VMware® Workstation 17 Pro
版本:17.6.0 build-24238078- Ubuntu
# uname -a
Linux sumu-vm 5.15.0-139-generic #149~20.04.1-Ubuntu SMP Wed Apr 16 08:29:56 UTC 2025 x86_64 x86_64 x86_64 GNU/Linux

# lsb_release -a
No LSB modules are available.
Distributor ID:	Ubuntu
Description:	Ubuntu 20.04.6 LTS
Release:	20.04
Codename: focal3. 开发板
正点原子 I.MX6ULL-ALPHA 开发板,系统使用的是出厂系统。
- U-Boot
U-Boot 2016.03-gee88051 (Nov 05 2021 - 17:59:02 +0800)

CPU:   Freescale i.MX6ULL rev1.1 792 MHz (running at 396 MHz)
CPU:   Industrial temperature grade (-40C to 105C) at 29C
Reset cause: POR
Board: I.MX6U ALPHA|MINI
I2C:   ready
DRAM:  512 MiB
MMC: FSL_SDHC: 0, FSL_SDHC: 1- Linux 内核
# uname -a
Linux ATK-IMX6U 4.1.15-g06f53e4 #1 SMP PREEMPT Sat Nov 27 18:39:27 CST 2021 armv7l armv7l armv7l GNU/Linux

# cat /etc/issue
Freescale i.MX Release Distro 4.1.15-2.1.0 \n \l4. IP
开发板 IP   : 192.168.10.103
虚拟机 IP   : 192.168.10.101
电脑网口的 IP: 192.168.10.100二、TFTP 简介
TFTP ( Trivial File Transfer Protocol ,简单文件传输协议)是 TCP/IP 协议族中的一个用来在客户机与服务器之间进行简单文件传输的协议,提供不复杂、开销不大的文件传输服务,它的端口号为 69 。我们可以使用 TFTP 来加载内核镜像、设备树和其他较小的文件到开发板 DDR 上,从而实现网络挂载。
TFTP 文件在服务器中,客户端将文件下载到本地,然后本地和服务器端都会有相同的这样一个文件。
三、Ubuntu TFTP 环境
1. TFTP 搭建
1.1 查看是否已安装
在终端执行以下命令检查 tftp 相关服务是否安装:
dpkg -s tftpd-hpa1.2 安装和配置 xinetd
1.2.1 安装 xinetd
在终端执行以下命令安装 xinetd :
sudo apt-get install xinetd1.2.2 配置 xinetd.conf
这里我们直接用下边的命令打开 xinetd.conf 配置文件(不检查是否存在了,直接打开,没有的话就是空文件,配置完后边直接保存就可以了):
sudo vi /etc/xinetd.conf打开后将文件修改为以下内容:
# Simple configuration file for xinetd
#


# Some defaults, and include /etc/xinetd.d/

defaults
{

# Please note that you need a log_type line to be able to use log_on_success
# and log_on_failure. The default is the following :
# log_type = SYSLOG daemon info

}

includedir /etc/xinetd.d最后直接保存即可。
1.3 TFTP 服务器目录创建
接下来创建一个目录用作 TFTP 服务器的站点,在终端执行以下命令:
mkdir -p /home/sumu/3tftp
sudo chmod 777 /home/sumu/3tftp/1.4 安装 TFTP 相关服务
1.4.1 安装 tftp-hpa 和 tftpd-hpa
在终端执行以下命令:
sudo apt-get install tftp-hpa tftpd-hpa1.4.2 ftpd-hpa 配置文件修改
sudo vi /etc/default/tftpd-hpa # 打开配置文件修改为以下内容:
# /etc/default/tftpd-hpa

TFTP_USERNAME="tftp"
TFTP_DIRECTORY="/home/sumu/3tftp"
TFTP_ADDRESS=":69"
# TFTP_OPTIONS = "--secure"
TFTP_OPTIONS="-c -s -l"只是修改了 TFTP_DIRECTORY 的值,后边改为我们自己创建的 TFTP 服务目录,后边客户端要下载的文件需要放到该目录下。
1.4.3 tftp 配置文件修改
在终端执行以下命令打开相关配置文件,若没有 xinetd.d 这个目录,我们可以自己手动创建):
sudo vi /etc/xinetd.d/tftp打开后,一般应该是新文件,我们添加如下内容:
server tftp
{
        socket_type = dgram
        wait = yes
        disable = no
        user = root
        protocol = udp
        server = /usr/sbin/in.tftpd
        server_args = -s /home/sumu/3tftp -c
        #log_on_success += PID HOST DURATION
        #log_on_failure += HOST
        per_source = 11
        cps =100 2
        flags =IPv4
}【注意】 server_args = -s 后面要添加自己的 tftp 工作目录。
1.5 重启相关服务
在终端执行以下命令:
sudo service tftpd-hpa restart # 重启 tftpd-hpa
sudo service xinetd restart # 重启 xinetd【注意】看到有个资料上说,每次重新打开 ubuntu 若要使用 tftp 都需要重启,这里先记下,后边出现问题的话可以重启再试一下。
2. 功能测试
2.1 ubuntu 本地测试
- 在服务器目录创建一个新文件
cd /home/sumu/3tftp # 进入到服务器工作目录
sudo touch test.c # 创建一个新文件文件内容如下:
#include <stdio.h>
int main(int argc, const char* argv[])
{
    return 0;
}- 本机登录 tftp 服务器
cd ~              # 回到家目录
tftp localhost # 使用 tftp 命令登录本机当我们本地登录成功后,命令提示符会变成如下形式:
tftp>- 下载服务器中文件
tftp> get test.c- 退出 tftp
tftp> quit退出 tftp 服务后,我们就会回到刚所在的目录里,我们下载的文件也将会被保存到这里
- 查看是否下载成功
ls若显示有 test.c 文件,那么表示我们的 TFTP 服务安装配置成功。

2.2 linux 开发板测试
开发板中是正点原子出厂系统,肯定是有 tftp 功能的,但是其实我们经常会再 uboot 中使用 tftp 下载 linux 内核镜像,然后启动内核,一般来说官方的 uboot 和 linux 都应该是支持的。
2.2.1 开发板 ip 配置
按照上一节《LV005-网络环境方案一》配置好 uboot、开发板、windows 的 IP,使其三者可以互相 ping 通。三者的 IP 如下:
开发板 IP   : 192.168.10.103
虚拟机 IP   : 192.168.10.101
电脑网口的 IP: 192.168.10.1002.2.2 传输文件到开发板
我们搭建 TFTP 环境就是为了能将文件从 Ubuntu 传输到我们的 linux 开发板,当我们配置好 Linux 开发板和 ubuntu 的网络环境,两者之间互相可以 ping 通的时候,我们可以这样来实现文件的传输,在开发板的终端(我一般使用 MobaXterm )中执行:
tftp -g -r <file_name> <Ubuntu_IP>这样便会将 Ubuntu 中 TFTP 服务器目录下的文件下载到开发板的当前目录下。例如,
tftp -g -r test.c 192.168.10.101若是能下载成功,那么就会在当前目录生成下载的文件:

四、Windows TFTP 环境
1. Tftpd64/32
1.1 简介
TFTPD 是由 Ph. Jung 开发的,它是一个多线程的 TFTP 服务器,支持 Windows 平台,可用于简化和加速网络设备和计算机之间的文件交换。此软件具有高度可定制性和易用性,支持多种传输模式,并且可以在局域网和广域网环境下使用。
这个软件有 64 位和 32 位的,根据自己的宿主机来选择不同版本。
官网:TFTPD64 : an opensource IPv6 ready TFTP server/service for windows : TFTP server
1.2 安装
可以到它的 github 仓库下载:Release Version 4.74 · PJO2/tftpd64 · GitHub
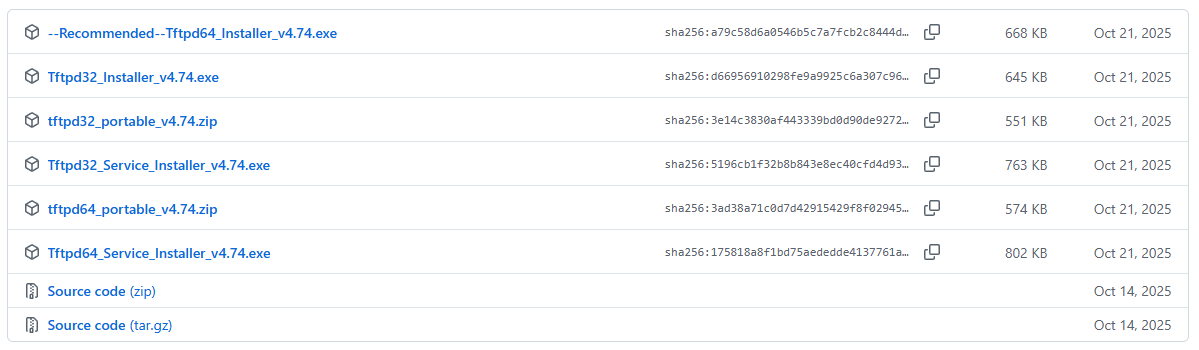
我下载了一个 64 位免安装的版本,打开后界面如下:

2. 配置 TFTP
- 服务器目录配置
这个就比较简单了,直接在这里浏览要共享的目录即可。

- IP 配置

这里会自动识别主机的网卡 IP,选择自己要使用的 IP 地址即可。
- 查看要共享的文件
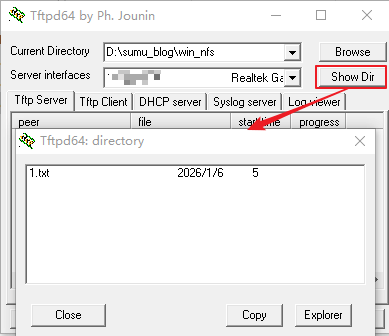
配置好服务器目录和 IP 后,点击这里的 Show Dir 即可。
3. 功能测试
3.1 windows 本地测试
3.1.1 开启TFTP客户端
【控制面板】→【程序】→【程序和功能】→【启用或关闭Windows功能】:
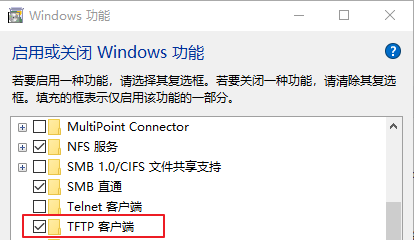
勾选 TFTP客户端。
3.1.2 向服务器请求
【win+r】→【输入cmd】→【enter】打开命令行:
# 切换到对应的盘
d:

# 创建并进入要保存文件的目录
mkdir tftp_temp
cd tftp_temp

# 下载文件:tftp [-i] [<host>] [{get | put}] <source> [<destination>]
tftp -i 192.168.10.100 get 1.txt

# 查看文件内容
type 1.txttftp命令的用法可以看这里:tftp | Microsoft Learn
【例】
D:\tftp_tmp>tftp -i 192.168.10.100 get 1.txt
传输成功: 1 秒 5 字节,5 字节/秒

D:\tftp_tmp>type 1.txt
33333.2 linux开发板测试
ip配置好,要保证可以和windows互相ping通,然后执行下面的命令:
tftp -g -r 1.txt 192.168.10.100可以下载文件表示tftp正常。