
LV105-I2C设备驱动
来详细了解下 I2C 设备驱动框架。若笔记中有错误或者不合适的地方,欢迎批评指正 😃。
一、注册 i2c_driver
1. 注册 I2C 设备驱动
对于我们 I2C 设备驱动编写人来说,重点工作就是创建 i2c_driver,创建完成以后需要向 Linux 内核注册这个 i2c_driver。i2c_driver 注册函数为 i2c_register_driver() :
int i2c_register_driver(struct module *owner, struct i2c_driver *driver);其中 owner 一般为 THIS_MODULE,driver 是要注册的 i2c_driver。返回值: 0,成功;负值,失败。
另外 i2c_add_driver() 也常常用于注册 i2c_driver, i2c_add_driver() 是一个宏,定义如下:
/* use a define to avoid include chaining to get THIS_MODULE */
#define i2c_add_driver(driver) \
i2c_register_driver(THIS_MODULE, driver)其实 i2c_add_driver 就是对 i2c_register_driver 做了一个简单的封装,只有一个参数,就是要注册的 i2c_driver。
2. 销毁 I2C 设备驱动
注销 I2C 设备驱动的时候需要将前面注册的 i2c_driver 从 Linux 内核中注销掉,需要用到 i2c_del_driver() 函数 :
void i2c_del_driver(struct i2c_driver *driver)
{
	i2c_for_each_dev(driver, __process_removed_driver);

	driver_unregister(&driver->driver);
	pr_debug("driver [%s] unregistered\n", driver->driver.name);
}3. i2c_driver 结构体注册示例
分配、设置、注册一个 i2c_driver 结构体:
/* 传统匹配方式 ID 列表 */
static const struct i2c_device_id ap3216c_id[] = {
	{"alpha,ap3216c", 0},
	{}
};

/* 设备树匹配列表 */
static const struct of_device_id ap3216c_of_match[] = {
	{ .compatible = "alpha,ap3216c" },
	{ /* Sentinel */ }
};

/* i2c 驱动结构体 */
static struct i2c_driver ap3216c_driver = {
    .probe = ap3216c_probe,       // 找到可以支持的设备后,将会调用该函数
    .remove = ap3216c_remove,
    .driver = {
        .owner = THIS_MODULE,
        .name = "ap3216c",
        .of_match_table = ap3216c_of_match, // 可以支持哪些设备(主要用来判断设备树中的 I2C 设备)
    },
    .id_table = ap3216c_id,                 // 可以支持哪些设备,用与 id 匹配
};可以在在 ap3216c_probe 函数中,分配、设置、注册 file_operations 结构体。在 file_operations 的函数中,使用 i2c_transfer 等函数发起 I2C 传输。
4. i2c_driver 驱动框架
// (1)第一部分 实现设备的读、写 和初始化等相关功能
//实现 i2c 总线设备结构体中定义的操作函数,主要是.probe 匹配函数,在.probe 函数中添加、注册一个字符设备,这个字符设备用于实现 i2c 设备的具体功能。
static int i2c_write_dev_xxx(struct i2c_client *mpu6050_client, u8 address, u8 data)
{
    return 0;
}
static int i2c_read_dev_xxx(struct i2c_client *mpu6050_client, u8 address, void *data, u32 length)
{
    return 0;
}
static int dev_xxx_init(void)
{
    return 0;
}

// (2)第二部分 实现字符设备操作函数集
/*字符设备操作函数集,open 函数实现*/
static int dev_xxx_open(struct inode *inode, struct file *filp)
{
    return 0;
}
/*字符设备操作函数集,.read 函数实现*/
static ssize_t dev_xxx_read(struct file *filp, char __user *buf, size_t cnt, loff_t *off)
{
    return 0;
}
/*字符设备操作函数集,.release 函数实现*/
static int dev_xxx_release(struct inode *inode, struct file *filp)
{
    return 0;
}
/*字符设备操作函数集*/
static struct file_operations mpu6050_chr_dev_fops =
    {
            .owner = THIS_MODULE,
            .open = dev_xxx_open,
            .read = dev_xxx_read,
            .release = dev_xxx_release,
};

// (3) 第三部分 .probe 函数和.remove 函数实现
/* i2c 驱动的 probe 函数 */
static int xxx_probe(struct i2c_client *client, const struct i2c_device_id *id)
{
    /* 函数具体程序 */
    /* 1、构建设备号 */
    /* 2、注册设备 */
    /* 3、创建类 */
    /* 4、创建设备 */
    return 0;
}

/* i2c 驱动的 remove 函数 */
static int xxx_remove(struct i2c_client *client)
{
    /* 函数具体程序 */
    /* 删除设备 */
    /* 注销掉类和设备 */
    return 0;
}

// (4)第四部分 驱动入口和出口函数实现
/* 传统匹配方式 ID 列表 */
static const struct i2c_device_id xxx_id[] = {
    {"xxx", 0},
    {}
};

/* 设备树匹配列表 */
static const struct of_device_id xxx_of_match[] = {
    { .compatible = "xxx" },
    { /* Sentinel */ }
};

/* i2c 驱动结构体 */
static struct i2c_driver xxx_driver = {
    .probe = xxx_probe,
    .remove = xxx_remove,
    .driver = {
        .owner = THIS_MODULE,
        .name = "xxx",
        .of_match_table = xxx_of_match,
    },
    .id_table = xxx_id,
};

/* 驱动入口函数 */
static int __init xxx_init(void)
{
    int ret = 0;

    ret = i2c_add_driver(&xxx_driver);
    return ret;
}

/* 驱动出口函数 */
static void __exit xxx_exit(void)
{
	i2c_del_driver(&xxx_driver);
}

module_init(xxx_init);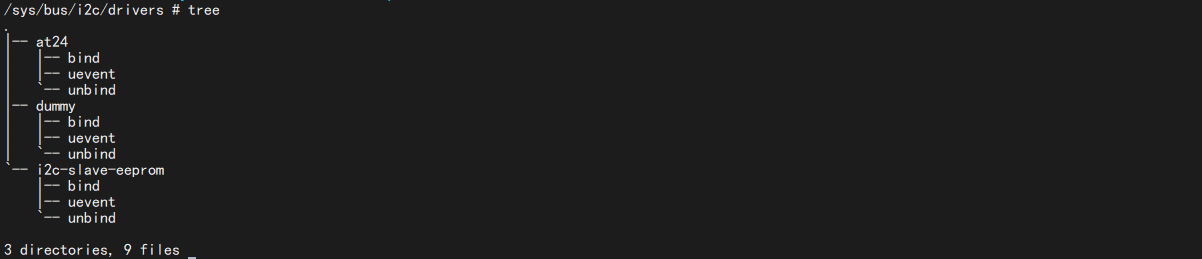
module_exit(xxx_exit);5. 在 sysfs 中的体现
当我们加载了 i2c 设备驱动后,可以看一下这个 /sys/bus/i2c/drivers/ 目录,这个目录下存放着所有的 i2c 驱动:
二、注册 i2c_client
i2c_client 表示一个 I2C 设备,那么我们怎么注册一个 i2c_client?这部分可以看 instantiating-devices - Documentation/i2c/instantiating-devices
1. 方式一
1.1 通过 devicetree 声明 I2C 设备
使用设备树的时候 I2C 设备信息通过创建相应的节点就行了,比如 NXP 官方的 EVK 开发板在 I2C1 上接了 mag3110 这个磁力计芯片,因此必须在 i2c1 节点下创建 mag3110 子节点,然后在这个子节点内描述 mag3110 这个芯片的相关信息。我们打开 imx6ul-14x14-evk.dtsi ,找到以下内容:
&i2c1 {
	clock-frequency = <100000>;
	pinctrl-names = "default";
	pinctrl-0 = <&pinctrl_i2c1>;
	status = "okay";

	mag3110@e {
		compatible = "fsl,mag3110";
		reg = <0x0e>;
	};
};第 7~11 行,向 i2c1 添加 mag3110 子节点,第 7 行“mag3110@0e”是子节点名字,“@”后面的“0e”就是 mag3110 的 I2C 器件地址。第 8 行设置 compatible 属性值为“fsl, mag3110”。第 9 行的 reg 属性也是设置 mag3110 的器件地址的,因此值为 0x0e。
I2C 设备节点的 创建重点是 compatible 属性和 reg 属性的设置,一个用于匹配驱动,一个用于设置器件地址。
示例如下:
	i2c1: i2c@400a0000 {
		/* ... master properties skipped ... */
		clock-frequency = <100000>;

		flash@50 {
			compatible = "atmel,24c256";
			reg = <0x50>;
		};

		pca9532: gpio@60 {
			compatible = "nxp,pca9532";
			gpio-controller;
			#gpio-cells = <2>;
			reg = <0x60>;
		};
};1.2 根据总线号声明 I2C 设备
首先肯定要描述 I2C 设备节点信息,在未使用设备树的时候需要在 BSP 里面使用 struct i2c_board_info 结构体来描述一个具体的 I2C 设备。
struct i2c_board_info {
	char		type[I2C_NAME_SIZE]; /* I2C 设备名字 */
	unsigned short	flags; /* 标志 */
	unsigned short	addr;  /* I2C 器件地址 */
	const char	*dev_name;
	void		*platform_data;
	struct device_node *of_node;
	struct fwnode_handle *fwnode;
	const struct property_entry *properties;
	const struct resource *resources;
	unsigned int	num_resources;
	int		irq;
};type 和 addr 这两个成员变量是必须要设置的,一个是 I2C 设备的名字,一个是 I2C 设备的器件地址。我们看一下 mach-pcm037.c 这个文件中,就有这种用法:
static struct i2c_board_info pcm037_i2c_devices[] = {
	{
		I2C_BOARD_INFO("24c32", 0x52), /* E0 = 0, E1 = 1, E2 = 0 */
		.properties = board_eeprom_properties,
	}, {
		I2C_BOARD_INFO("pcf8563", 0x51),
	}
};中使用 I2C_BOARD_INFO 来完成 pcm037_i2c_devices 的初始化工作, I2C_BOARD_INFO 是一个宏,定义如下:
#define I2C_BOARD_INFO(dev_type, dev_addr) \
.type = dev_type, .addr = (dev_addr)可以看出, I2C_BOARD_INFO 宏其实就是设置 i2c_board_info 的 type 和 addr 这两个成员变量,因此前面的主要工作就是设置 I2C 设备名字为 24c32, 24c32 的器件地址为 0X52。可以在 Linux 源码里面全局搜索 i2c_board_info,会找到大量以 i2c_board_info 定义的 I2C 设备信息,这些就是未使用设备树的时候 I2C 设备的描述方式,当采用了设备树以后就不会再使用 i2c_board_info 来描述 I2C 设备了。
上面的变量只是定义一个全局变量,然后需要通过 i2c_register_board_info() 函数创建一个 i2c 设备,我们来看一下:
int i2c_register_board_info(int busnum, struct i2c_board_info const *info, unsigned len)
{
	//......
}示例如下:
static void __init omap_h4_init(void)
{
	(...)
	i2c_register_board_info(1, h4_i2c_board_info,
			ARRAY_SIZE(h4_i2c_board_info));
	(...)
}2. 方式二:显式地实例化设备
有时候无法知道该设备挂载哪个 I2C bus 下,无法知道它对应的 I2C bus number。但是可以通过其他方法知道对应的 i2c_adapter 结构体。可以使用下面两个函数来创建 i2c_client。
2.1 i2c_new_device()
i2c_new_device() 函数定义如下:
struct i2c_client *
i2c_new_device(struct i2c_adapter *adap, struct i2c_board_info const *info)
{
	//......
}
EXPORT_SYMBOL_GPL(i2c_new_device);i2c_new_device() 函数会创建 i2c_client,即使该设备并不存在。这里就不详细分析这个函数了,了解一下,示例如下:
static struct i2c_board_info sfe4001_hwmon_info = {
	I2C_BOARD_INFO("max6647", 0x4e),
};

int sfe4001_init(struct efx_nic *efx)
{
	(...)
	efx->board_info.hwmon_client =
		i2c_new_device(&efx->i2c_adap, &sfe4001_hwmon_info);

	(...)
}2.2 i2c_new_probed_device()
还可以使用 i2c_new_probed_device() 函数,函数定义如下:
struct i2c_client *
i2c_new_probed_device(struct i2c_adapter *adap,
		      struct i2c_board_info *info,
		      unsigned short const *addr_list,
		      int (*probe)(struct i2c_adapter *, unsigned short addr))
{
	//......
}
EXPORT_SYMBOL_GPL(i2c_new_probed_device);这个函数成功的话,会创建 i2c_client,并且表示这个设备肯定存在。I2C 设备的地址可能发生变化,比如 AT24C02 的引脚 A2A1A0 电平不一样时,设备地址就不一样。它可以罗列出可能的地址,i2c_new_probed_device() 将会使用这些地址判断设备是否存在。这里也是简单了解下,示例如下:
static const unsigned short normal_i2c[] = { 0x2c, 0x2d, I2C_CLIENT_END };

static int usb_hcd_nxp_probe(struct platform_device *pdev)
{
	(...)
	struct i2c_adapter *i2c_adap;
	struct i2c_board_info i2c_info;

	(...)
	i2c_adap = i2c_get_adapter(2);
	memset(&i2c_info, 0, sizeof(struct i2c_board_info));
	strlcpy(i2c_info.type, "isp1301_nxp", I2C_NAME_SIZE);
	isp1301_i2c_client = i2c_new_probed_device(i2c_adap, &i2c_info,
						   normal_i2c, NULL);
	i2c_put_adapter(i2c_adap);
	(...)
}3. 方式三:探测特定设备的 I2C 总线
由 i2c_driver.detect 函数来判断是否有对应的 I2C 设备并生成 i2c_client。好像不是很建议使用这种方式,这个详细的可以看 instantiating-devices - Method 3: Probe an I2C bus for certain devices。
4. 方式四:从用户空间实例化
一般来说,内核应该知道连接了哪些 I2C 设备以及它们所在的地址。但是,在某些情况下,它不会这样做,因此添加了 sysfs 接口来让用户提供信息。该接口由 2 个属性文件组成,它们在每个 I2C 总线目录中创建:new_device 和 delete_device。这两个文件都只能写,我们必须向它们写入正确的参数,以便正确地实例化(或者删除)I2C 设备。
- 文件 new_device 接受 2 个参数:I2C 设备的名称(一个字符串)和 I2C 设备的地址(一个数字,通常以 0x 开头的十六进制表示,但也可以用十进制表示)。我们创建一个 i2c_client, .name = "sdeveeprom", .addr = 0x50, .adapter 是 i2c-1
echo sdeveeprom 0x50 > /sys/bus/i2c/devices/i2c-1/new_device
这个时候我们用 i2cdetect 工具看一下:
i2cdetect -y -a 1会发现什么也没有,这个应该是因为我们实际并没有对应的 i2c 设备存在,这就会导致 i2cdetect 向这个地址发数据的时候,并不会收到回应,所以就探测不出来了

- 文件 delete_device 接受一个参数:I2C 设备的地址。由于没有两个设备可以在给定的 I2C 段上使用相同的地址,因此地址足以唯一地标识要删除的设备。删除一个 i2c_client
echo 0x50 > /sys/bus/i2c/devices/i2c-1/delete_device
5. i2c_client 设备注册示例
这里采用设备树的方式,以正点原子 alpha 开发板上的 ap3216c 为例,我们可以看一下原理图:
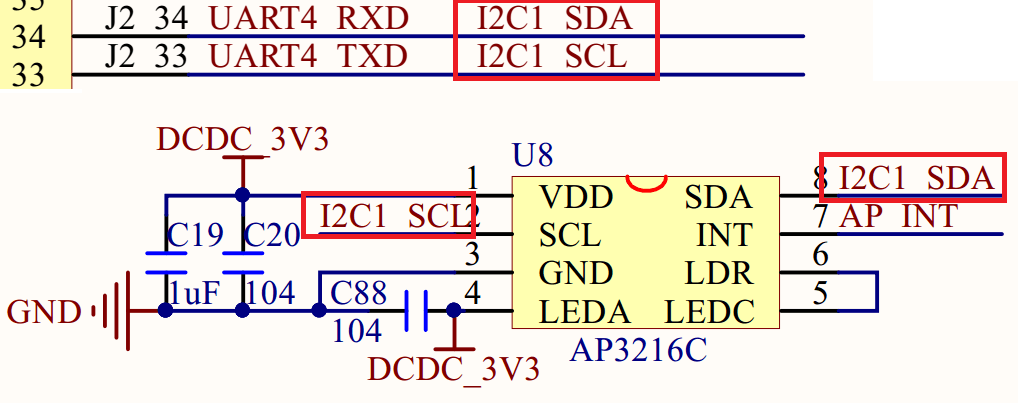
可以看到,AP3216C 芯片的 SCL 和 SDA 是接在 I2C1 上的。
&i2c1 {
    clock-frequency = <100000>;
    pinctrl-names = "default";
    pinctrl-0 = <&pinctrl_i2c1>;
    status = "okay";

    ap3216c@1e {
    	compatible = "alpha,ap3216c";
    	reg = <0x1e>;
    };
};这两个引脚可以用作 GPIO 吗?我们可以看一下它们两个用的是什么引脚,看一下《 i.MX 6ULL Applications Processor Reference Manual》——Table 31-1. I2C External Signals :
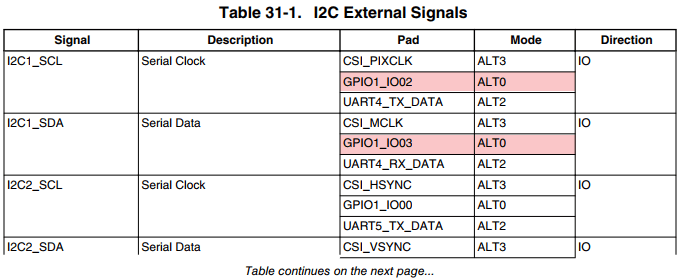
可以看到其实这两个引脚可以由 GPIO1_IO02 和 GPIO1_03 复用而来,从表上看,这两个 gpio 默认的功能就是 I2C1 的 SCL 和 SDA。我们可以打开 imx6ul-14x14-evk.dtsi 找一下 pinctrl_i2c1:
pinctrl_i2c1: i2c1grp {
		fsl,pins = <
			MX6UL_PAD_UART4_TX_DATA__I2C1_SCL 0x4001b8b0
			MX6UL_PAD_UART4_RX_DATA__I2C1_SDA 0x4001b8b0
		>;
};可以发现,这里的 I2C1 用的是 UART4 的那两个引脚复用而来的。
6. 在 sysfs 中的体现
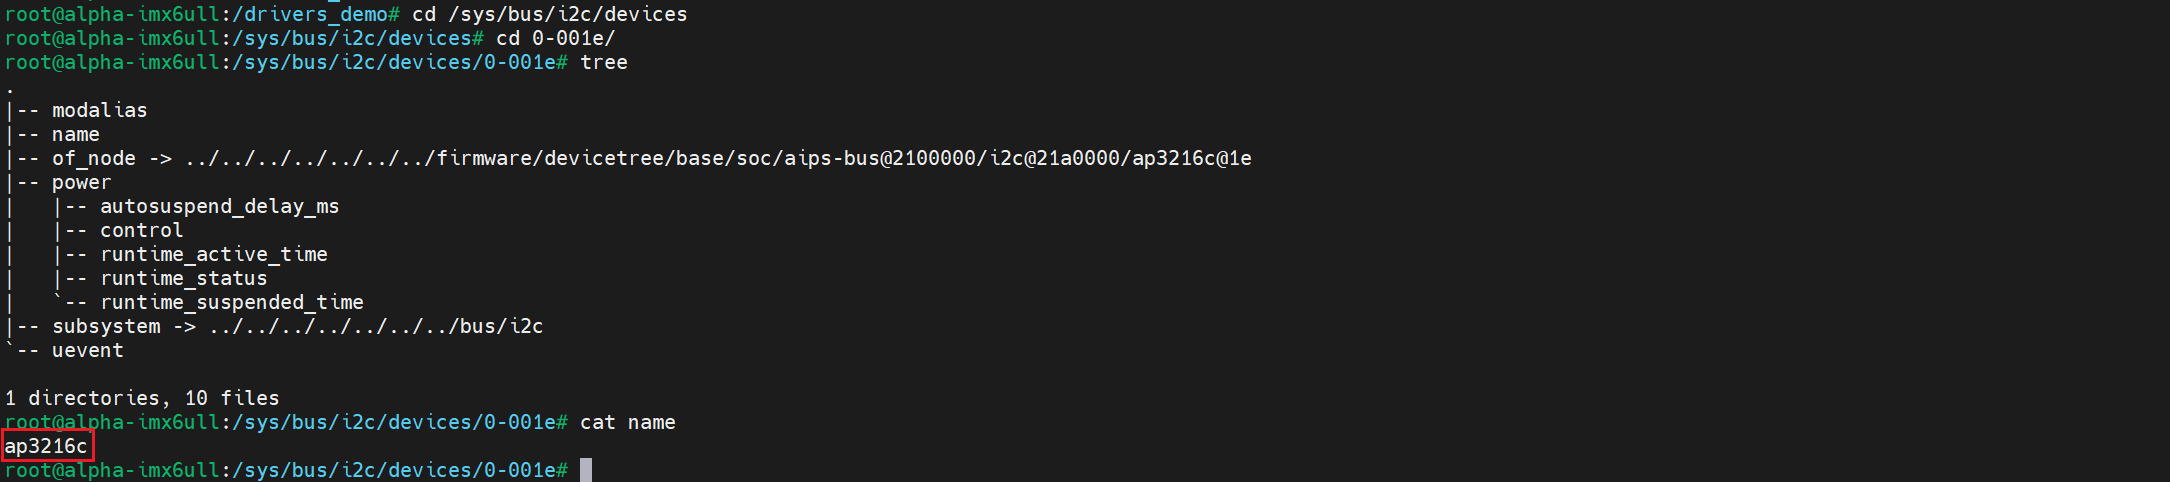
当我们在设备树写好设备节点后,可以看一下这个 /sys/bus/i2c/devices 目录,这个目录下存放着所有的 i2c 设备。如果设备树修改正确的话,会在/sys/bus/i2c/devices 目录下看到一个名为“0-001e”的子目录 :

“0-001e”就是 ap3216c 的设备目录,“1e”就是 ap3216c 器件地址。进入 0-001e 目录,可以看到“name”文件, name 文件就保存着此设备名字,在这里就是“ap3216c” :
我们还可以用 i2cdetect 工具探测一下:
i2cdetect -y -a 0
i2cdetect -y -a 1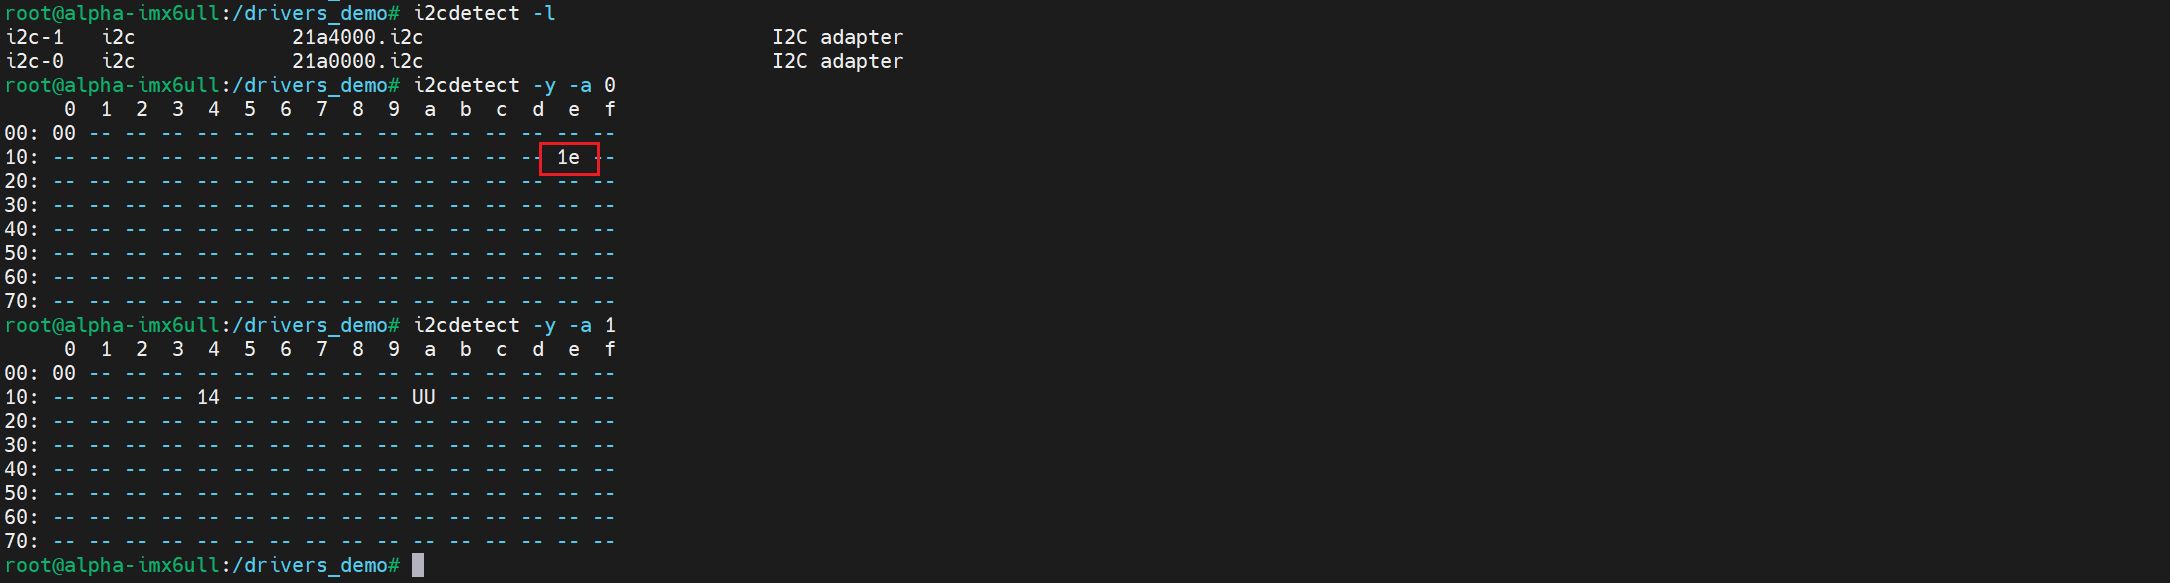
三、I2C 设备和驱动的匹配
设备和驱动的匹配过程也是由 I2C 总线完成的, I2C 总线的数据结构为 i2c_bus_type:
struct bus_type i2c_bus_type = {
	.name		= "i2c",
	.match		= i2c_device_match,
	.probe		= i2c_device_probe,
	.remove		= i2c_device_remove,
	.shutdown	= i2c_device_shutdown,
};.match 就是 I2C 总线的设备和驱动匹配函数,在这里就是 i2c_device_match() 这个函数 :
static int i2c_device_match(struct device *dev, struct device_driver *drv)
{
	struct i2c_client	*client = i2c_verify_client(dev);
	struct i2c_driver	*driver;


	/* Attempt an OF style match */
	if (i2c_of_match_device(drv->of_match_table, client))
		return 1;

	/* Then ACPI style match */
	if (acpi_driver_match_device(dev, drv))
		return 1;

	driver = to_i2c_driver(drv);

	/* Finally an I2C match */
	if (i2c_match_id(driver->id_table, client))
		return 1;

	return 0;
}1. 设备树匹配:i2c_of_match_device()
第一种方式是通过函数 i2c_of_match_device() 完成设备树匹配:
const struct of_device_id
*i2c_of_match_device(const struct of_device_id *matches,
		     struct i2c_client *client)
{
	const struct of_device_id *match;

	if (!(client && matches))
		return NULL;

	match = of_match_device(matches, &client->dev);
	if (match)
		return match;

	return i2c_of_match_device_sysfs(matches, client);
}在这个函数中,调用了两个函数,这两个函数都是使用 i2c_driver.driver.of_match_table 这个匹配表进行匹配。
const struct of_device_id *of_match_device(const struct of_device_id *matches,
					   const struct device *dev)
{
	if ((!matches) || (!dev->of_node))
		return NULL;
	return of_match_node(matches, dev->of_node);
}
EXPORT_SYMBOL(of_match_device);设备树中,某个 I2C 控制器节点下可以创建 I2C 设备的节点。如果 I2C 设备节点的 compatible 属性跟 of_match_table 的某项兼容,则匹配成功。
static const struct of_device_id*
i2c_of_match_device_sysfs(const struct of_device_id *matches,
				  struct i2c_client *client)
{
	const char *name;

	for (; matches->compatible[0]; matches++) {
		//......
		if (sysfs_streq(client->name, matches->compatible))
			return matches;
		//......
	}

	return NULL;
}这个函数是比较 i2c_client.name 跟某个 i2c_driver.driver.of_match_table[i].compatible 值,若有相同的,则匹配成功。(这种方式在 platform 平台总线中好像没看到,但是 i2c 中是有这样的方式的)。strchr() 函数是用于在字符串中查找第一次出现的指定字符,并返回一个指向该字符的指针。如果未找到字符,则返回 NULL。
2. id 匹配:i2c_match_id()
const struct i2c_device_id *i2c_match_id(const struct i2c_device_id *id,
						const struct i2c_client *client)
{
	if (!(id && client))
		return NULL;

	while (id->name[0]) {
		if (strcmp(client->name, id->name) == 0)
			return id;
		id++;
	}
	return NULL;
}这个函数用于传统的、无设备树的 I2C 设备和驱动匹配过程。 使用 i2c_driver.id_table 来判断,当 i2c_client.name 跟某个 i2c_driver.id_table[i].name 值相同,则匹配成功
i2c_driver 跟 i2c_client 匹配成功后,就调用 i2c_driver.probe 函数。
四、I2C 设备收发数据
1. i2c_transfer()
I2C 设备驱动首先要做的就是初始化 i2c_driver 并向 Linux 内核注册。当设备和驱动匹配以后 i2c_driver 里面的 probe 函数就会执行, probe 函数里面所做的就是字符设备驱动那一套了。
一般需要在 probe 函数里面初始化 I2C 设备,初始化完肯定就是对 I2C 设备进行操作了,在 linux 中为我们提供了 i2c_transfer() 函数。 i2c_transfer 函数最终会调用 I2C 适配器中 i2c_algorithm 里面的 master_xfer() 函数,对于 imx6ull 来说就是 i2c_imx_algo.i2c_imx_xfer(),这个函数后面会进行分析,在里面就是完成了起始信号、结束信号、应答与非应答,读写等相关操作。
int i2c_transfer(struct i2c_adapter *adap, struct i2c_msg *msgs, int num)
{
	int ret;

	//......
		ret = __i2c_transfer(adap, msgs, num);
		i2c_unlock_bus(adap, I2C_LOCK_SEGMENT);
	//......
}
EXPORT_SYMBOL(i2c_transfer);【参数说明】
- adap: 所使用的 I2C 适配器, i2c_client 会保存其对应的 i2c_adapter。
- msgs: struct i2c_msg 类型指针,表示 I2C 要发送的一个或多个消息。
- num: 消息数量,也就是 msgs 的数量。
【返回值】 负值,失败,其他非负值,发送的 msgs 数量。
另外还有两个 API 函数 i2c_master_send() 和 i2c_master_recv(),分别用于 I2C 数据的收发操作,这两个函数最终都会调用 i2c_transfer。就相当于替我们封装了一下,这样就可以不用自己去定义 i2c_msg 了。
2. 收发示例
2.1 设备结构体
/* 设备结构体 */
struct xxx_dev {
    ......
    void *private_data; /* 私有数据,一般会设置为 i2c_client */
};设备结构体,在设备结构体里面添加一个执行 void 的指针成员变量 private_data,此成员变量用于保存设备的私有数据。在 I2C 设备驱动中我们一般将其指向 I2C 设备对应的 i2c_client。
2.2 xxx_read_regs()
/**
 * @description : 读取 I2C 设备多个寄存器数据
 * @param – dev : I2C 设备
 * @param – reg : 要读取的寄存器首地址
 * @param – val : 读取到的数据
 * @param – len : 要读取的数据长度
 * @return : 操作结果
 */
static int xxx_read_regs(struct xxx_dev *dev, u8 reg, void *val, int len)
{
    int ret;
    struct i2c_msg msg[2];
    struct i2c_client *client = (struct i2c_client *)dev->private_data;

    /* msg [0],第一条写消息,发送要读取的寄存器首地址 */
    msg[0].addr = client->addr; /* I2C 器件地址 */
    msg[0].flags = 0;           /* 标记为发送数据 */
    msg[0].buf = ®          /* 读取的首地址 */
    msg[0].len = 1;             /* reg 长度 */

    /* msg [1],第二条读消息,读取寄存器数据 */
    msg[1].addr = client->addr; /* I2C 器件地址 */
    msg[1].flags = I2C_M_RD;    /* 标记为读取数据 */
    msg[1].buf = val;           /* 读取数据缓冲区 */
    msg[1].len = len;           /* 要读取的数据长度 */
    ret = i2c_transfer(client->adapter, msg, 2);
    if (ret == 2)
    {
        ret = 0;
    }
    else
    {
        ret = -EREMOTEIO;
    }
    return ret;
}该函数用于读取 I2C 设备多个寄存器数据。
第 12 行:定义了一个 i2c_msg 数组, 2 个数组元素,因为 I2C 读取数据的时候要先发送要读取的寄存器地址,然后再读取数据,所以需要准备两个 i2c_msg。一个用于发送寄存器地址,一个用于读取寄存器值。
第 15 - 19 行:对于 msg [0],将 flags 设置为 0,表示写数据。 msg [0] 的 addr 是 I2C 设备的器件地址, msg [0] 的 buf 成员变量就是要读取的寄存器地址。
第 21 - 25 行:对于 msg [1],将 flags 设置为 I2C_M_RD,表示读取数据。msg [1] 的 buf 成员变量用于保存读取到的数据, len 成员变量就是要读取的数据长度。
第 26 - 34 行:调用 i2c_transfer 函数完成 I2C 数据读操作。
2.3 xxx_write_regs()
/**
 * @description : 向 I2C 设备多个寄存器写入数据
 * @param – dev : 要写入的设备结构体
 * @param – reg : 要写入的寄存器首地址
 * @param – buf : 要写入的数据缓冲区
 * @param – len : 要写入的数据长度
 * @return : 操作结果
 */
static s32 xxx_write_regs(struct xxx_dev *dev, u8 reg, u8 *buf, u8 len)
{
    u8 b[256];
    struct i2c_msg msg;
    struct i2c_client *client = (struct i2c_client *)dev->private_data;

    b[0] = reg;              /* 寄存器首地址 */
    memcpy(&b[1], buf, len); /* 将要发送的数据拷贝到数组 b 里面 */

    msg.addr = client->addr; /* I2C 器件地址 */
    msg.flags = 0;           /* 标记为写数据 */

    msg.buf = b;       /* 要发送的数据缓冲区 */
    msg.len = len + 1; /* 要发送的数据长度 */

    return i2c_transfer(client->adapter, &msg, 1);
}该函数用于向 I2C 设备多个寄存器写数据, I2C 写操作要比读操作简单一点,因此一个 i2c_msg 即可。
第 11 行:数组 b 用于存放寄存器首地址和要发送的数据。
第 18 行:设置 msg 的 addr 为 I2C 器件地址。
第 19 行:设置 msg 的 flags 为 0,也就是写数据。
第 21 行:设置要发送的数据,也就是数组 b。
第 22 行:设置 msg 的 len 为 len+1,因为要加上一个字节的寄存器地址。
第 24 行:最后通过 i2c_transfer 函数完成向 I2C 设备的写操作。
五、ap3216c 实例
1. demo 源码
demo 源码可以看这里:30_i2c_subsystem/01_ap3216c
2. 开发板测试
我们更新对应的设备树,然后重启,就会发现在/sys/bus/i2c/devices/下存在我们创建的 ap3216c 设备:

由于这设备室真实存在的,我们使用 i2cdetect 也会得到正确的回应:
i2cdetect -y -a 0
然后加载驱动:
insmod sdriver_ap3216c.ko
然后我们执行测试程序:
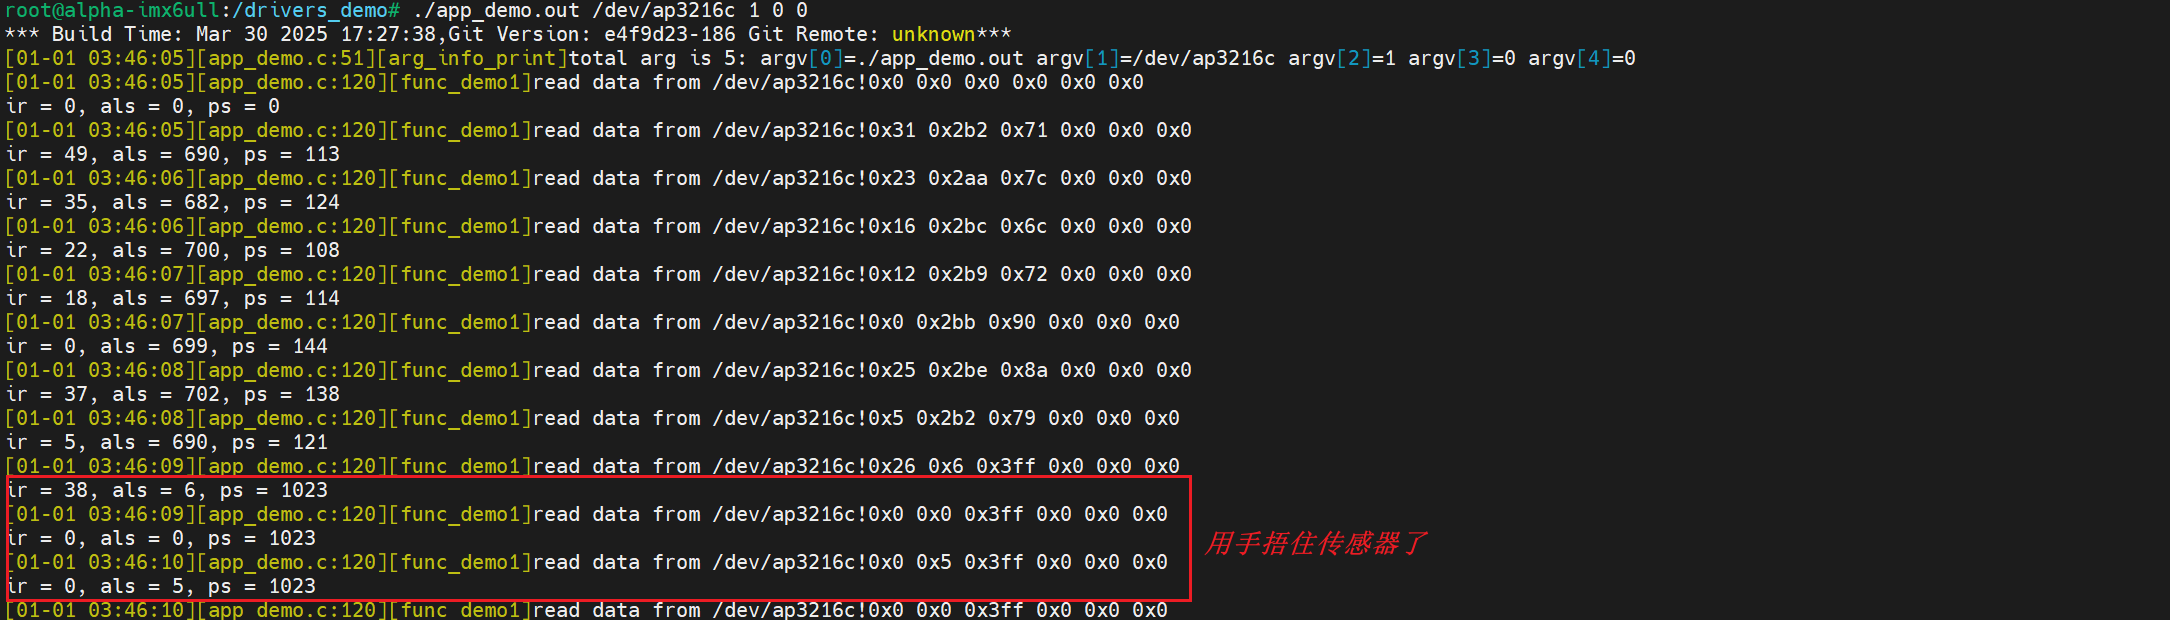
参考资料:
【驱动】linux 下 I2C 驱动架构全面分析 - Leo.cheng - 博客园
Linux i2c 子系统(一) _动手写一个 i2c 设备驱动_Linux 编程_Linux 公社-Linux 系统门户网站
I2C 子系统–mpu6050 驱动实验 野火嵌入式 Linux 驱动开发实战指南——基于 i.MX6ULL 系列 文档