
LV010-基于SDK的demo
一、官方 demo
1. SDK demo 说明
我们这里以 linux 下的 SDK 为例,linux 下的 SDK 是没有 IAR 版本的 demo 的。只有 armgcc 版本。我们可以看一下这个 hello world:
sumu@sumu-virtual-machine:~/7Linux/SDK_2.2_MCIM6ULL/boards/evkmcimx6ull/demo_apps/hello_world$ tree
.
├── armgcc
│   ├── build_all.bat
│   ├── build_all.sh
│   ├── build_ddr_debug.bat
│   ├── build_ddr_debug.sh
│   ├── build_ddr_release.bat
│   ├── build_ddr_release.sh
│   ├── build_debug.bat
│   ├── build_debug.sh
│   ├── build_release.bat
│   ├── build_release.sh
│   ├── clean.bat
│   ├── clean.sh
│   ├── CMakeLists.txt
│   ├── MCIMX6Y2xxx05_flash.ld
│   └── MCIMX6Y2xxx05_ram.ld
├── board.c
├── board.h
├── clock_config.c
├── clock_config.h
├── clock_config_ocram.c
├── ddr_init.jlinkscript
├── example.xml
├── hello_world.c
├── hello_world.img
├── hello_world.xml
├── pin_mux.c
├── pin_mux.h
└── readme.txt

1 directory, 28 files可以看到 arngcc 文件夹下包含很多 build_xx 脚本,这些脚本用于在 linux 环境下编译生成.bin 可执行文件, 所以我们需要一个 arm gcc 交叉编译器。CMakeList.txt 用于生成编译过程中需要的 Makefile,所以我们还需要一个 CMake 工具。 以.ld 结尾的文件是链接器脚本相关文件,根据运行的脚本不同,脚本会自动调用相应的链接文件。
2. linux 搭建 SDK 编译环境
2.1 cmake
我们可以看一下 cmake 有没有安装,若是没安装,可以用这个命令安装:
sudo apt-get install cmake我们可以用这个命令查看版本:
cmake --version2.2 交叉编译工具
2.2.1 用的什么交叉编译器?
官方 demo 用的是什么工具?我们打开一个脚本看一眼:
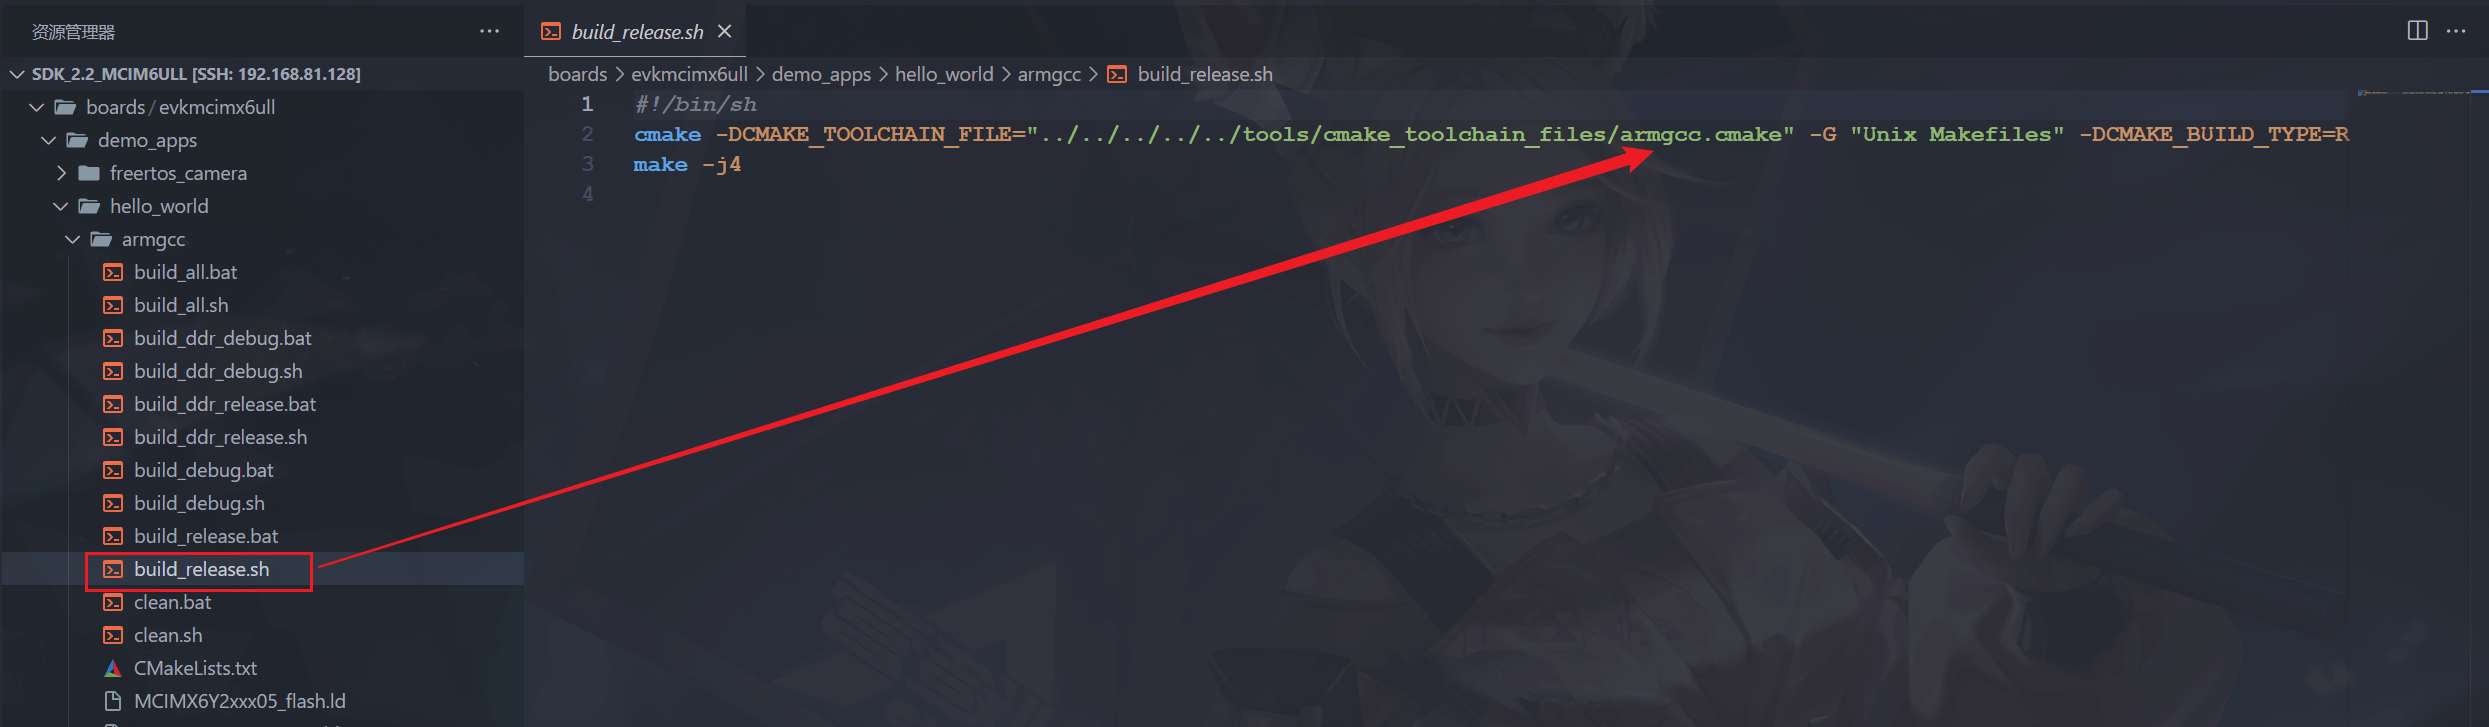
发现这里会使用 armgcc.cmake 这个文件,我们到 tool 目录下看一下这个文件:
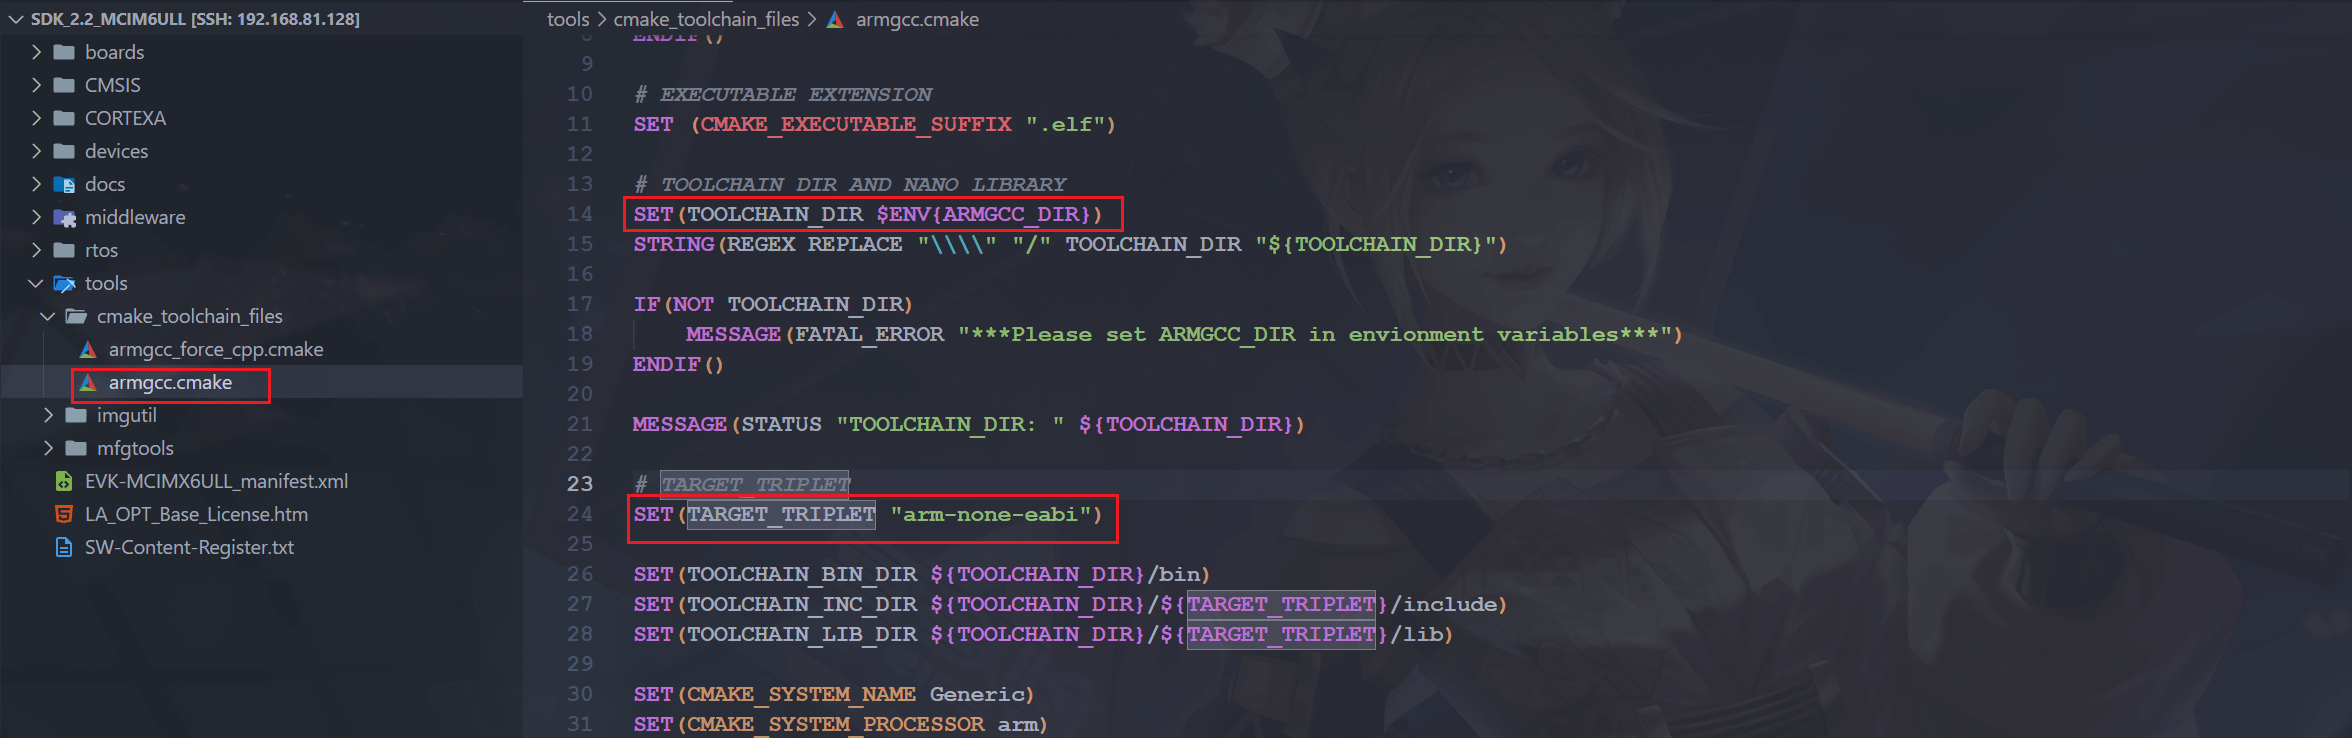
可以看到这里有一个交叉编译工具链的目录配置和前缀配置,由此可知,编译 demo 需要使用 arm-none-eabi-gcc。但是我们之前没有安装这个,那就装一个吧。
2.2.2 安装 arm-none-eabi
- 错误的尝试 1
我们来到交叉编译工具链的官网:GNU Arm Embedded Toolchain in Launchpad,我们点一下这个 External downloads 我们可以找到这里:Arm GNU Toolchain Downloads – Arm Developer。然后就会发现这个页面的版本是最新版,也没啥必要,这里我们装一个和 arm-linux-gnueabihf-gcc 8.3.0 同一年份的版本吧:Downloads | GNU-A Downloads – Arm Developer
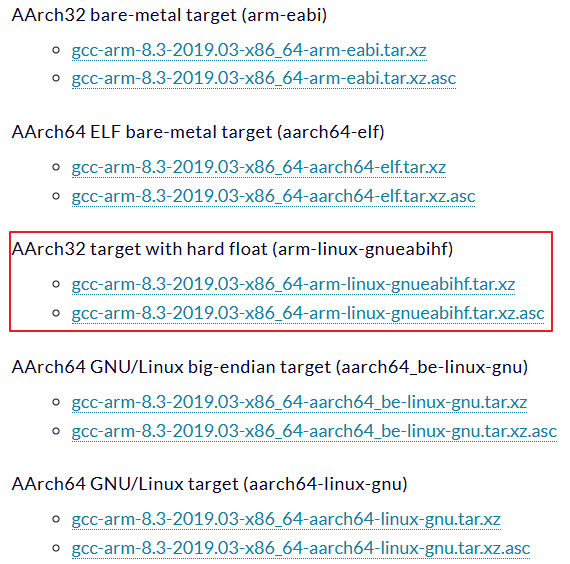
跑到这里一看,好像没有 arm-none-eabi,那这没办法了,往前找找,看看哪个版本有就装那个吧,由于这个 SDK 也挺早了,所以最好还是装个年份差不多的,防止有问题,往前找的话会发现这个版本有:
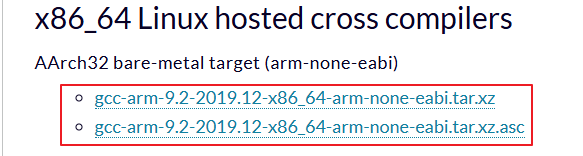
那就安装这个吧:gcc-arm-9.2-2019.12-x86_64-arm-none-eabi.tar.xz

这里还有一个坑,就是安装完后,用这个编译工具链编译会报错:

- 错误的尝试 2
上面安装不是有问题吗,我们看一下文档吧:
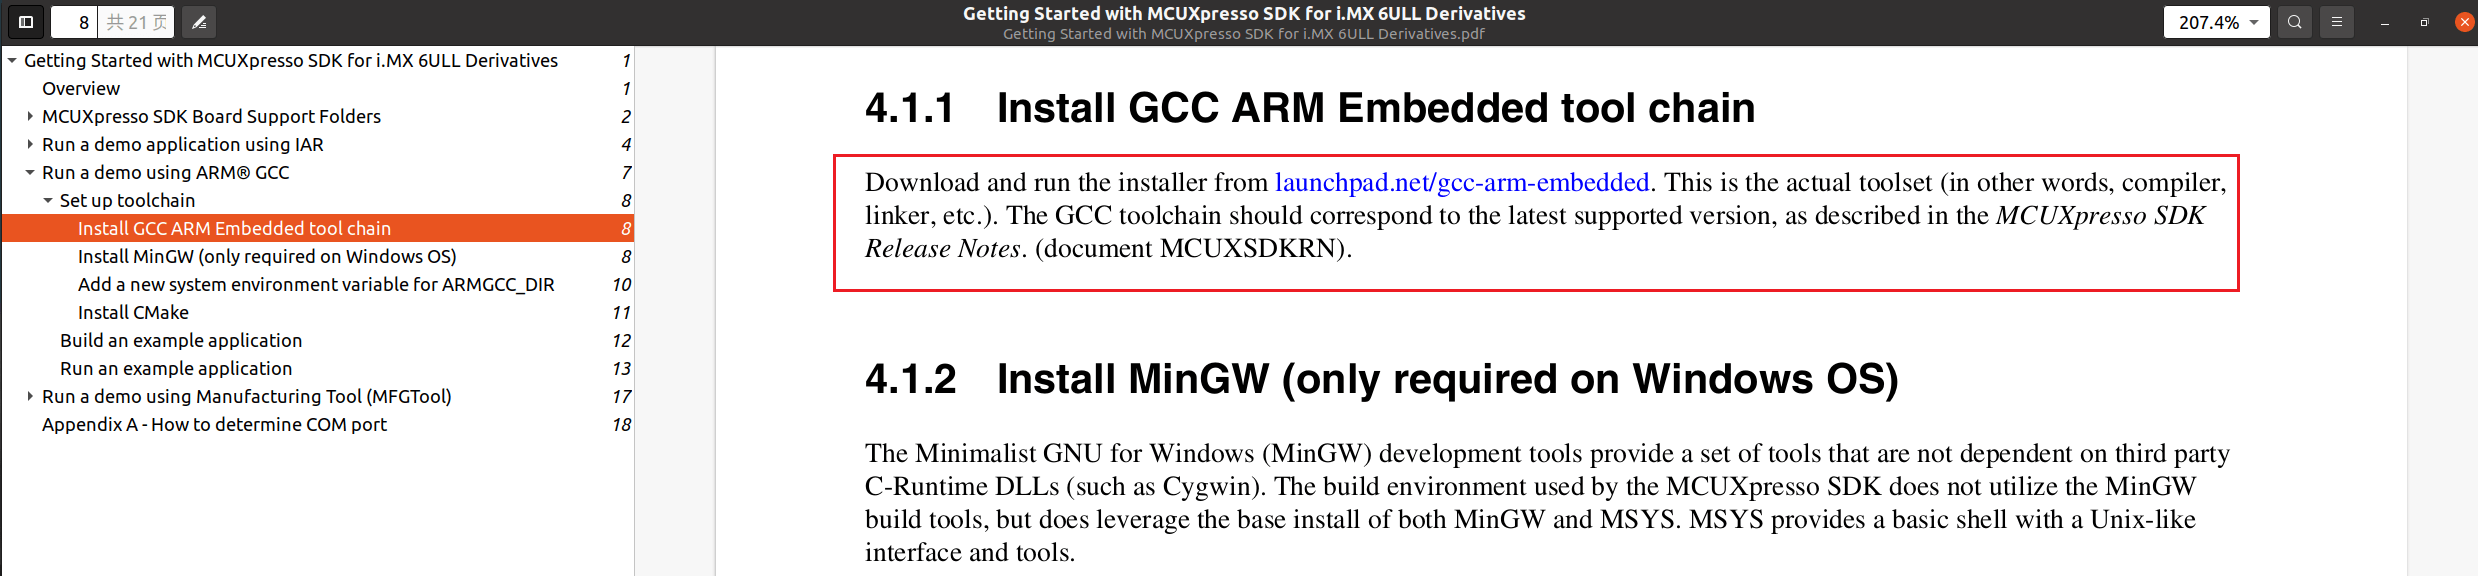
翻译一下最后一句就是:GCC 工具链应与最新支持的版本相对应,如 MCUXpresso SDK 发行说明中所述。(文档 MCUXSDKRN)。虽然没怎么看懂,但是我去翻了一下 demo 中的说明文档:
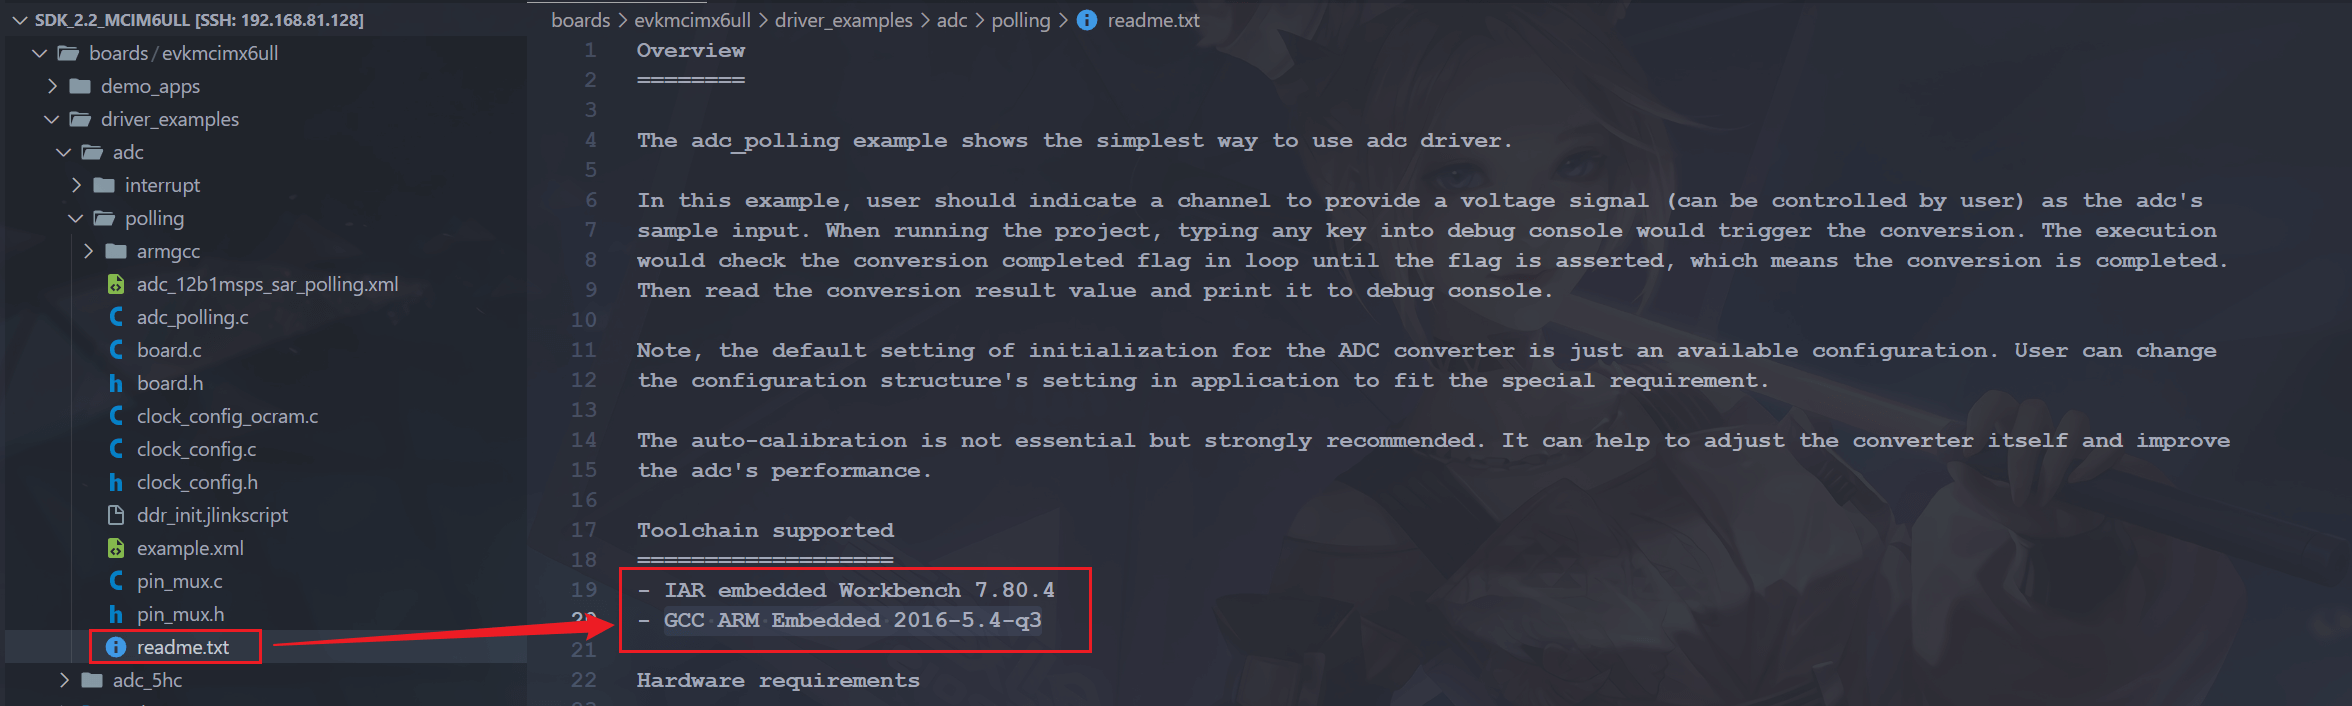
发现这里有写交叉编译工具链的版本,那还有啥说的,直接去搜这个就是了,可以找到这个页面 Downloads | 5-2016-q3-update – Arm Developer 或者 5-2016-q3-update : Series 5.0 : GNU Arm Embedded Toolchain (launchpad.net)

下载完毕后,会发现这是一个脚本:

那就直接执行吧:

待执行完毕,我们会看到如下

没看见可执行文件啊,我们怎么用?这样用:
source /home/sumu/2software/fsl-imx-x11/4.1.15-2.1.0/environment-setup-cortexa7hf-neon-poky-linux-gnueabi然后到最后发现,工具名不对啊,又踩一个坑。
- 最终尝试
最后一次尝试,后来总是找不到合适的版本,那就按照野火的教程试一下:
sudo apt-get install gcc-arm-none-eabi安装完毕后看一下版本:
sumu@sumu-virtual-machine:~$ arm-none-eabi-gcc -v
Using built-in specs.
COLLECT_GCC=arm-none-eabi-gcc
COLLECT_LTO_WRAPPER=/usr/lib/gcc/arm-none-eabi/9.2.1/lto-wrapper
Target: arm-none-eabi
Configured with: ../configure --build=x86_64-linux-gnu --prefix=/usr --includedir='/usr/lib/include' --mandir='/usr/lib/share/man' --infodir='/usr/lib/share/info' --sysconfdir=/etc --localstatedir=/var --disable-silent-rules --libdir='/usr/lib/lib/x86_64-linux-gnu' --libexecdir='/usr/lib/lib/x86_64-linux-gnu' --disable-maintainer-mode --disable-dependency-tracking --mandir=/usr/share/man --enable-languages=c,c++,lto --enable-multilib --disable-decimal-float --disable-libffi --disable-libgomp --disable-libmudflap --disable-libquadmath --disable-libssp --disable-libstdcxx-pch --disable-nls --disable-shared --disable-threads --enable-tls --build=x86_64-linux-gnu --target=arm-none-eabi --with-system-zlib --with-gnu-as --with-gnu-ld --with-pkgversion=15:9-2019-q4-0ubuntu1 --without-included-gettext --prefix=/usr/lib --infodir=/usr/share/doc/gcc-arm-none-eabi/info --htmldir=/usr/share/doc/gcc-arm-none-eabi/html --pdfdir=/usr/share/doc/gcc-arm-none-eabi/pdf --bindir=/usr/bin --libexecdir=/usr/lib --libdir=/usr/lib --disable-libstdc++-v3 --host=x86_64-linux-gnu --with-headers=no --without-newlib --with-multilib-list=rmprofile CFLAGS='-g -O2 -fdebug-prefix-map=/build/gcc-arm-none-eabi-Gl9kT9/gcc-arm-none-eabi-9-2019-q4=. -fstack-protector-strong' CPPFLAGS='-Wdate-time -D_FORTIFY_SOURCE=2' CXXFLAGS='-g -O2 -fdebug-prefix-map=/build/gcc-arm-none-eabi-Gl9kT9/gcc-arm-none-eabi-9-2019-q4=. -fstack-protector-strong' FCFLAGS='-g -O2 -fdebug-prefix-map=/build/gcc-arm-none-eabi-Gl9kT9/gcc-arm-none-eabi-9-2019-q4=. -fstack-protector-strong' FFLAGS='-g -O2 -fdebug-prefix-map=/build/gcc-arm-none-eabi-Gl9kT9/gcc-arm-none-eabi-9-2019-q4=. -fstack-protector-strong' GCJFLAGS='-g -O2 -fdebug-prefix-map=/build/gcc-arm-none-eabi-Gl9kT9/gcc-arm-none-eabi-9-2019-q4=. -fstack-protector-strong' LDFLAGS='-Wl,-Bsymbolic-functions -Wl,-z,relro' OBJCFLAGS='-g -O2 -fdebug-prefix-map=/build/gcc-arm-none-eabi-Gl9kT9/gcc-arm-none-eabi-9-2019-q4=. -fstack-protector-strong' OBJCXXFLAGS='-g -O2 -fdebug-prefix-map=/build/gcc-arm-none-eabi-Gl9kT9/gcc-arm-none-eabi-9-2019-q4=. -fstack-protector-strong' INHIBIT_LIBC_CFLAGS=-DUSE_TM_CLONE_REGISTRY=0 AR_FOR_TARGET=arm-none-eabi-ar AS_FOR_TARGET=arm-none-eabi-as LD_FOR_TARGET=arm-none-eabi-ld NM_FOR_TARGET=arm-none-eabi-nm OBJDUMP_FOR_TARGET=arm-none-eabi-objdump RANLIB_FOR_TARGET=arm-none-eabi-ranlib READELF_FOR_TARGET=arm-none-eabi-readelf STRIP_FOR_TARGET=arm-none-eabi-strip
Thread model: single
gcc version 9.2.1 20191025 (release) [ARM/arm-9-branch revision 277599] (15:9-2019-q4-0ubuntu1)但是其实吧,这里的版本跟上面手动安装的一样,但是不是很清楚为什么那次尝试没成功?难道是安装目录问题?算了,不纠结了,这也不重要。
3. 编译 demo
我们来到 hello world 这个 demo 的 armgcc 目录下,编译这个 demo,我们执行这个脚本:
./build_release.sh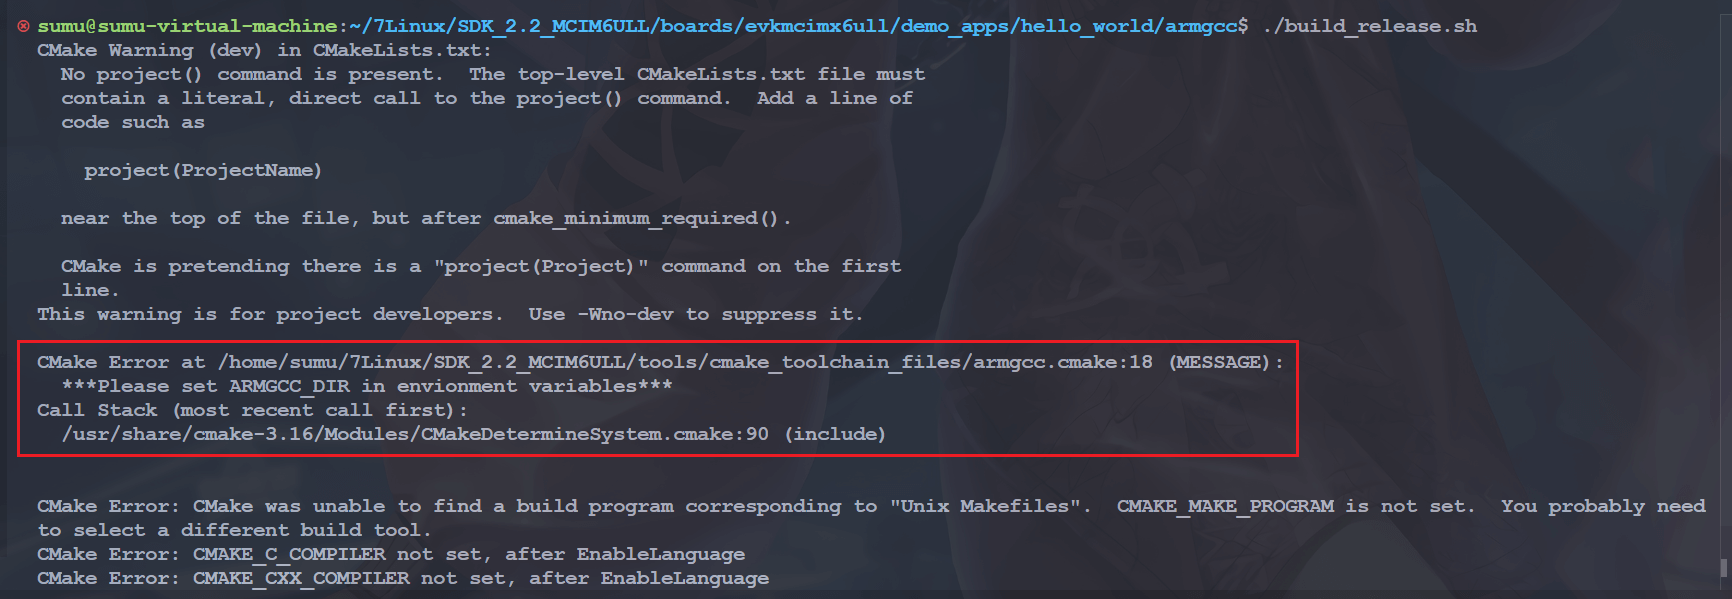
然后发现报错了,这是因为没有指定交叉编译工具链的位置,我们指定一下:
# 不需要到 bin 这一级 arm-none-eabi-gcc 的上一级目录即可
export ARMGCC_DIR=/usr然后重新执行脚本就没问题啦:
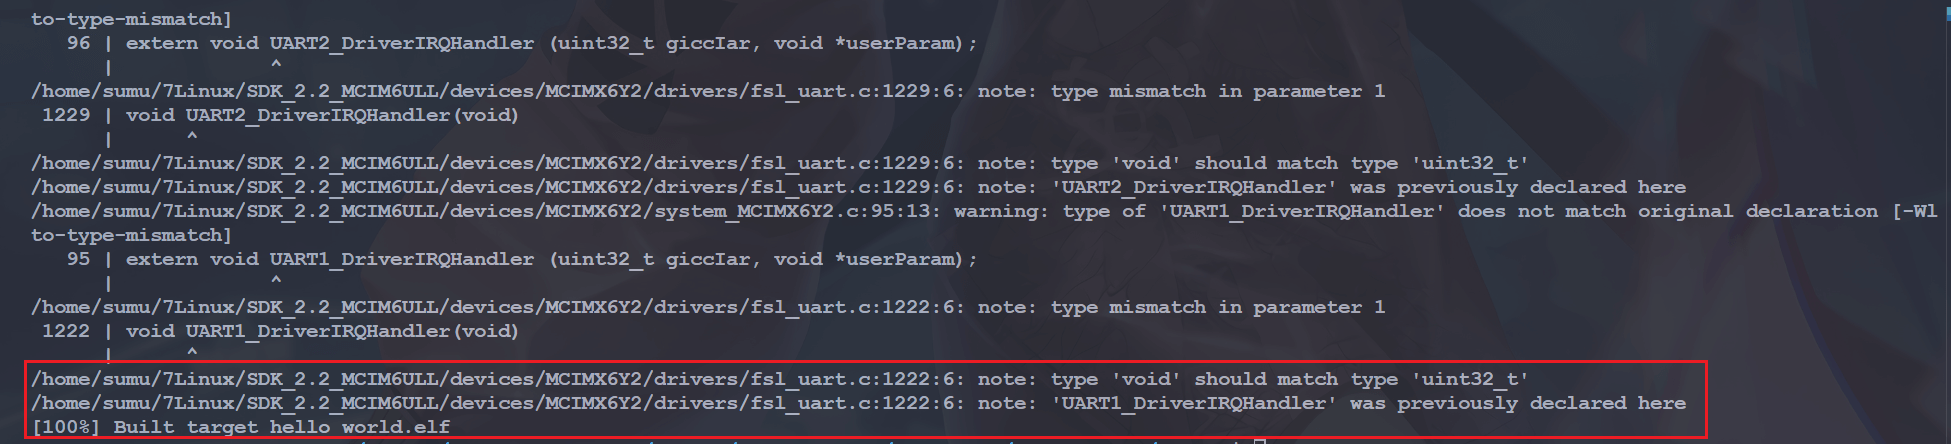
然后我们会在 boards/evkmcimx6ull/demo_apps/hello_world/armgcc 路径下生成这两个目录:
sumu@sumu-virtual-machine:~/7Linux/SDK_2.2_MCIM6ULL/boards/evkmcimx6ull/demo_apps/hello_world/armgcc$ tree -L 2
.
#......
├── CMakeFiles
│   ├── 3.16.3
│   ├── cmake.check_cache
│   ├── CMakeDirectoryInformation.cmake
│   ├── CMakeOutput.log
│   ├── hello_world.elf.dir
│   ├── Makefile2
│   ├── Makefile.cmake
│   ├── progress.marks
│   └── TargetDirectories.txt
#......
└── release
    ├── hello_world.elf
└── sdk20-app.bin生成的是 CMakeFiles 和 release 目录,得到的成果物在 release 中。这个 sdk20-app.bin 就是做后得到的 bin 文件。
4. 烧录到 SD 卡
官方的 SDK 也同样为我们提供了裸机的烧录方式,我们看一下这个 SDK_2.2_MCIM6ULL/tools/imgutil 目录下的 readme 文件:
   IMGUTIL User Guide

   ======================================

   1. Build SDK2.0 application
   2. Copy built binary (.bin file) to imgutil/<board> folder and rename to sdk20-app.bin
   3. In imgutil/<board> folder, run mkimage.sh in mingw32 shell to get bootable image file sdk20-app.img
       a. If the image is built with ram link file, use "mkimage.sh ram" to make the bootable image.
       b. If the image is built with flash link file, use "mkimage.sh flash" to make the bootable XIP image.
       c. If the image is built with ram link file and want to boot from MicroSD card, use "mkimage.sh sd" to make the bootable image.

======================================从这里我们可以知道我们需要把.bin 文件拷贝到 imgutil/< board > 目录下,然后重命名为 sdk20-app.bin,然后执行 mkimage.sh sd 就可以生成 img 文件,我们可以来试一下:
mkimage.sh sd
发现这里提示权限不够,我们修改一下上面两个 bin 文件的权限:
chmod 777 ../bin/dcdgen.bin
chmod 777 ../bin/imgutil.bin然后我们会看到以下打印信息:
sumu@sumu-virtual-machine:~/7Linux/SDK_2.2_MCIM6ULL/tools/imgutil/evkmcimx6ull$ ./mkimage.sh sd
Get command: set 0x020c4068 0xffffffff
Get command: set 0x020c406c 0xffffffff
#......

Combined Image Info:
--------------------------------------
   base_addr         = 0x80000000
   ivt_offset        = 0x00000400
   hab_ivt.hdr       = 0x412000d1
   hab_ivt.entry     = 0x80002000
   hab_ivt.self      = 0x80000400
   hab_ivt.csf       = 0x00000000
   hab_ivt.boot_data = 0x80000420
   hab_ivt.dcd       = 0x80000440
   boot_data.start   = 0x80000000
   boot_data.size    = 0x00007e50
   boot_data.plugin  = 0x00000000

 Info for CSF file generation
--------------------------------------
   ivt_addr  = 0x80000400, ivt_offset  = 0x00000400
   app_addr  = 0x80002000, app_offset  = 0x00002000, app_size = 0x00005e60
--------------------------------------然后就会生成一个 img 文件:

我们使用 dd 命令将这个 img 文件烧写到 sd 卡中:
sudo dd if=sdk20-app.img of=/dev/sdx bs=512 conv=fsync这个 img 文件直接从 0 开始烧写就可以了,这里设置块大小为 512。
5. 开发板验证
我们将拨码开关拨到 SD 卡启动:
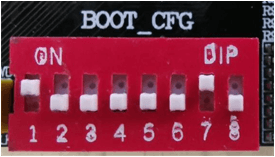
然后启动开发板,发现是跑不起来的,我猜测可能是硬件上哪里不兼容吧,不过问题不大,后面我们是移植这个 SDK 来用于自己的工程中,这里主要是学习一下怎么用这个工具烧录。
二、使用 SDK 控制 GPIO
1. SDK 移植
我们需要的的三个文件如下,前边已经说明了这三个文件的位置。
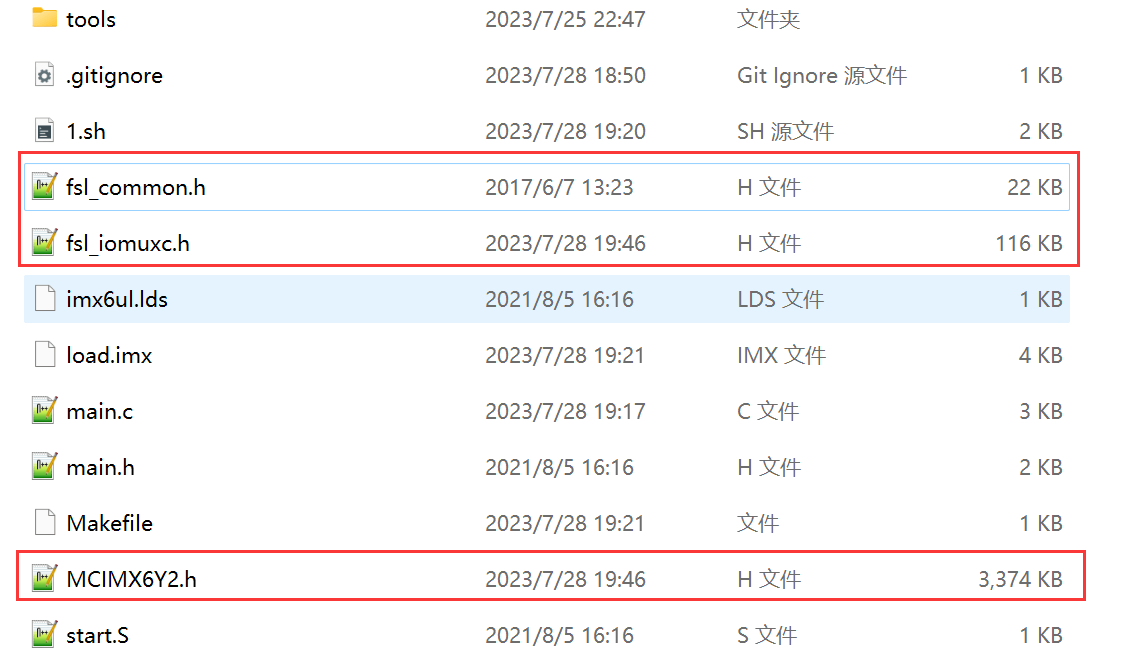
这三个文件直接编译的话肯定会出错的!需要对其做删减,因为这三个文件里面的代码都比较大 我们可以看这里:01_GPIO_LED/05_led_c_nxp_sdk——C 语言点亮 LED 实验(NXP 官方 SDK 移植) · 1e13542,这一次的提交我同时修改了编译脚本和 Makefile 文件,可以直接看上边这三个文件的更改就会知道文件发生了哪些变化了。
2. 新建 cc.h 文件
新建一个名为 cc.h 的头文件, cc.h 里面存放一些 SDK 库文件需要使用到的数据类型,可以看工程里边的:01_GPIO_LED/05_led_c_nxp_sdk/cc.h
3. 其他文件
像 led 的 GPIO 配置,延时函数、时钟配置等与前边都是一样的,只是我们可以使用 SDK 中已经定义好的一些函数和结构体来实现,就不需要自己再定义了,这里就不详细说明了,大概了解就可以了。
4. 编译和下载
我在工程里写了脚本和 Makefile 文件,可以直接使用脚本来编译:01_GPIO_LED/05_led_c_nxp_sdk/1.sh。我们编译完后,可以通过这个脚本完成下载功能:
5. 链接地址
我们在 mkimage.sh 中会看到这么一句:
../bin/$IMG_BUILDER --combine base_addr=0x80000000 ivt_offset=0x400 app_offset=0x2000 dcd_file=dcd.bin app_file=sdk20-app.bin ofile=sdk20-app.img image_entry_point=0x80002000这个主要是生成 img 文件的,按理来说 image_entry_point 这个值应该填我们的链接文件中链接的地址,我们这里注意和链接脚本保持一致。
注意:其实吧这里我试过,编译的时候链接脚本是 0x87800000,这个烧写工具填 0x80002000 的话也能跑,不是很明白内部是怎么搞的,我甚至还试了 mkimage 工具,好像也一样,有点不懂,后面有问题再补充吧。
6. 开发板测试
我们将拨码开关拨到 SD 卡启动,然后复位开发板,我们就可以看到灯闪烁了。