
LV015-直方图
直方图数据怎么看?
一、VA6320
1. 简介
VA6320 是一款集成了全局快门 40x30 SPAD(单光子雪崩光电二极管)像素阵列、前端时间到数字转换器和深度 DSP 处理器的 1/18 英寸 ToF(飞行时间)成像传感器。配合脉冲激光发射器,该传感器可以生成一个 40x30 的深度图像。
该传感器提供支持直方图模式和 DSP 模式数据格式的 MIPI CSI-2 接口。使用 CSI-2 单通道接口,传感器能够以全分辨率每秒 30 帧的速度进行图像传输。传感器内部包含一个微处理器(MCU),用于实现软件补丁和增强系统的可编程性。此外,它还集成了一个照明控制器和一个 SPI 接口,允许配置 ToF 模块中的下游 LDD(激光二极管驱动器),使传感器能够直接访问模块内存(如 EEPROM 或 Flash)中的校准数据和固件代码。

2. 参数说明
| 参数 | 规格 | 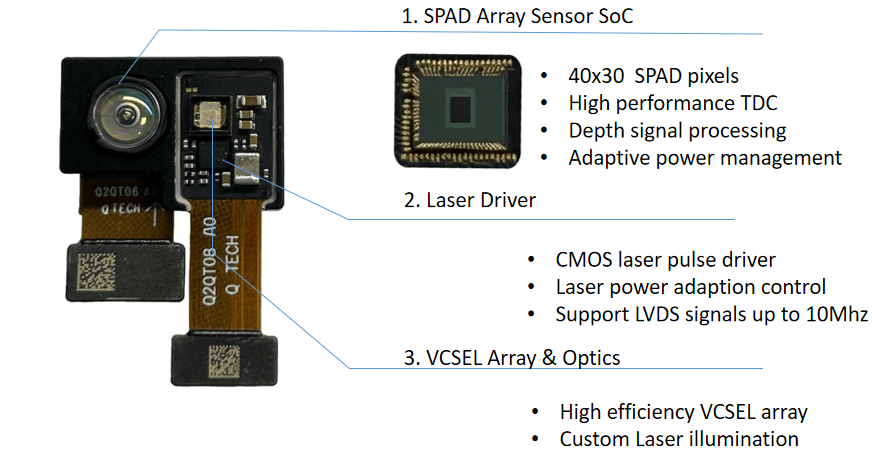 |
| 深度分辨率 | 1200 点分辨率 | |
| 测量距离 | 9.6 米 | |
| 激光波长 | 940nm | |
| 精确度 | 5cm~1m@±1cm,1m~8m@< 1% | |
| 准确度 | < 10mm | |
| 深度 FOV | ||
| 外观尺寸 | 2493um * 2997um | |
| 数据传输 | IIC, MIPI, DVP | |
| 设备功耗 | ||
| 待机功耗典型值 | ||
| 支持操作系统 | ||
| 工作温度 | -20°C ~ 85°C | |
| 人眼安全等级 | Class 1 |
这里采用的是 Histogram 模式,也就是直方图模式,每一个像素 64 个 bin,一行是 40 像素,就是 2560 个 bin,每个 bin 是 10bit 的 raw 数据。 所以按照普通 sensor 来理解的话,它是 40x30 像素,分辨率为 2560x30,但是会多输出一行 EMBD 数据,这样就相当于一个 2560x31 分辨率,输出为 raw10 格式的 sensor。具体的格式可以看手册。
我们存储 raw10 数据很多时候直接以紧凑型存储,也就是 10bit 直接按顺序存储,有时候还需要解压成 16bit 存储着 10bit 数据的格式,可以用下面的脚本来转化。
3.1 python
#!/usr/bin/env python3
# -*- coding: utf-8 -*-
"""
RAW10 to 16-bit converter
Converts RAW10 format Bayer data to 16-bit format
Based on the packing format from bbb.c:
- Data is read as 16-bit values
- 5 16-bit values contain 8 pixels of 10 bits each
- Each 10-bit pixel value is stored in 2 bytes in the output (LSB aligned)
"""

import os
import sys
import numpy as np
import struct


def read_raw10_file(file_path):
    """
    Read RAW10 format file and return byte data
    """
    with open(file_path, 'rb') as f:
        data = f.read()
    return data


def raw10_to_16bit(raw10_data, debug=False):
    """
    Convert RAW10 format data to 16-bit format
    Based on the packing format from bbb.c:
    - Data is read as 16-bit values
    - 5 16-bit values contain 8 pixels of 10 bits each
    - Format: 5 16-bit values -> 8 pixels of 10 bits each

    Returns:
        list: 16-bit pixel values (each 10-bit value stored in 2 bytes)
    """
    # Convert raw bytes to 16-bit values (little-endian)
    num_16bit_values = len(raw10_data) // 2
    u16_data = []
    for i in range(num_16bit_values):
        u16_value = struct.unpack('<H', raw10_data[i*2:i*2+2])[0]
        u16_data.append(u16_value)

    # Calculate number of complete 5-16bit-value groups
    num_groups = len(u16_data) // 5
    remaining_values = len(u16_data) % 5

    # Output list for 16-bit values
    pixels_16bit = []

    # Process complete 5-16bit-value groups
    for i in range(num_groups):
        # Extract 5 16-bit values for 8 pixels
        u16_group = u16_data[i*5:(i+1)*5]

        # Convert to integers
        b0, b1, b2, b3, b4 = u16_group

        # Extract 8 pixels (10 bits each) based on bbb.c logic
        # Pixel 0: bits 9-0 from b0
        pixel0 = (b0 & 0x3ff)

        # Pixel 1: bits 3-0 from b0 (bits 13-10) + bits 9-4 from b1 (bits 3-0)
        pixel1 = (((b0 & 0xfC00) >> 10) | ((b1 & 0xf) << 6))

        # Pixel 2: bits 9-0 from b1 (bits 13-4)
        pixel2 = (((b1 & 0x3ff0) >> 4))

        # Pixel 3: bits 1-0 from b1 (bits 15-14) + bits 9-2 from b2 (bits 7-0)
        pixel3 = (((b1 & 0xC000) >> 14) | ((b2 & 0xff) << 2))

        # Pixel 4: bits 7-0 from b2 (bits 15-8) + bits 1-0 from b3 (bits 9-8)
        pixel4 = (((b2 & 0xff00) >> 8) | ((b3 & 0x3) << 8))

        # Pixel 5: bits 9-0 from b3 (bits 7-0)
        pixel5 = (((b3 & 0xffc) >> 2))

        # Pixel 6: bits 3-0 from b3 (bits 11-8) + bits 5-0 from b4 (bits 5-0)
        pixel6 = (((b3 & 0xf000) >> 12) | ((b4 & 0x3f) << 4))

        # Pixel 7: bits 9-0 from b4 (bits 15-6)
        pixel7 = (((b4 & 0xffc0) >> 6))

        # Add to output list
        pixels_16bit.extend([pixel0, pixel1, pixel2, pixel3, pixel4, pixel5, pixel6, pixel7])

        # Debug print for first group
        if debug and i == 0:
            print("Debug - First 5 16-bit values:")
            print(f"  Raw 16-bit values: 0x{b0:04X} 0x{b1:04X} 0x{b2:04X} 0x{b3:04X} 0x{b4:04X}")
            print(f"  Extracted pixels: {pixel0:4d} {pixel1:4d} {pixel2:4d} {pixel3:4d} {pixel4:4d} {pixel5:4d} {pixel6:4d} {pixel7:4d}")

    # Handle remaining values if any
    if remaining_values > 0:
        print(f"Warning: {remaining_values} remaining 16-bit values ignored")

    return pixels_16bit


def convert_raw10_to_16bit(input_file, output_file, debug=False):
    """
    Convert RAW10 file to 16-bit format file
    Each 10-bit pixel value is stored as 2 bytes in the output file
    """
    # Read RAW10 data
    raw10_data = read_raw10_file(input_file)
    print(f"Read {len(raw10_data)} bytes from {input_file}")

    if debug:
        print("First 16 bytes of RAW10 data:")
        for i in range(min(16, len(raw10_data))):
            print(f"  Byte {i}: 0x{raw10_data[i]:02X}")

    # Convert to 16-bit values
    pixels_16bit = raw10_to_16bit(raw10_data, debug)
    print(f"Converted to {len(pixels_16bit)} 16-bit pixels")

    if debug:
        print("First 16 pixels in 16-bit format:")
        for i in range(min(16, len(pixels_16bit))):
            print(f"  Pixel {i}: {pixels_16bit[i]:4d} (0x{pixels_16bit[i]:03X})")

    # Write to output file
    with open(output_file, 'wb') as f:
        for pixel in pixels_16bit:
            # Write as little-endian 16-bit value
            f.write(pixel.to_bytes(2, byteorder='little'))

    print(f"Written to {output_file}")


def verify_conversion(input_file, converted_file, debug=False):
    """
    Verify the conversion by comparing some sample values
    """
    # Read original RAW10 data
    raw10_data = read_raw10_file(input_file)

    # Read converted 16-bit data
    with open(converted_file, 'rb') as f:
        converted_data = f.read()

    # Convert bytes to 16-bit values
    converted_pixels = []
    for i in range(0, len(converted_data), 2):
        pixel = int.from_bytes(converted_data[i:i+2], byteorder='little')
        converted_pixels.append(pixel)

    # Convert RAW10 data to verify
    original_pixels = raw10_to_16bit(raw10_data, debug)

    # Compare first few pixels
    print("Verification - First 10 pixels:")
    for i in range(min(10, len(original_pixels), len(converted_pixels))):
        print(f"  Original: {original_pixels[i]:4d}, Converted: {converted_pixels[i]:4d}, Match: {original_pixels[i] == converted_pixels[i]}")


if __name__ == "__main__":
    debug_mode = False
    input_file = ""
    output_file = ""

    # Parse command line arguments
    if len(sys.argv) < 2:
        print("Usage: python raw10_converter.py <input_raw10_file> [<output_16bit_file>] [--debug]")
        print("  <input_raw10_file>   : Input RAW10 file to convert")
        print("  <output_16bit_file>  : Output 16-bit file (optional, auto-generated if not provided)")
        print("  --debug              : Enable debug mode")
        sys.exit(1)
    elif len(sys.argv) >= 2:
        input_file = sys.argv[1]

        # 如果提供了输出文件名参数,则使用提供的文件名
        # 否则自动生成文件名:输入文件名去掉后缀后加上 _16bit 然后再加上后缀
        if len(sys.argv) >= 3 and sys.argv[2] != "--debug":
            output_file = sys.argv[2]
        else:
            # 自动生成输出文件名
            base_name = os.path.splitext(input_file)[0]
            ext = os.path.splitext(input_file)[1]
            output_file = base_name + "_16bit_py" + ext

        # 检查是否启用调试模式
        if "--debug" in sys.argv:
            debug_mode = True

    # Check if input file exists
    if not os.path.exists(input_file):
        print(f"Error: Input file '{input_file}' not found")
        sys.exit(1)

    # Perform conversion
    convert_raw10_to_16bit(input_file, output_file, debug_mode)

    # Verify conversion
verify_conversion(input_file, output_file, debug_mode)3.2 C++
3.2.1 raw10_converter.cpp
#include "raw10_converter.h"
#include <iostream>
#include <fstream>
#include <vector>
#include <cstdint>
#include <cstdio>
#include <cstring>

// C interface implementation
size_t raw10_convert_from_memory(const unsigned char* raw_data, size_t raw_data_size,
                                unsigned short* output_buffer, int debug) {
    // Convert C-style debug flag to C++ style
    bool cpp_debug = (debug != 0);

    // Call the C++ implementation
    return Raw10Converter::convertRaw10To16BitFromMemory(raw_data, raw_data_size, output_buffer, cpp_debug);
}

std::vector<unsigned char> Raw10Converter::readRaw10File(const std::string& file_path) {
    std::ifstream file(file_path, std::ios::binary);
    if (!file.is_open()) {
        std::cerr << "Error: Could not open file " << file_path << std::endl;
        return std::vector<unsigned char>();
    }

    // Get file size
    file.seekg(0, std::ios::end);
    size_t file_size = file.tellg();
    file.seekg(0, std::ios::beg);

    // Read all data
    std::vector<unsigned char> data(file_size);
    file.read(reinterpret_cast<char*>(data.data()), file_size);
    file.close();

    return data;
}

std::vector<unsigned short> Raw10Converter::raw10To16Bit(const std::vector<unsigned char>& raw10_data, bool debug) {
    // Convert raw bytes to 16-bit values (little-endian)
    size_t num_16bit_values = raw10_data.size() / 2;
    std::vector<unsigned short> u16_data;
    u16_data.reserve(num_16bit_values);

    for (size_t i = 0; i < num_16bit_values; i++) {
        unsigned short u16_value = static_cast<unsigned short>(raw10_data[i*2]) |
                                  (static_cast<unsigned short>(raw10_data[i*2+1]) << 8);
        u16_data.push_back(u16_value);
    }

    // Calculate number of complete 5-16bit-value groups
    size_t num_groups = u16_data.size() / 5;
    size_t remaining_values = u16_data.size() % 5;

    // Output vector for 16-bit values
    std::vector<unsigned short> pixels_16bit;
    pixels_16bit.reserve(num_groups * 8);

    // Process complete 5-16bit-value groups
    for (size_t i = 0; i < num_groups; i++) {
        // Extract 5 16-bit values for 8 pixels
        unsigned short b0 = u16_data[i*5];
        unsigned short b1 = u16_data[i*5+1];
        unsigned short b2 = u16_data[i*5+2];
        unsigned short b3 = u16_data[i*5+3];
        unsigned short b4 = u16_data[i*5+4];

        // Extract 8 pixels (10 bits each) based on bbb.c logic
        // Pixel 0: bits 9-0 from b0
        unsigned short pixel0 = (b0 & 0x3ff);

        // Pixel 1: bits 3-0 from b0 (bits 13-10) + bits 9-4 from b1 (bits 3-0)
        unsigned short pixel1 = (((b0 & 0xfC00) >> 10) | ((b1 & 0xf) << 6));

        // Pixel 2: bits 9-0 from b1 (bits 13-4)
        unsigned short pixel2 = (((b1 & 0x3ff0) >> 4));

        // Pixel 3: bits 1-0 from b1 (bits 15-14) + bits 9-2 from b2 (bits 7-0)
        unsigned short pixel3 = (((b1 & 0xC000) >> 14) | ((b2 & 0xff) << 2));

        // Pixel 4: bits 7-0 from b2 (bits 15-8) + bits 1-0 from b3 (bits 9-8)
        unsigned short pixel4 = (((b2 & 0xff00) >> 8) | ((b3 & 0x3) << 8));

        // Pixel 5: bits 9-0 from b3 (bits 7-0)
        unsigned short pixel5 = (((b3 & 0xffc) >> 2));

        // Pixel 6: bits 3-0 from b3 (bits 11-8) + bits 5-0 from b4 (bits 5-0)
        unsigned short pixel6 = (((b3 & 0xf000) >> 12) | ((b4 & 0x3f) << 4));

        // Pixel 7: bits 9-0 from b4 (bits 15-6)
        unsigned short pixel7 = (((b4 & 0xffc0) >> 6));

        // Add to output vector
        pixels_16bit.push_back(pixel0);
        pixels_16bit.push_back(pixel1);
        pixels_16bit.push_back(pixel2);
        pixels_16bit.push_back(pixel3);
        pixels_16bit.push_back(pixel4);
        pixels_16bit.push_back(pixel5);
        pixels_16bit.push_back(pixel6);
        pixels_16bit.push_back(pixel7);

        // Debug print for first group
        if (debug && i == 0) {
            printf("Debug - First 5 16-bit values:\n");
            printf("  Raw 16-bit values: 0x%04X 0x%04X 0x%04X 0x%04X 0x%04X\n", b0, b1, b2, b3, b4);
            printf("  Extracted pixels: %4d %4d %4d %4d %4d %4d %4d %4d\n",
                   pixel0, pixel1, pixel2, pixel3, pixel4, pixel5, pixel6, pixel7);
        }
    }

    // Handle remaining values if any
    if (remaining_values > 0) {
        printf("Warning: %zu remaining 16-bit values ignored\n", remaining_values);
    }

    return pixels_16bit;
}

bool Raw10Converter::convertRaw10To16Bit(const std::string& input_file, const std::string& output_file, bool debug) {
    // Read RAW10 data
    std::vector<unsigned char> raw10_data = readRaw10File(input_file);
    if (raw10_data.empty()) {
        return false;
    }

    printf("Read %zu bytes from %s\n", raw10_data.size(), input_file.c_str());

    if (debug) {
        printf("First 16 bytes of RAW10 data:\n");
        for (size_t i = 0; i < 16 && i < raw10_data.size(); i++) {
            printf("  Byte %zu: 0x%02X\n", i, raw10_data[i]);
        }
    }

    // Convert to 16-bit values
    std::vector<unsigned short> pixels_16bit = raw10To16Bit(raw10_data, debug);
    printf("Converted to %zu 16-bit pixels\n", pixels_16bit.size());

    if (debug) {
        printf("First 16 pixels in 16-bit format:\n");
        for (size_t i = 0; i < 16 && i < pixels_16bit.size(); i++) {
            printf("  Pixel %zu: %4d (0x%03X)\n", i, pixels_16bit[i], pixels_16bit[i]);
        }
    }

    // Write to output file
    std::ofstream file(output_file, std::ios::binary);
    if (!file.is_open()) {
        std::cerr << "Error: Could not open output file " << output_file << std::endl;
        return false;
    }

    for (const auto& pixel : pixels_16bit) {
        // Write as little-endian 16-bit value
        unsigned char byte0 = pixel & 0xFF;
        unsigned char byte1 = (pixel >> 8) & 0xFF;
        file.write(reinterpret_cast<const char*>(&byte0), 1);
        file.write(reinterpret_cast<const char*>(&byte1), 1);
    }

    file.close();
    printf("Written to %s\n", output_file.c_str());

    return true;
}

size_t Raw10Converter::convertRaw10To16BitFromMemory(const unsigned char* raw_data, size_t raw_data_size,
                                                    unsigned short* output_buffer, bool debug) {
    // Check input parameters
    if (raw_data == nullptr || output_buffer == nullptr || raw_data_size == 0) {
        if (debug) {
            std::cerr << "Error: Invalid input parameters" << std::endl;
        }
        return 0;
    }

    if (debug) {
        printf("Debug - Memory conversion:\n");
        printf("  Input data size: %zu bytes\n", raw_data_size);

        if (raw_data_size >= 16) {
            printf("First 16 bytes of RAW10 data:\n");
            for (size_t i = 0; i < 16; i++) {
                printf("  Byte %zu: 0x%02X\n", i, raw_data[i]);
            }
        }
    }

    // Create vector from raw data to reuse existing function
    std::vector<unsigned char> raw10_vector(raw_data, raw_data + raw_data_size);

    // Call existing conversion function
    std::vector<unsigned short> converted_pixels = raw10To16Bit(raw10_vector, debug);

    if (debug) {
        printf("Converted to %zu 16-bit pixels\n", converted_pixels.size());

        if (converted_pixels.size() > 0) {
            printf("First 16 pixels in 16-bit format:\n");
            for (size_t i = 0; i < 16 && i < converted_pixels.size(); i++) {
                printf("  Pixel %zu: %4d (0x%03X)\n", i, converted_pixels[i], converted_pixels[i]);
            }
        }
    }

    // Copy converted data to output buffer
    if (converted_pixels.size() > 0) {
        memcpy(output_buffer, converted_pixels.data(), converted_pixels.size() * sizeof(unsigned short));
    }

    // Return size of converted data in bytes
    return converted_pixels.size() * 2;  // Each pixel is 2 bytes (16-bit)
}

bool Raw10Converter::verifyConversion(const std::string& input_file, const std::string& converted_file, bool debug) {
    // Read original RAW10 data
    std::vector<unsigned char> raw10_data = readRaw10File(input_file);
    if (raw10_data.empty()) {
        return false;
    }

    // Read converted 16-bit data
    std::ifstream file(converted_file, std::ios::binary);
    if (!file.is_open()) {
        std::cerr << "Error: Could not open file " << converted_file << std::endl;
        return false;
    }

    // Get file size
    file.seekg(0, std::ios::end);
    size_t file_size = file.tellg();
    file.seekg(0, std::ios::beg);

    // Read all data
    std::vector<unsigned char> converted_data(file_size);
    file.read(reinterpret_cast<char*>(converted_data.data()), file_size);
    file.close();

    // Convert bytes to 16-bit values
    std::vector<unsigned short> converted_pixels;
    converted_pixels.reserve(file_size / 2);

    for (size_t i = 0; i < file_size; i += 2) {
        unsigned short pixel = static_cast<unsigned short>(converted_data[i]) |
                              (static_cast<unsigned short>(converted_data[i+1]) << 8);
        converted_pixels.push_back(pixel);
    }

    // Convert RAW10 data to verify
    std::vector<unsigned short> original_pixels = raw10To16Bit(raw10_data, debug);

    // Compare first few pixels
    printf("Verification - First 10 pixels:\n");
    for (size_t i = 0; i < 10 && i < original_pixels.size() && i < converted_pixels.size(); i++) {
        bool match = original_pixels[i] == converted_pixels[i];
        printf("  Original: %4d, Converted: %4d, Match: %s\n",
               original_pixels[i], converted_pixels[i], match ? "true" : "false");
    }

    return true;
}3.2.2 raw10_converter.h
#ifndef RAW10_CONVERTER_H
#define RAW10_CONVERTER_H

#include <stddef.h>
#include <stdint.h>

// C interface - available for both C and C++
#ifdef __cplusplus
extern "C" {
#endif

/**
 * @brief C interface for RAW10 to 16-bit conversion
 *
 * @param raw_data Pointer to input RAW10 data
 * @param raw_data_size Size of input RAW10 data in bytes
 * @param output_buffer Pointer to output buffer for 16-bit data
 * @param debug Enable debug output (1 for true, 0 for false)
 * @return Size of converted data in bytes (number of 16-bit pixels * 2), 0 on error
 */
size_t raw10_convert_from_memory(const unsigned char* raw_data, size_t raw_data_size,
                                unsigned short* output_buffer, int debug);

#ifdef __cplusplus
}
#endif

#ifdef __cplusplus

// C++ interface - only available for C++
#include <vector>
#include <string>

/**
 * RAW10 to 16-bit converter
 * Converts RAW10 format Bayer data to 16-bit format
 * Based on the packing format from bbb.c:
 * - Data is read as 16-bit values
 * - 5 16-bit values contain 8 pixels of 10 bits each
 * - Each 10-bit pixel value is stored in 2 bytes in the output (LSB aligned)
 */
class Raw10Converter {
public:
    /**
     * Convert RAW10 file to 16-bit format file
     * Each 10-bit pixel value is stored as 2 bytes in the output file
     * @param input_file Path to the input RAW10 file
     * @param output_file Path to the output 16-bit file
     * @param debug Enable debug output
     * @return true on success, false on failure
     */
    static bool convertRaw10To16Bit(const std::string& input_file, const std::string& output_file, bool debug = false);

    /**
     * Verify the conversion by comparing some sample values
     * @param input_file Path to the original RAW10 file
     * @param converted_file Path to the converted 16-bit file
     * @param debug Enable debug output
     * @return true on success, false on failure
     */
    static bool verifyConversion(const std::string& input_file, const std::string& converted_file, bool debug = false);

    /**
     * Convert RAW10 format data from memory to 16-bit format
     * Direct memory-to-memory conversion without file I/O
     * @param raw_data Pointer to input RAW10 data
     * @param raw_data_size Size of input RAW10 data in bytes
     * @param output_buffer Pointer to output buffer for 16-bit data
     * @param debug Enable debug output
     * @return Size of converted data in bytes (number of 16-bit pixels * 2), 0 on error
     */
    static size_t convertRaw10To16BitFromMemory(const unsigned char* raw_data, size_t raw_data_size,
                                               unsigned short* output_buffer, bool debug = false);

private:
    /**
     * Read RAW10 format file and return byte data
     * @param file_path Path to the RAW10 file
     * @return Vector of bytes read from the file
     */
    static std::vector<unsigned char> readRaw10File(const std::string& file_path);

    /**
     * Convert RAW10 format data to 16-bit format
     * Based on the packing format from bbb.c:
     * - Data is read as 16-bit values
     * - 5 16-bit values contain 8 pixels of 10 bits each
     * - Format: 5 16-bit values -> 8 pixels of 10 bits each
     *
     * @param raw10_data Input RAW10 data
     * @param debug Enable debug output
     * @return Vector of 16-bit pixel values (each 10-bit value stored in 2 bytes)
     */
    static std::vector<unsigned short> raw10To16Bit(const std::vector<unsigned char>& raw10_data, bool debug = false);
};

#endif // __cplusplus

#endif // RAW10_CONVERTER_H4. 数据解析
4.1 解析脚本
这个解析脚本输入数据为解压后的 raw10 数据(即 2 字节存储 10bit 的 raw10 数据)。
# -*- encoding: utf-8 -*-
import matplotlib.pyplot as plt
import sys
import numpy as np
import os
# 启用交互模式,使 plt.show()不会阻塞程序执行
plt.ion()
# 定义变量 a 和 b,可能用于数据处理中的索引或范围
a = 0
b = 40
# 全局计数器
global_count = 1
# 图表子图之间的水平和垂直间距
g_wspace = 0.45
g_hspace = 0.45
# 图像宽度和高度参数
g_nWidth = 40
g_nHeight = 31
# 数据块大小
g_nBiSize = 64
# 积分计数阈值
g_nIntegCount = 60000
# 封装鼠标交互功能
def setup_mouse_interaction(image):
# 添加文本显示坐标信息
coord_text = plt.text(0, 0, '', fontsize=12, color='red',
verticalalignment='top', transform=plt.gca().transAxes)
# 用于存储当前高亮框的引用
highlight_rect = [None] # 使用列表来避免 nonlocal 问题
# 鼠标移动事件处理函数
def on_mouse_move(event):
# 获取当前轴
ax = plt.gca()
# 如果有之前的高亮框,先移除它
if highlight_rect[0] is not None:
highlight_rect[0].remove()
highlight_rect[0] = None
# 检查鼠标是否在图像区域内
if event.inaxes == ax and event.xdata is not None and event.ydata is not None:
# 获取像素坐标(注意图像坐标和数组坐标的差异)
x_pixel = int(round(event.xdata))
y_pixel = int(round(event.ydata))
# 检查坐标是否在有效范围内
if 0 <= x_pixel < 40 and 0 <= y_pixel < 30:
# 获取对应像素的 count 值
count_value = image[y_pixel, x_pixel]
# 在图像下方显示坐标和 count 值
coord_text.set_text(f'Pixel: ({x_pixel}, {y_pixel}), Count: {count_value}')
coord_text.set_position((0.05, -0.1)) # 调整位置到图像下方
# 添加红色高亮框
from matplotlib.patches import Rectangle
highlight_rect[0] = Rectangle((x_pixel-0.5, y_pixel-0.5), 1, 1,
linewidth=2, edgecolor='red', facecolor='none')
ax.add_patch(highlight_rect[0])
# 刷新图像
plt.draw()
# 连接鼠标移动事件
plt.connect('motion_notify_event', on_mouse_move)
if __name__ == '__main__':
# 检查是否提供了文件路径作为命令行参数
if len(sys.argv) < 2:
print("使用方法: python dtof_test.py <文件路径>")
sys.exit(1)
# 获取命令行传入的文件路径
file_path = sys.argv[1]
# 定义图表的行数和列数,用于显示多个直方图
PictureRow = 3
PictureCol = 4
# 初始化数据列表
list_data = []
# 以二进制模式打开文件并逐字节读取
with open(file_path, 'rb') as file:
file.seek(0, 0) # 定位到文件开头
while True:
# 每次读取一个字节
t_byte = file.read(1)
# 如果读取到文件末尾则退出循环
if len(t_byte) == 0:
break
else:
# 将字节转换为十六进制字符串并添加到列表中
strtemp = "0x%.2X" % ord(t_byte)
list_data.append(int(strtemp, 16))
pass
# 将读取的数据保存到 vctSrcData 变量中
vctSrcData = list_data
# 初始化直方图数据列表
vctHistogramData = []
# 将每两个字节组合成一个 10 位的数据值(TOF 数据处理)
for i in range(0, len(vctSrcData), 2):
# 将两个字节组合成一个值,并保留低 10 位, 这里得到每个 bin 的 10 位数据
# 00 01 --> (00 + (01 << 8))&0x3ff = (00 + 100)&0x3ff = 100&0x3ff = 100
# 0c 01 --> (0c + (01 << 8))&0x3ff = (0c + 100)&0x3ff = 10c&0x3ff = 10c
vctHistogramData.append(((vctSrcData[i])+(vctSrcData[i+1]<<8)) & 0x3FF)
pass
# 对于列表 len 函数返回列表元素个数,这里 vctSrcData 列表每个元素占 1 个字节,vctHistogramData 每个元素占 2 个字节
print(f"len(vctSrcData)={ len(vctSrcData) }, {vctSrcData[0]:02x} {vctSrcData[1]:02x} {vctSrcData[2]:02x} {vctSrcData[3]:02x}")
print(f"len(vctHistogramData)={ len(vctHistogramData)}, {vctHistogramData[0]:x} {vctHistogramData[1]:x}")
# 初始化 EMBD 数据列表
vctEmbd = []
# 将直方图数据右移 2 位得到真实的 EMBD 数据,每个 raw10 数据中 [9:2] 有效,在用户手册的数据解析说明中有
for data in vctHistogramData:
# 100 --> 0000 0001 0000 0000 >> 2 = 0000 0000 0100 0000 = 0040
# 10c --> 0000 0001 0000 1100 >> 2 = 0000 0000 0100 0011 = 0043
vctEmbd.append(data>>2)
print(f"Chip_ID:{vctEmbd[0]:02x} {vctEmbd[1]:02x}")
print(f"Chip_VID:{vctEmbd[2]:02x}")
print(f"Spad_bin_rd_mode(0:DSP, 1:Histogram):{vctEmbd[3]:02x} {vctEmbd[3]&0x01:d}")
# 打印 vctEmbd 列表中索引 30 到 37 的值(调试信息)
for i in range(30, 38, 1):
print(vctEmbd[i], end=' ')
print("")
# 创建直方图数据字典,用于存储每个像素点的直方图数据,每个像素带你包含 64 个 bin 数据
dicHistogramData = {}
# 从索引 40*64 开始,每隔 64 个数据处理一组(每个像素 64 个 bin,每个 bin 是 10bit)
# 第 1 行的 40 个像素点共 40*64 个字节数据是 EMBD 数据,实际数据从第 2 行开始
# vctHistogramData 是组合两个字节之后的数据,每一个元素占用 2 个字节,每个元素包含 1 个 bin 的完整数据
for j in range(40 * 64, len(vctHistogramData), 64):
vctTemp = []
# 提取 64 个数据点
for z in range(0, 64, 1):
vctTemp.append(vctHistogramData[j + z])
pass
# 以像素位置作为键存储数据
dicHistogramData[int(j / 64 - 40)] = vctTemp # dicHistogramData 中存的是每个像素点的 64 个 bin 数据,包含 64 个 vctHistogramData 数据
# 创建 X 轴数据列表(0 到 63,表示时间 bin)
vctX = []
for i in range(0, 64, 1):
vctX.append(i)
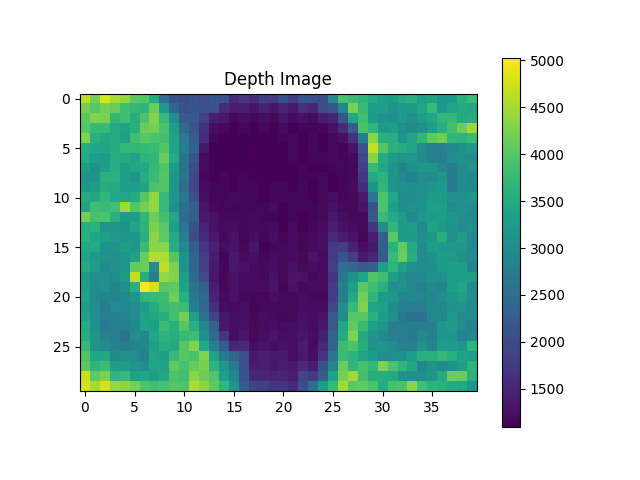
# 计算每个像素点的总计数,用于生成深度图像,这个并非真正的深度图像,而是间接反映,
vctTotalCount = []
for i in range(0, 1200, 1):
# 如果该像素点有数据,则计算前 62 个 bin 的总和,把所有 Bin 加起来,得到的是这个像素点 "看到" 的光有多亮,而不是这些光“走了多远”才回来。
if i in dicHistogramData:
vctTotalCount.append(sum(dicHistogramData[i][:62]))
else:
# 如果没有数据则添加 0
vctTotalCount.append(0)
filename = os.path.basename(file_path)
# 创建第一个 figure 显示深度图像
# 使用文件名作为 figure 窗口的标题
fig1 = plt.figure(1)
fig1.canvas.manager.set_window_title(filename)
# 将总计数数据转换为 numpy 数组并重塑为 30x40 的图像
image = np.array(vctTotalCount).reshape(30,40)
plt.imshow(image)
plt.colorbar()
# 使用文件名作为图像标题
plt.title(f"Depth Image - {filename}")
# 设置鼠标交互功能
setup_mouse_interaction(image)
plt.show(block=False)
# 创建第二个 figure 显示直方图
fig2 = plt.figure(2)
fig2.canvas.manager.set_window_title(filename)
nCount = 1
# 显示像素点(0, 1)的直方图
vctData = dicHistogramData[1]
plt.subplot(PictureRow, PictureCol, nCount)
plt.xlabel("time(bin)")
plt.ylabel("count")
plt.title(
"pix(0, 1):total count:%d : mutishot:%d" % (sum(vctData[:61]), (int(vctData[62]) << 10) + int(vctData[63])))
plt.bar(vctX, vctData)
plt.subplots_adjust(left=None, bottom=None, right=None, top=None, wspace=g_wspace, hspace=g_hspace)
# 显示像素点(0, 10)的直方图
nCount = nCount + 1
vctData = dicHistogramData[10]
plt.subplot(PictureRow, PictureCol, nCount)
plt.xlabel("time(bin)")
plt.ylabel("count")
plt.title(
"pix(0, 10):total count:%d : mutishot:%d" % (
sum(vctData[:61]), (int(vctData[62]) << 10) + int(vctData[63])))
plt.bar(vctX, vctData)
plt.subplots_adjust(left=None, bottom=None, right=None, top=None, wspace=g_wspace, hspace=g_hspace)
# 显示像素点(0, 20)的直方图
vctData = dicHistogramData[20]
nCount = nCount + 1
plt.subplot(PictureRow, PictureCol, nCount)
plt.xlabel("time(bin)")
plt.ylabel("count")
plt.title(
"pix(0, 20):total count:%d : mutishot:%d" % (
sum(vctData[:61]), (int(vctData[62]) << 10) + int(vctData[63])))
plt.bar(vctX, vctData)
plt.subplots_adjust(left=None, bottom=None, right=None, top=None, wspace=g_wspace, hspace=g_hspace)
# 显示像素点(0, 39)的直方图
vctData = dicHistogramData[39]
nCount = nCount + 1
plt.subplot(PictureRow, PictureCol, nCount)
plt.xlabel("time(bin)")
plt.ylabel("count")
plt.title(
"pix(0, 39):total count:%d : mutishot:%d" % (
sum(vctData[:61]), (int(vctData[62]) << 10) + int(vctData[63])))
plt.bar(vctX, vctData)
plt.subplots_adjust(left=None, bottom=None, right=None, top=None, wspace=g_wspace, hspace=g_hspace)
# 显示像素点(3, 9)的直方图
index = (3 * 40 + 9)
vctData = dicHistogramData[index]
nCount = nCount + 1
plt.subplot(PictureRow, PictureCol, nCount)
plt.xlabel("time(bin)")
plt.ylabel("count")
plt.title(
"pix(3, 9):total count:%d : mutishot:%d" % (
sum(vctData[:61]), (int(vctData[62]) << 10) + int(vctData[63])))
plt.bar(vctX, vctData)
plt.subplots_adjust(left=None, bottom=None, right=None, top=None, wspace=g_wspace, hspace=g_hspace)
# 显示像素点(6, 27)的直方图
index = (6 * 40 + 27)
vctData = dicHistogramData[index]
nCount = nCount + 1
plt.subplot(PictureRow, PictureCol, nCount)
plt.xlabel("time(bin)")
plt.ylabel("count")
plt.title(
"pix(2, 7):total count:%d : mutishot:%d" % (
sum(vctData[:61]), (int(vctData[62]) << 10) + int(vctData[63])))
plt.bar(vctX, vctData)
plt.subplots_adjust(left=None, bottom=None, right=None, top=None, wspace=g_wspace, hspace=g_hspace)
# 显示像素点(7, 11)的直方图
index = (7 * 40 + 11) # 修复了原代码中的错误(原为 7 * 30 + 11)
vctData = dicHistogramData[index]
nCount = nCount + 1
plt.subplot(PictureRow, PictureCol, nCount)
plt.xlabel("time(bin)")
plt.ylabel("count")
plt.title(
"pix(11, 7):total count:%d : mutishot:%d" % (
sum(vctData[:61]), (int(vctData[62]) << 10) + int(vctData[63])))
plt.bar(vctX, vctData)
plt.subplots_adjust(left=None, bottom=None, right=None, top=None, wspace=g_wspace, hspace=g_hspace)
# 显示像素点(15, 39)的直方图
index = (15 * 40 + 39)
vctData = dicHistogramData[index]
nCount = nCount + 1
plt.subplot(PictureRow, PictureCol, nCount)
plt.xlabel("time(bin)")
plt.ylabel("count")
plt.title(
"pix(15, 39):total count:%d : mutishot:%d" % (
sum(vctData[:61]), (int(vctData[62]) << 10) + int(vctData[63])))
plt.bar(vctX, vctData)
plt.subplots_adjust(left=None, bottom=None, right=None, top=None, wspace=g_wspace, hspace=g_hspace)
# 显示像素点(29, 1)的直方图
index = (29 * 40 + 1)
vctData = dicHistogramData[index]
nCount = nCount + 1
plt.subplot(PictureRow, PictureCol, nCount)
plt.xlabel("time(bin)")
plt.ylabel("count")
plt.title(
"pix(29, 1):total count:%d : mutishot:%d" % (
sum(vctData[:61]), (int(vctData[62]) << 10) + int(vctData[63])))
plt.bar(vctX, vctData)
plt.subplots_adjust(left=None, bottom=None, right=None, top=None, wspace=g_wspace, hspace=g_hspace)
# 显示像素点(29, 10)的直方图
index = (29 * 40 + 10)
vctData = dicHistogramData[index]
nCount = nCount + 1
plt.subplot(PictureRow, PictureCol, nCount)
plt.xlabel("time(bin)")
plt.ylabel("count")
plt.title(
"pix(29, 10):total count:%d : mutishot:%d" % (
sum(vctData[:61]), (int(vctData[62]) << 10) + int(vctData[63])))
plt.bar(vctX, vctData)
plt.subplots_adjust(left=None, bottom=None, right=None, top=None, wspace=g_wspace, hspace=g_hspace)
# 显示像素点(29, 20)的直方图
index = (29 * 40 + 20)
vctData = dicHistogramData[index]
nCount = nCount + 1
plt.subplot(PictureRow, PictureCol, nCount)
plt.xlabel("time(bin)")
plt.ylabel("count")
plt.title(
"pix(29, 20):total count:%d : mutishot:%d" % (
sum(vctData[:61]), (int(vctData[62]) << 10) + int(vctData[63])))
plt.bar(vctX, vctData)
plt.subplots_adjust(left=None, bottom=None, right=None, top=None, wspace=g_wspace, hspace=g_hspace)
# 显示像素点(29, 38)的直方图
index = (29 * 40 + 38)
vctData = dicHistogramData[index]
nCount = nCount + 1
plt.subplot(PictureRow, PictureCol, nCount)
plt.xlabel("time(bin)")
plt.ylabel("count")
plt.title(
"pix(29, 39):total count:%d : mutishot:%d" % (
sum(vctData[:61]), (int(vctData[62]) << 10) + int(vctData[63])))
plt.bar(vctX, vctData)
plt.subplots_adjust(left=None, bottom=None, right=None, top=None, wspace=g_wspace, hspace=g_hspace)
plt.show(block=False)
# 保持程序运行,直到用户关闭图表
# 关闭交互模式
plt.ioff()
# 显示图表并阻塞程序,直到用户关闭所有图表窗口
plt.show()
# DealWithData_One(list_data)4.2 解析实例
上面知道了输出数据格式,我们可以画出直方图和深度图,下图是手放在距离传感器大概 20cm 的位置处(但是这个图并非是真正的深度图,而是间接反映的,因为它统计的是每个像素收到的总的返回的光子数量):
下图是某几个像素点对应的直方图:
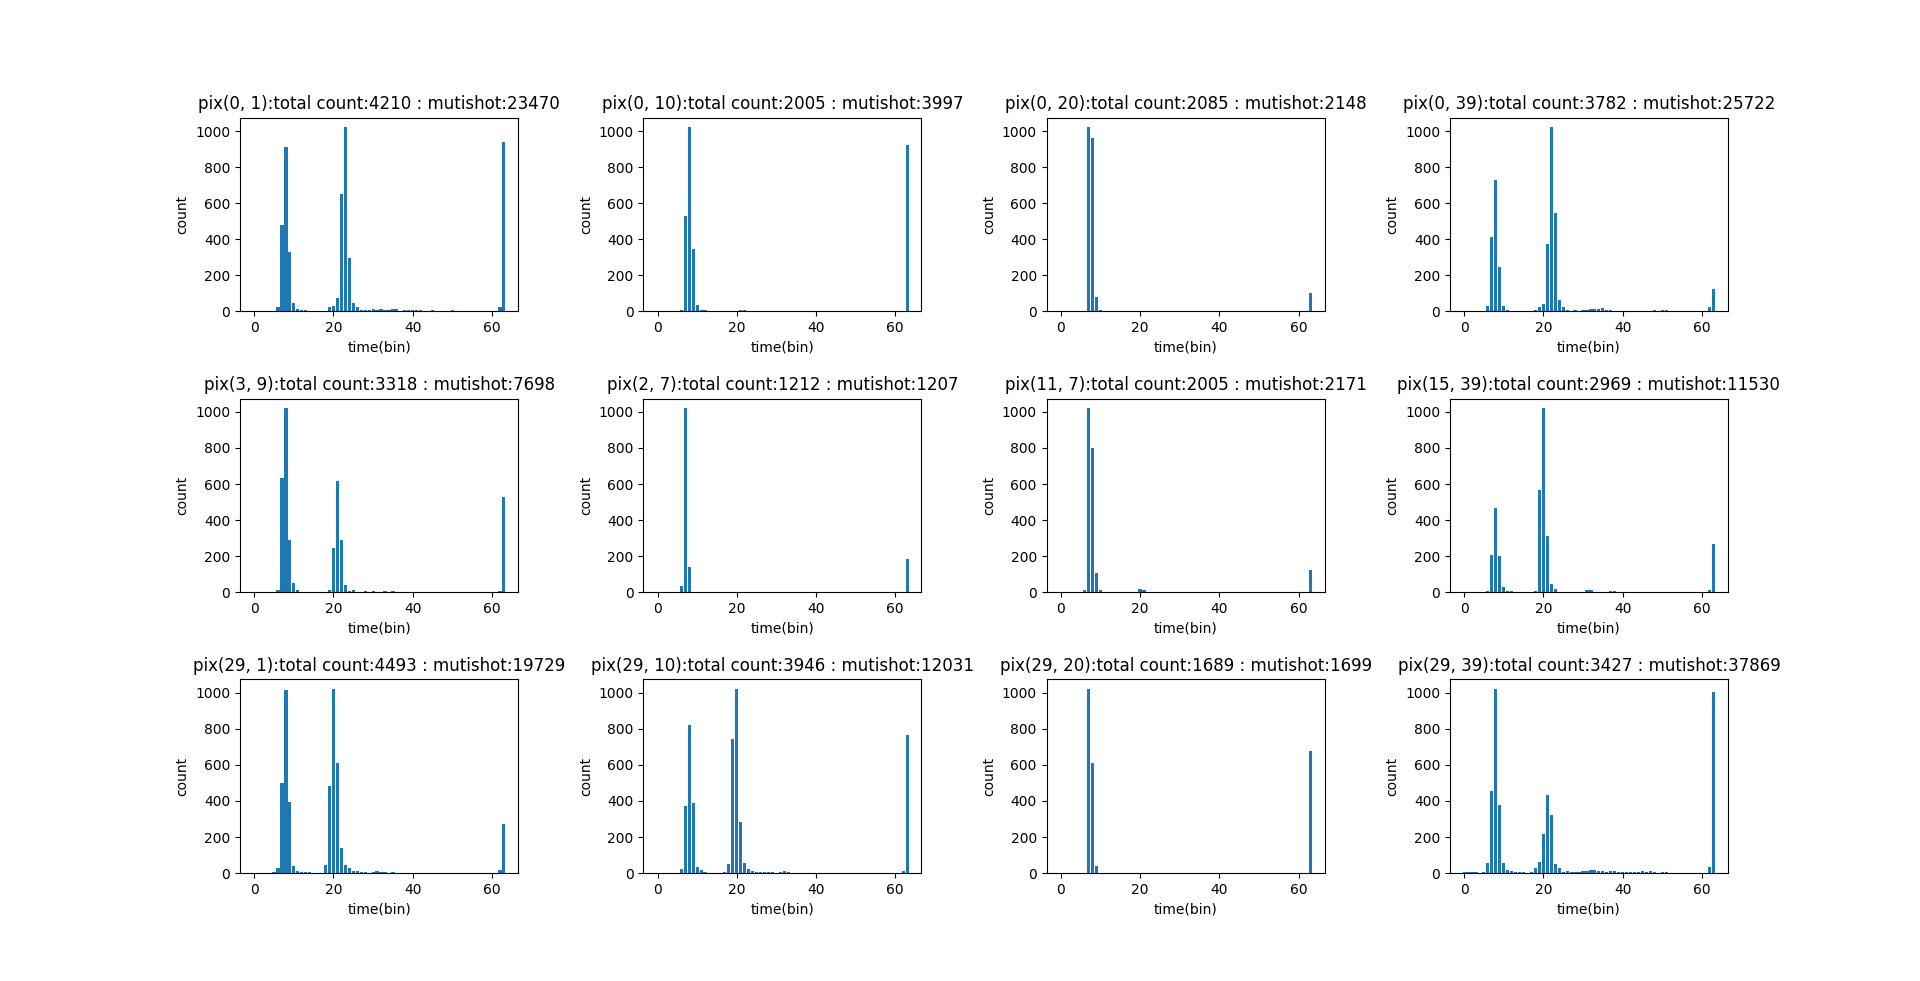
可以看到横坐标是 bin,这些是极小的、等宽的 “时间仓”,每个时间仓代表一个微小的时间窗口,例如几十或几百皮秒。图上体现出来的应该是 61 个 bin,这个总共是 64 个 bin,另外 3 个 bin 截掉是有其他用处,纵坐标是 count 也就是计数,代表落入到 每一个时间仓内的光子数量。
二、Liszt_HistogramViewer
1. 简介
这是一个解析 tof 数据的工具,上传解压后的 raw10 数据后就可以进行解析,获取到对应的直方图。在线解析的网址为:Liszt HistogramViewer - a Hugging Face Space by JohnChiu,但是在线的这个似乎不支持距离的计算,我们也可以下载到本地进行修改。
2. 源码
2.1 app.py
import gradio as gr
import numpy as np
import plotly.graph_objs as go
from scipy.ndimage import convolve
import os

def readRAW(path):

    filesize = os.path.getsize(path)
    print(filesize)
    if filesize == 31*40*64*2:
        output = np.fromfile(path, dtype=np.int16)
    else:
        with open(path, "rb") as f:
            raw_data = f.read()


        raw10 = np.frombuffer(raw_data, dtype=np.uint8)
        n_blocks = raw10.shape[0] // 5

        raw10 = raw10[:n_blocks * 5].reshape(-1, 5)

        B0 = raw10[:, 0].astype(np.uint16)
        B1 = raw10[:, 1].astype(np.uint16)
        B2 = raw10[:, 2].astype(np.uint16)
        B3 = raw10[:, 3].astype(np.uint16)
        B4 = raw10[:, 4]

        p0 = (B0 << 2) | ((B4 >> 0) & 0x03)
        p1 = (B1 << 2) | ((B4 >> 2) & 0x03)
        p2 = (B2 << 2) | ((B4 >> 4) & 0x03)
        p3 = (B3 << 2) | ((B4 >> 6) & 0x03)

        output = np.stack([p0, p1, p2, p3], axis=1).flatten()
    # output = np.fromfile(path, dtype = np.int16).reshape(31,40,64*2)
    # output = np.fromfile(path, dtype = np.int16).reshape(30,40,64)

    return output.reshape(31,40,64)


def load_bin(file):


    # raw_hist = readRAW(file.name)[1:,...].astype(np.float32)
    raw_hist = readRAW(file.name).astype(np.float32)

    print("raw_hist shape:", raw_hist[0,0,:])
    # raw_hist = raw_hist [::-1, ::-1, :]

    print("raw_hist shape:", raw_hist[0,0,:])

    # raw_hist = readRAW(file.name)
    # 默认显示一张 sum 图像

    multishot =  (raw_hist[...,62]*1024 + raw_hist[...,63])
    # multishot[multishot == 0] = 20e3
    normalize_data =  1 / multishot * 20e3

    nor_hist = (raw_hist) * normalize_data[...,np.newaxis]

    # nor_hist = (raw_hist)

    img = np.sum(nor_hist[1:, :, :-2], axis=2)
    img = np.log(img +1)
    norm_img = (img - img.min()) / (img.max())
    img_uint8 = (norm_img * 255).astype(np.uint8)

    img_tc_zoomed = np.repeat(np.repeat(img_uint8, 16, axis=0), 16, axis=1)


    img = np.argmax(nor_hist[1:, :, 5:-2], axis=2)
    norm_img = (img - img.min()) / (img.max() + 1e-8)
    img_uint8 = (norm_img * 255).astype(np.uint8)
    img_tof_zoomed = np.repeat(np.repeat(img_uint8, 16, axis=0), 16, axis=1)

    return img_tc_zoomed,img_tof_zoomed, raw_hist, nor_hist


def plot_pixel_histogram(evt: gr.SelectData, raw_hist, nor_hist):
    # print("evt:", evt)
    x, y = evt.index  # Gradio SelectData 对象
    x = x // 16
    y = y // 16
    raw_values = raw_hist[y+1, x, :]

    tof = np.argmax(nor_hist[y+1, x, :-2])


    kernel = np.array(([1,2,1]), dtype=np.int32)

    result_conv = convolve(raw_values, kernel, mode='constant', cval=0)
    # result_conv = data
    I4 = tof

    I3 = I4-1
    I5 = I4+1
    C3 = result_conv[I3]
    C4 = result_conv[I4]
    C5 = result_conv[I5]
    shift_mat = (C5-C3)/(4.0 * C4 -2.0 * C3 - 2.0 * C5)

    sr_tof = (tof + shift_mat) * 500 * 0.15

    range = 5
    sim_values = nor_hist[y+1, x, tof-range:tof+range+1]
    histogram_sim = raw_hist[1:, :, tof-range:tof+range+1]
    print(sim_values.shape, histogram_sim.shape)

    img = np.tensordot(sim_values,histogram_sim, axes=(0, 2))

    # img = np.log(img +1)
    norm_img = (img - img.min()) / (img.max() + 1e-8)
    img_uint8 = (norm_img * 255).astype(np.uint8)
    img_tof_zoomed = np.repeat(np.repeat(img_uint8, 16, axis=0), 16, axis=1)

    vctEmbd = raw_hist[:1,:,:].flatten().astype(np.int32) >> 2
    fRX_Temp = (vctEmbd[15] << 3) + vctEmbd[14]

    LDVCC = (((((vctEmbd[65] << 8) + vctEmbd[64])) - 1024) / 1024 * 1.7 * 0.9638 + 1.42) * 6
    fTx_Temp = (((vctEmbd[67] << 8) + vctEmbd[66] - 1024) / 5.34 + 30)
    BVD = vctEmbd[23]

    # fTx_Temp = float(vctEmbd [61]+((vctEmbd [63] & 0xc0) << 2)) * 0.178 - 38.18
    # LDVCC = ((((vctEmbd [63]&0x30)<< 4) + vctEmbd [60] - 110) * 13.7 + 5000) / 1000
    y_min = np.min(raw_values[:-2]) - 10
    y_max = np.max(raw_values[:-2]) + 10
    fig = go.Figure()
    fig.add_trace(go.Scatter(y=raw_values, mode="lines+markers"))
    fig.update_layout(
        title=f"Pixel ({x}, {y}) 在所有 {raw_values.shape[0]} 帧的强度变化 {f'ToF: {sr_tof:.1f}  mm'} {f'RX: {fRX_Temp}  °C'} {f'TX: {fTx_Temp:.2f} °C'} {f'LDVCC: {LDVCC:.2f} V'} {f'BVD: {BVD} V'}",
        xaxis_title="帧索引 (T)",
        yaxis_title="强度值",
        yaxis=dict(
        range=[y_min, y_max])  # Set the min and max for y-axis
    )


    return fig, img_tof_zoomed

# def plot_depth(nor_hist):

#     kernel = np.array([[1,1,1], [1,1,1], [1,1,1]])

#     # Create an empty array to store the results
#     output = np.zeros((96, 240, 254))

#         # Perform the convolution along the first two axes (height and width)
#     for i in range(254):
#         output [:, :, i] = convolve(nor_hist [:, :, i], kernel, mode ='constant', cval = 0)

#     modulate1 =  np.arange(1,181,1)
#     modulate = modulate1 * modulate1 /(180* 180)
#     arr  = output [...,: 180]  * modulate

#     tc_bin = np.sum(arr, axis =(0,1))
#     max_id = np.argmax(tc_bin [:-2])

#     # modulate = np.concatenate([a, b, c])
#     pad_head = np.ones(max_id-4)
#     expand_kernel = np.arange(1,13,1) * 0.01
#     pad_tail = np.ones((180-len(pad_head)-len(expand_kernel)))
#     expand_filter = np.concatenate([pad_head, expand_kernel, pad_tail])


#     arr_expandfilter  =  arr *   expand_filter
#     tof  = np.argmax(arr, axis = 2)
#     tof_filter  = np.argmax(arr_expandfilter, axis = 2)

#     return tof, tof_filter

with gr.Blocks() as demo:
    gr.Markdown("## 上传 31,40,64 int16 `.bin/.raw` 文件,点击图像像素查看该像素的 64 帧直方图 ")

    file_input = gr.File(label="上传 .raw/.bin 文件", file_types=[".raw", ".bin"])
    image_tc_display = gr.Image(interactive=True, label="tc")
    image_tof_display = gr.Image(interactive=True, label="tof")

    histogram = gr.Plot(label="像素强度曲线")
    raw_hist = gr.State()
    nor_hist = gr.State()
    image_sim_display = gr.Image(interactive=True, label="sim")

    file_input.change(load_bin, inputs=file_input, outputs=[image_tc_display, image_tof_display, raw_hist, nor_hist])

    image_tof_display.select(plot_pixel_histogram, inputs=[ raw_hist, nor_hist], outputs=[histogram,image_sim_display])

# demo.launch(share = True)
demo.launch(share=False)这里其实有对源码进行过修改,增加了这部分:
    kernel = np.array(([1,2,1]), dtype=np.int32)

    result_conv = convolve(raw_values, kernel, mode='constant', cval=0)
    # result_conv = data
    I4 = tof

    I3 = I4-1
    I5 = I4+1
    C3 = result_conv[I3]
    C4 = result_conv[I4]
    C5 = result_conv[I5]
    shift_mat = (C5-C3)/(4.0 * C4 -2.0 * C3 - 2.0 * C5)

sr_tof = (tof + shift_mat) * 500 * 0.15这段代码实现了一个基于卷积和二次插值的 TOF(Time of Flight)距离精确计算算法。
(1)使用卷积核 [1,2,1] 对原始强度值序列进行平滑处理,减少噪声
(2)在粗略 TOF 值附近取三个点的卷积结果
(3)通过二次插值公式计算亚像素级偏移量:shift_mat = (C5-C3)/(4.0 * C4 -2.0 * C3 - 2.0 * C5)
(3)将偏移量添加到原始 TOF 值上得到精确 TOF 值,并乘以转换因子得到实际距离
该算法通过在峰值附近进行二次插值,实现了比原始帧数更高的距离测量精度,是 TOF 系统中常见的亚像素级距离计算方法。里面有一个常系数 500,这个应该是和厂家的 sensor 相关,我看了 VA6320 的 sdk 以及 yml 传感器配置文件,有一个 Bin size 配置的就是 500,这里应该是表示 500 皮秒。
物理原理:TOF 距离 = (光速 × 飞行时间) / 2
- 光速约为 3×10^8 m/s
- 飞行时间通过直方图的 bin 索引来确定
根据代码分析,从 sdk 或者配置文件中可以知道传感器的每个 bin 对应 500 皮秒(0.5 纳秒)的时间,这样每个 bin 的实际距离贡献约为 (3×10^8 × 500×10^12) / 2 = 0.075 毫米。
计算过程:
(tof + shift_mat)得到精确的飞行时间(bin 单位)
shift_mat 是亚像素级偏移量:
shift_mat = (C5-C3)/(4.0 * C4 -2.0 * C3 - 2.0 * C5)这是核心的插值计算。这个公式来自于一个二次插值方法,用于计算 TOF 值的精确位置。其原理是:通过三个点 (C3, C4, C5) 构建二次多项式,然后计算该二次多项式的极值点(即最大值点),最后通过求导得到精确的偏移量。
乘以 500 将 bin 单位转换为与传感器时间基准相关的值。
乘以 0.15 进行最终的距离标定和单位转换,0.15 可能是经验校准系数,用于补偿系统误差或特定环境因素。
需要注意不是所有 TOF 计算都需要乘以 500,这个值是特定于此传感器和系统的参数。不同的 TOF 传感器会根据其时间分辨率和硬件特性使用不同的转换系数。这个可以和 sensor 厂家确定。
2.2 requirements.txt
gradio
plotly
numpy
scipy3. 结果分析
我们上传对应的 raw 图后,会生成 tof 图,例如:

这里中间是一个竖直放的一个盒子,离传感器平面大概 50cm。我们点击这个 tof 图上对应的像素点就会生成像素强度曲线,就是前面说的直方图:

这里会显示出距离,但是之前测试的时候没有做距离的标定,所以这里的值当前其实是不准的,大概知道是这样就可以了。
参考资料:
探索 dToF 技术:直方图在距离成像中的奥秘-CSDN 博客
TOF 深度相机数据到点云转换(一)_tof 数据-CSDN 博客
dToF 直方图之美_2_dtof 散点 面阵-CSDN 博客
Data Processing Approaches on SPAD-Based d-TOF LiDAR Systems: A Review