
LV010-驱动的框架
一、字符设备驱动框架
可以先看一张思维导图:
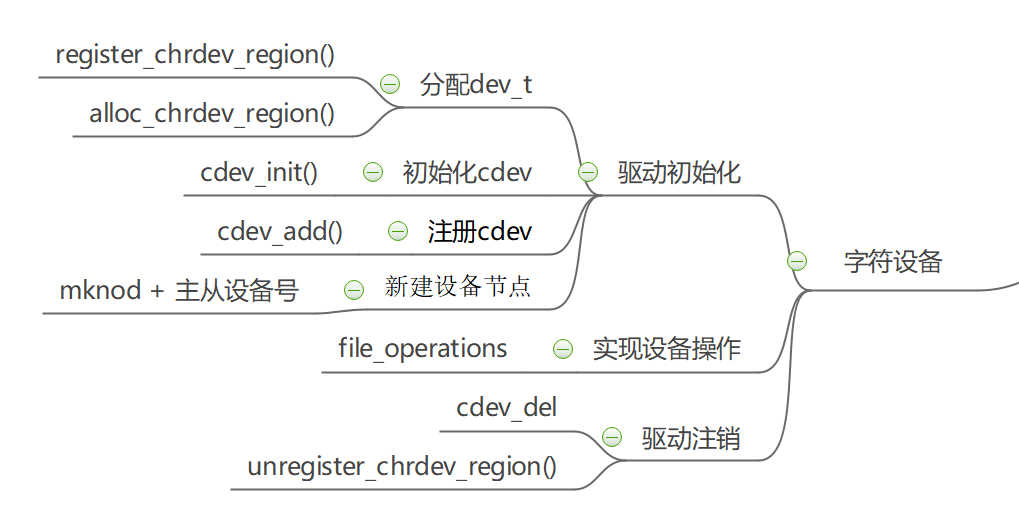
我们创建一个字符设备的时候,首先要的到一个设备号,分配设备号的途径有静态分配和动态分配; 拿到设备的唯一 ID,我们需要实现 file_operation 并保存到 cdev 中,实现 cdev 的初始化; 然后我们需要将我们所做的工作告诉内核,使用 cdev_add()注册 cdev; 最后我们还需要创建设备节点,以便我们后面调用 file_operation 接口。
注销设备时我们需释放内核中的 cdev,归还申请的设备号,删除创建的设备节点。
二、驱动框架解析
1. 设备号
1.1 设备号的申请
在 Linux 系统中每一个设备都有相应的设备号,通过该设备号查找对应的设备,从而进行 之后的文件操作。设备号有主设备号与次设备号之分,主设备号用来表示一个特定的驱动,次设备号用来管理下面的设备。
在 Linux 驱动中可以使用以下两种方法进行设备号的申请:
(1)register_chrdev_region()函数静态申请。
(2)alloc_chrdev_region()函数动态申请。
1.1.1 静态申请
register_chrdev_region()函数声明在 fs.h - include/linux/fs.h - register_chrdev_region,定义在 char_dev.c - fs/char_dev.c - register_chrdev_region:
int register_chrdev_region(dev_t from, unsigned count, const char *name)
{
	// ......
}register_chrdev_region 函数用于静态地为一个字符设备申请一个或多个设备编号。
【参数说明】
- from:dev_t 类型的变量,用于指定字符设备的起始设备号,如果要注册的设备号已经被其他的设备注册了,那么就会导致注册失败。
- count:指定要申请的设备号个数,count 的值不可以太大,否则会与下一个主设备号重叠。
- name:用于指定该设备的名称,我们可以在/proc/devices 中看到该设备。
【返回值】 返回 0 表示申请成功,失败则返回错误码。
(1)关于设备编号,我们可以去 devices.txt - Documentation/admin-guide/devices.txt 中看一下,里面提供了主设备号以及次设备号的一些参考,比如 devices.txt - Documentation/admin-guide/devices.txt - 200 char:
txt200 char Veritas VxVM configuration interface 0 = /dev/vx/config Configuration access node 1 = /dev/vx/trace Volume i/o trace access node 2 = /dev/vx/iod Volume i/o daemon access node 3 = /dev/vx/info Volume information access node 4 = /dev/vx/task Volume tasks access node 5 = /dev/vx/taskmon Volume tasks monitor daemon(2)我们静态申请设备号的时候可以使用以下宏生成设备号:
c#define MINORBITS 20 /*次设备号位数*/ #define MINORMASK ((1U << MINORBITS) - 1) /*次设备号掩码*/ #define MAJOR(dev) ((unsigned int) ((dev) >> MINORBITS))/*dev 右移 20 位得到主设备号*/ #define MINOR(dev) ((unsigned int) ((dev) & MINORMASK)) /*与次设备掩码与,得到次设备号*/ #define MKDEV(ma,mi) (((ma) << MINORBITS) | (mi)) /*MKDEV 宏将主设备号(ma)左移 20 位, 然后与次设备号(mi)相与,得到设备号*/
1.1.2 动态申请
alloc_chrdev_region()函数声明在 fs.h - include/linux/fs.h - alloc_chrdev_region,定义在 char_dev.c - fs/char_dev.c - alloc_chrdev_region:
int alloc_chrdev_region(dev_t *dev, unsigned baseminor, unsigned count,
			const char *name)
{
	//......
}调用 alloc_chrdev_region 函数,内核会自动分配给我们一个尚未使用的主设备号。 我们可以通过命令“cat /proc/devices”查询内核分配的主设备号。
【参数说明】
- dev:指向 dev_t 类型数据的指针变量,用于存放分配到的设备编号的起始值;
- baseminor:次设备号的起始值,通常情况下,设置为 0;
- count、name:同 register_chrdev_region 类型,用于指定需要分配的设备编号的个数以及设备的名称。
【返回值】 返回 0 表示申请成功,失败则返回错误码
1.1.3 register_chrdev 函数
除了上述的两种,内核还提供了 register_chrdev 函数用于分配设备号。该函数是一个内联函数,它不 仅支持静态申请设备号,也支持动态申请设备号,并将主设备号返回,函数定义在 fs.h - include/linux/fs.h - register_chrdev:
static inline int register_chrdev(unsigned int major, const char *name,
				  const struct file_operations *fops)
{
	return __register_chrdev(major, 0, 256, name, fops);
}【参数说明】
- major:用于指定要申请的字符设备的主设备号,等价于 register_chrdev_region 函数,当设置为 0 时,内核会自动分配一个未使用的主设备号。
- name:用于指定字符设备的名称
- fops:用于操作该设备的函数接口指针。
【返回值】 主设备号。
我们从函数定义中可以看到,使用 register_chrdev 函数向内核申请设备号,同一类字 符设备(即主设备号相同),会在内核中申请了 256 个,通常情况下,我们不需要用到这么多个设备,这就造成了极大的资源浪费。所以一般也不用这个函数。
1.2 设备号的释放
1.2.1 unregister_chrdev_region 函数
当我们删除字符设备时候,我们需要把分配的设备编号交还给内核,对于使用 register_chrdev_region 函数 以及 alloc_chrdev_region 函数分配得到的设备编号,可以使用 unregister_chrdev_region 函数实现该功能。该函数声明在 fs.h - include/linux/fs.h - unregister_chrdev_region,定义在 char_dev.c - fs/char_dev.c - unregister_chrdev_region
/**
 * unregister_chrdev_region() - unregister a range of device numbers
 * @from: the first in the range of numbers to unregister
 * @count: the number of device numbers to unregister
 *
 * This function will unregister a range of @count device numbers,
 * starting with @from.  The caller should normally be the one who
 * allocated those numbers in the first place...
 */
void unregister_chrdev_region(dev_t from, unsigned count)
{
	// ......
}【参数说明】
- from:指定需要注销的字符设备的设备编号起始值,我们一般将定义的 dev_t 变量作为实参。
- count:指定需要注销的字符设备编号的个数,该值应与申请函数的 count 值相等,通常采用宏定义进行管理。
【返回值】 无
1.2.2 unregister_chrdev 函数
使用 register_chrdev 函数申请的设备号,则应该使用 unregister_chrdev 函数进行注销。这也是一个内联函数,定义在 fs.h - include/linux/fs.h - unregister_chrdev:
static inline void unregister_chrdev(unsigned int major, const char *name)
{
	__unregister_chrdev(major, 0, 256, name);
}【参数说明】
- major:指定需要释放的字符设备的主设备号,一般使用 register_chrdev 函数的返回值作为实参。
- name:执行需要释放的字符设备的名称。
【返回值】 无
2. 字符设备
2.1 字符设备的定义
Linux 内核提供了两种方式来定义字符设备,如下所示:
//第一种方式
static struct cdev chrdev;
//第二种方式
struct cdev *cdev_alloc(void);第一种方式,就是我们常见的变量定义;第二种方式,是内核提供的动态分配方式,调用该函数之 后,会返回一个 struct cdev 类型的指针,用于描述字符设备。struct cdev 结构体定义在 cdev.h - include/linux/cdev.h - struct cdev:
struct cdev {
	struct kobject kobj; // 内嵌的内核对象.
	struct module *owner;// 该字符设备所在的内核模块的对象指针
	const struct file_operations *ops; // 该结构描述了字符设备所能实现的方法,是极为关键的一个结构体.
	struct list_head list;// 用来将已经向内核注册的所有字符设备形成链表
	dev_t dev;            // 字符设备的设备号,由主设备号和次设备号构成.
	unsigned int count;   // 隶属于同一主设备号的次设备号的个数.
} __randomize_layout;cdev_alloc 函数定义在 char_dev.c - fs/char_dev.c - cdev_alloc:
/**
 * cdev_alloc() - allocate a cdev structure
 *
 * Allocates and returns a cdev structure, or NULL on failure.
 */
struct cdev *cdev_alloc(void)
{
	// ......
}2.2 字符设备的初始化
2.2.1 cdev_init 函数
前面我们已经提到过了,编写一个字符设备最重要的事情,就是要实现 file_operations 这个结构体中的函数。 实现之后,如何将该结构体与我们的字符设备结构体相关联呢?内核提供了 cdev_init 函数,来实现这个过程。cdev_init 函数定义在 char_dev.c - fs/char_dev.c - cdev_init:
/**
 * cdev_init() - initialize a cdev structure
 * @cdev: the structure to initialize
 * @fops: the file_operations for this device
 *
 * Initializes @cdev, remembering @fops, making it ready to add to the
 * system with cdev_add().
 */
void cdev_init(struct cdev *cdev, const struct file_operations *fops)
{
	// ......
}函数参数和返回值如下:
【参数说明】
- cdev:struct cdev 类型的指针变量,指向需要关联的字符设备结构体;
- fops:file_operations 类型的结构体指针变量,一般将实现操作该设备的结构体 file_operations 结构体作为实参。
【返回值】 无
2.2.2 使用实例
static struct cdev g_cdev_dev;    // 定义 cdev 结构体类型的变量 g_cdev_dev

static int chrdev_open(struct inode *inode, struct file *file);
static ssize_t chrdev_read(struct file *file,char __user *buf, size_t size, loff_t *off);
static ssize_t chrdev_write(struct file *file,const char __user *buf,size_t size,loff_t *off);
static int chrdev_release(struct inode *inode, struct file *file);

static struct file_operations g_cdev_dev_ops = {
    .owner = THIS_MODULE,//将 owner 字段指向本模块,可以避免在模块的操作正在被使用时卸载该模块
	.open = chrdev_open,
	.read = chrdev_read,
	.write = chrdev_write,
	.release = chrdev_release,
}; // 定义 file_operations 结构体类型的变量 g_cdev_dev_ops

// 模块入口函数
static int __init chrdev_xxx_init(void)
{
	// ......
    cdev_init(&g_cdev_dev, &g_cdev_dev_ops); // 使用 cdev_init()函数初始化 g_cdev_dev 结构体,并链接到 g_cdev_dev_ops 结构体
	// ......
    return 0;
}2.3 字符设备的注册
cdev_add 函数用于向内核的 cdev_map 散列表添加一个新的字符设备,它定义在 char_dev.c - fs/char_dev.c - cdev_add:
/**
 * cdev_add() - add a char device to the system
 * @p: the cdev structure for the device
 * @dev: the first device number for which this device is responsible
 * @count: the number of consecutive minor numbers corresponding to this
 *         device
 *
 * cdev_add() adds the device represented by @p to the system, making it
 * live immediately.  A negative error code is returned on failure.
 */
int cdev_add(struct cdev *p, dev_t dev, unsigned count)
{
	// ......
}【参数说明】
- p:struct cdev 类型的指针,用于指定需要添加的字符设备;
- dev:dev_t 类型变量,用于指定设备的起始编号;
- count:指定注册多少个设备。
【返回值】 错误码
2.4 字符设备的注销
字符设备删除所用到的函数为 cdev_del(),它定义在 char_dev.c - fs/char_dev.c - cdev_del:
/**
 * cdev_del() - remove a cdev from the system
 * @p: the cdev structure to be removed
 *
 * cdev_del() removes @p from the system, possibly freeing the structure
 * itself.
 *
 * NOTE: This guarantees that cdev device will no longer be able to be
 * opened, however any cdevs already open will remain and their fops will
 * still be callable even after cdev_del returns.
 */
void cdev_del(struct cdev *p)
{
	// ......
}【参数说明】
- p:struct cdev 类型的指针,用于指定需要删除的字符设备;
【返回值】 无
从系统中删除 cdev,cdev 设备将无法再打开,但任何已经打开的 cdev 将保持不变, 即使在 cdev_del 返回后,它们的 FOP 仍然可以调用。
3. 设备节点
在 Linux 操作系统中一切皆文件,设备访问也是通过文件的方式来进行的,对于用来进行 设备访问的文件称之为设备节点,设备节点被创建在/dev 目录下,将内核中注册的设备与用户 层进行链接,这样应用程序才能对设备进行访问。
根据设备节点的创建方式不同,分为了手动创建设备节点和自动创建设备节点。
3.1 手动创建设备节点
3.1.1 命令格式
当向内核注册好设备后,可以使用 mknod 命令创建设备节点。
mknod 设备名 设备类型 主设备号 次设备号设备名就是我们要创建的节点名称,比如
/dev/driver_test。设备类型,就是这个设备是字符设备还是块设备还是网络设备。当类型为”p”时可不指定主设备号和次设备号,否则它们是必须指定的。 如果主设备号和次设备号以”0x”或”0X”开头,它们会被视作十六进制数来解析;如果以”0”开头,则被视作八进制数; 其余情况下被视作十进制数。可用的类型包括:
b 创建(有缓冲的)区块特殊文件
c, u 创建(没有缓冲的)字符特殊文件
p 创建先进先出(FIFO)特殊文件
注意:根文件系统需要支持这个 mknod 命令才行。
3.1.2 mknod 流程
mknod 命令最终会调用内核中的函数完成设备节点的创建。
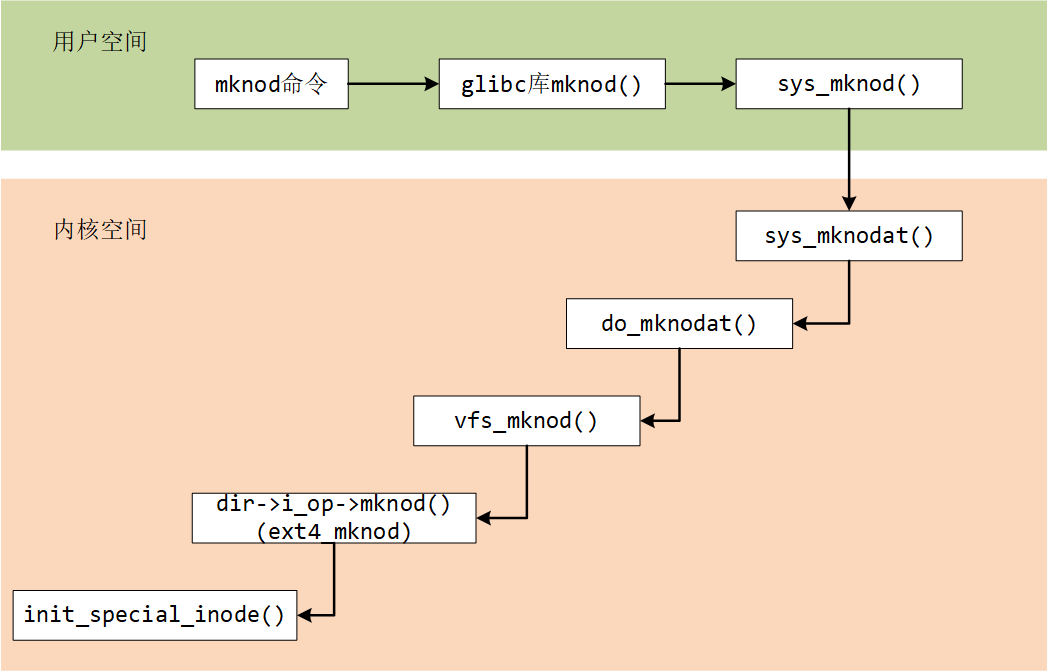
当我们使用上述命令,创建了一个字符设备文件时,实际上就是创建了一个设备节点 inode 结构体, 并且将该设备的设备编号记录在成员 i_rdev,将成员 f_op 指针指向了 def_chr_fops 结构体。 这就是 mknod 负责的工作内容,具体看这个 shmem.c - mm/shmem.c - shmem_get_inode 函数:
static struct inode *shmem_get_inode(struct super_block *sb, const struct inode *dir,
				     umode_t mode, dev_t dev, unsigned long flags)
{
	// ......
	inode = new_inode(sb);
	if (inode) {
		// ......
		switch (mode & S_IFMT) {
		default:
			inode->i_op = &shmem_special_inode_operations;
			init_special_inode(inode, mode, dev);
			break;
		// ......
		}

		lockdep_annotate_inode_mutex_key(inode);
	} else
		shmem_free_inode(sb);
	return inode;
}mknod 命令最终执行 init_special_inode 函数这个函数定义在 inode.c - fs/inode.c - init_special_inode:
void init_special_inode(struct inode *inode, umode_t mode, dev_t rdev)
{
	inode->i_mode = mode;
	if (S_ISCHR(mode)) {
		inode->i_fop = &def_chr_fops;
		inode->i_rdev = rdev;
	} else if (S_ISBLK(mode)) {
		inode->i_fop = &def_blk_fops;
		inode->i_rdev = rdev;
	} else if (S_ISFIFO(mode))
		inode->i_fop = &pipefifo_fops;
	else if (S_ISSOCK(mode))
		;	/* leave it no_open_fops */
	else
		printk(KERN_DEBUG "init_special_inode: bogus i_mode (%o) for"
				  " inode %s:%lu\n", mode, inode->i_sb->s_id,
				  inode->i_ino);
}
EXPORT_SYMBOL(init_special_inode);第 4 - 17 行判断文件的 inode 类型,如果是字符设备类型,则把 def_chr_fops 作为该文件的操作接口,并把设备号记录在 inode→ i_rdev。
Tips:inode 上的 file_operation 并不是自己构造的 file_operation,而是字符设备通用的 def_chr_fops, 那么自己构建的 file_operation 等在应用程序调用 open 函数之后,才会绑定在文件上。
3.1.3 使用实例
上面我们看到手动创建设备节点需要知道设备的主设备号和次设备号,我们只是创建了一个字符设备,申请了设备号,只能在这个 /proc/devices 文件中看到主设备号。所以要是手动创建设备节点的话,我们需要在申请设备号后打印出来为设备分配的主设备号和次设备号。知道了主设备号和次设备号的时候,我们可以这样创建设备节点:
mkmod /dev/chrdev_node c 246 03.2 自动创建设备节点
3.2.1 linux 热拔插机制
能不能让系统自动创建设备节点?除了使用 mknod 命令手动创建设备节点,还可以利用 linux 的 udev、mdev 机制,这就涉及到 linux 的热拔插机制了。
Linux 的热插拔支持是一个连接底层硬件、内核空间和用户空间程序的机制,且一直在变化。而设备文件系统有 devfs、mdev、udev 这三种。
在对待设备文件这块,Linux 改变了几次策略。在 Linux 早期,设备文件仅仅是是一些带有适当的属性集的普通文件,它由 mknod 命令创建,文件存放在/dev 目录下。后来,采用了 devfs, 一个基于内核的动态设备文件系统,他首次出现在 2.3.46 内核中。Mandrake,Gentoo 等 Linux 分发版本采用了这种方式。devfs 创建 的设备文件是动态的。但是 devfs 有一些严重的限制,从 2.6.13 版本后移走了。目前取代他的是 udev(PC 机上的 linux 中)和 mdev(嵌入式 linux 系统)。
我们的 ARM 开发板上移植的 busybox 一般都有 mdev 机制,mdev 是 busybox 自带的一个简化版的 udev。mdev 也是使用 uevent 机制处理热插拔问题的用户空间程序。
mdev 是基于 uevent_helper 机制的,它在系统启动时修改了内核中的 uevnet_helper 变量(通过写 /proc/sys/kernel/hotplug ),值为“/sbin/mdev”。这样内核产生 uevent 时会调用 uevent_helper 所指的用户级程序,也就是 mdev,来执行相应的热拔插动作。mdev 使用的 uevent_helper 机制实现简单,适合用在嵌入式系统中。
那么就可以使用 mdev 机制来自动创建设备节点。文件系统里,在哪里设置了 mdev 机制?在 etc/init.d/rcS 文件里有一句:
echo /sbin/mdev > /proc/sys/kernel/hotplug要是没有的话,可以加上。
3.2.2 udev 简介
udev 是基于 netlink 机制的通过监听内核发送的 uevent 来执行相应的热拔插动作,它能根据系统中硬件设备的状态动态的更新设备文件,包括设备文件的创建,删除,权限等。它能根据系统中硬件设备的状态动态的更新设备文件,包括设备文件的创建,删除,权限等。udev 的初始化脚本在系统启动时创建设备节点,并且当插入新设备——加入驱动模块——在 sysfs 上注册新的数据后,udev 会创新新的设备节点。
udev 是一个工作在用户空间的工具,它必须有内核中的 sysfs 和 tmpfs 支持,sysfs 为 udev 提供设备入口和 uevent 通道,tmpfs 为 udev 设备文件提供存放空间。
注意,udev 是通过对内核产生的设备文件修改,或增加别名的方式来达到自定义设备文件的目的。但是,udev 是用户模式程序,其不会更改内核行为。也就是说,内核仍然会创建 sda,sdb 等设备文件,而 udev 可根据设备的唯一信息来区分不同的设备,并产生新的设备文件(或链接)。
udev 通过在 sysfs 的 /class/ 和/block/ 目录树中查找一个称为 dev 的文件,以确定所创建的设备节点文件的主次设备号。所以要使用 udev,驱动必须为设备在 sysfs 中创建类接口及其 dev 属性文件,方法和 sculld 模块中创建 dev 属性相同。
基本工作原理如下:
当系统内核发现系统中添加或者删除了某个新的设备时,内核检测到后会产生一个 hotplug event 并查找 /proc/sys/kernel/hotplug 去找出管理设备连接的用户空间程序。若 udev 已经启动,内核会通知 udev 去检测 sysfs 中关于这个新设备的信息并创建设备节点。udev 就会去执行 udevd,以便让 udevd 可以产生或者删除硬件的设备文件。
接着 udevd 会通过 libsysfs 读取 sys 文件系统,以便取得该硬件设备的信息(如/dev/tty0,在 /sys/class/tty/tty0/dev 存放的是”4:0”,即/dev/tty0 的主次设备号);然后再向 namedev 查询该外部设备的设备文件信息,例如文件的名称、权限等。最后,udevd 就依据上述的结果,在/dev/目录中自动建立该外部设备的设备文件,同时在/etc/udev/rules.d 下检查有无针对该设备的使用权限。
当设备插入或移除时,hotplug 机制会让内核会通过 netlink socket 通讯(内核调用 kobject_uevent 函数发送 netlink message 给用户空间,该功能由内核的统一设备模型里的子系统这一层实现)向用户传递一个事件的发生,udevd 通过标准的 socket 机制,创建 socket 连接来获取内核广播的 uevent 事件 并解析这些 uevent 事件。
运行 udevd 以后,使用 udevtrigger 的时候,会把内核中已存在的设备的节点创建出来,其具体过程为:udevtrigger 通过向/sysfs 文件系统下现有设备的 uevent 节点写 "add" 字符串,从而触发 uevent 事件,使得 udevd 能够接收到这些事件,并创建 buildin 的设备驱动的设备节点连同任何已 insmod 的模块的设备节点。
大概就先了解到这里,后续有必要的话再详细学习。
3.2.3 相关函数
前面大概了解了 udev,其实设备文件的自动创建就是利用 udev(mdev)机制来实现,多数情况下采用自动创建设备节点 的方式。
udev(mdev)可以检测系统中硬件设备状态,可以根据系统中硬件设备状态来创建或者 删除设备文件。在驱动中首先使用 class_create()函数对 class 进行创建,这个类存放于 /sys/class/ 目录下,之后使用 device_create() 函数创建相应的设备,在进行模块加载时,用户空间中的 udev 会自动响应 device_create()函数,寻找对应的类从而创建设备节点。
3.2.3.1 类的创建
class_create()函数用于创建一个类,它定义在 device.h - include/linux/device.h - class_create:
/* This is a #define to keep the compiler from merging different
 * instances of the __key variable */
#define class_create(owner, name)		\
({						\
	static struct lock_class_key __key;	\
	__class_create(owner, name, &__key);	\
})该函数用于动态创建设备的逻辑类,并完成部分字段的初始化,然后将其添加进 Linux 内核系统。
【参数说明】
- owner:struct module 结构体类型的指针,指向函数即将创建的这个 struct class 的模块。 一般赋值为 THIS_MODULE。
- name:char 类型的指针,代表即将创建的 struct class 变量的名字。 这里的名字将会在
/sys/class中出现。
【返回值】 struct class * 类型的结构体。
3.2.3.2 类的销毁
class_destroy()函数用于销毁创建的类,它定义在 class.c - drivers/base/class.c - class_destroy:
/**
 * class_destroy - destroys a struct class structure
 * @cls: pointer to the struct class that is to be destroyed
 *
 * Note, the pointer to be destroyed must have been created with a call
 * to class_create().
 */
void class_destroy(struct class *cls)
{
	if ((cls == NULL) || (IS_ERR(cls)))
		return;

	class_unregister(cls);
}用于删除设备的逻辑类,即从 Linux 内核系统中删除设备的逻辑类。
【参数说明】
- cls:要销毁的类的指针。
【返回值】 无
3.2.3.3 设备节点创建
device_create()函数用于创建一个设备并将其注册到文件系统,它定义在 core.c - drivers/base/core.c - device_create:
/**
 * device_create - creates a device and registers it with sysfs
 * @class: pointer to the struct class that this device should be registered to
 * @parent: pointer to the parent struct device of this new device, if any
 * @devt: the dev_t for the char device to be added
 * @drvdata: the data to be added to the device for callbacks
 * @fmt: string for the device's name
 *
 * This function can be used by char device classes.  A struct device
 * will be created in sysfs, registered to the specified class.
 *
 * A "dev" file will be created, showing the dev_t for the device, if
 * the dev_t is not 0,0.
 * If a pointer to a parent struct device is passed in, the newly created
 * struct device will be a child of that device in sysfs.
 * The pointer to the struct device will be returned from the call.
 * Any further sysfs files that might be required can be created using this
 * pointer.
 *
 * Returns &struct device pointer on success, or ERR_PTR() on error.
 *
 * Note: the struct class passed to this function must have previously
 * been created with a call to class_create().
 */
struct device *device_create(struct class *class, struct device *parent,
			     dev_t devt, void *drvdata, const char *fmt, ...)
{
	// ......
}
EXPORT_SYMBOL_GPL(device_create);它会在 class 类中下创建一个设备属性文件,udev 会自动识别从而进行设备节点的创建。
【参数说明】
- class:指向这个设备应该注册到的 struct 类的指针;
- parent:指向此新设备的父结构设备(如果有)的指针;如果没有就指定为 NULL。
- devt:要添加的 char 设备的设备号;
- drvdata:要添加到设备进行回调的数据;没有则指定为 NULL。
- fmt:设备名称,这里的名称将会在
/dev/下显示。
【返回值】 成功时返回 struct device 结构体指针, 错误时返回 ERR_PTR().
3.2.3.4 设备节点的销毁
删除使用 device_create 函数创建的设备的时候使用 device_destroy()函数,它定义在 core.c - drivers/base/core.c - device_create:
/**
 * device_destroy - removes a device that was created with device_create()
 * @class: pointer to the struct class that this device was registered with
 * @devt: the dev_t of the device that was previously registered
 *
 * This call unregisters and cleans up a device that was created with a
 * call to device_create().
 */
void device_destroy(struct class *class, dev_t devt)
{
	struct device *dev;

	dev = class_find_device(class, NULL, &devt, __match_devt);
	if (dev) {
		put_device(dev);
		device_unregister(dev);
	}
}
EXPORT_SYMBOL_GPL(device_destroy);这个函数删除 class 类中的设备属性文件,udev 会自动识别从而进行设备节点的删除。
【参数说明】
- class:指定所要销毁的设备所从属的类。
- devt:以前注册的设备的设备号;
【返回值】 无
三、open 函数
1. 过程简介
使用设备之前我们通常都需要调用 open 函数,这个函数一般用于设备专有数据的初始化,申请相关资源及进行设备的初始化等工作, 对于简单的设备而言,open 函数可以不做具体的工作,你在应用层通过系统调用 open 打开设备时, 如果打开正常,就会得到该设备的文件描述符,之后,我们就可以通过该描述符对设备进行 read 和 write 等操作; open 函数到底做了些什么工作?下图中列出了 open 函数执行的大致过程。
用户空间使用 open()系统调用函数打开一个字符设备时(int fd = open(“dev/xxx”, O_RDWR))大致有以下过程:
- 在虚拟文件系统 VFS 中的查找对应与字符设备对应 struct inode 节点
- 遍历散列表 cdev_map,根据 inod 节点中的 cdev_t 设备号找到 cdev 对象
- 创建 struct file 对象(系统采用一个数组来管理一个进程中的多个被打开的设备,每个文件秒速符作为数组下标标识了一个设备对象)
- 初始化 struct file 对象,将 struct file 对象中的 file_operations 成员指向 struct cdev 对象中的 file_operations 成员(file→ fops = cdev→ fops)
- 回调 file→ fops→ open 函数。
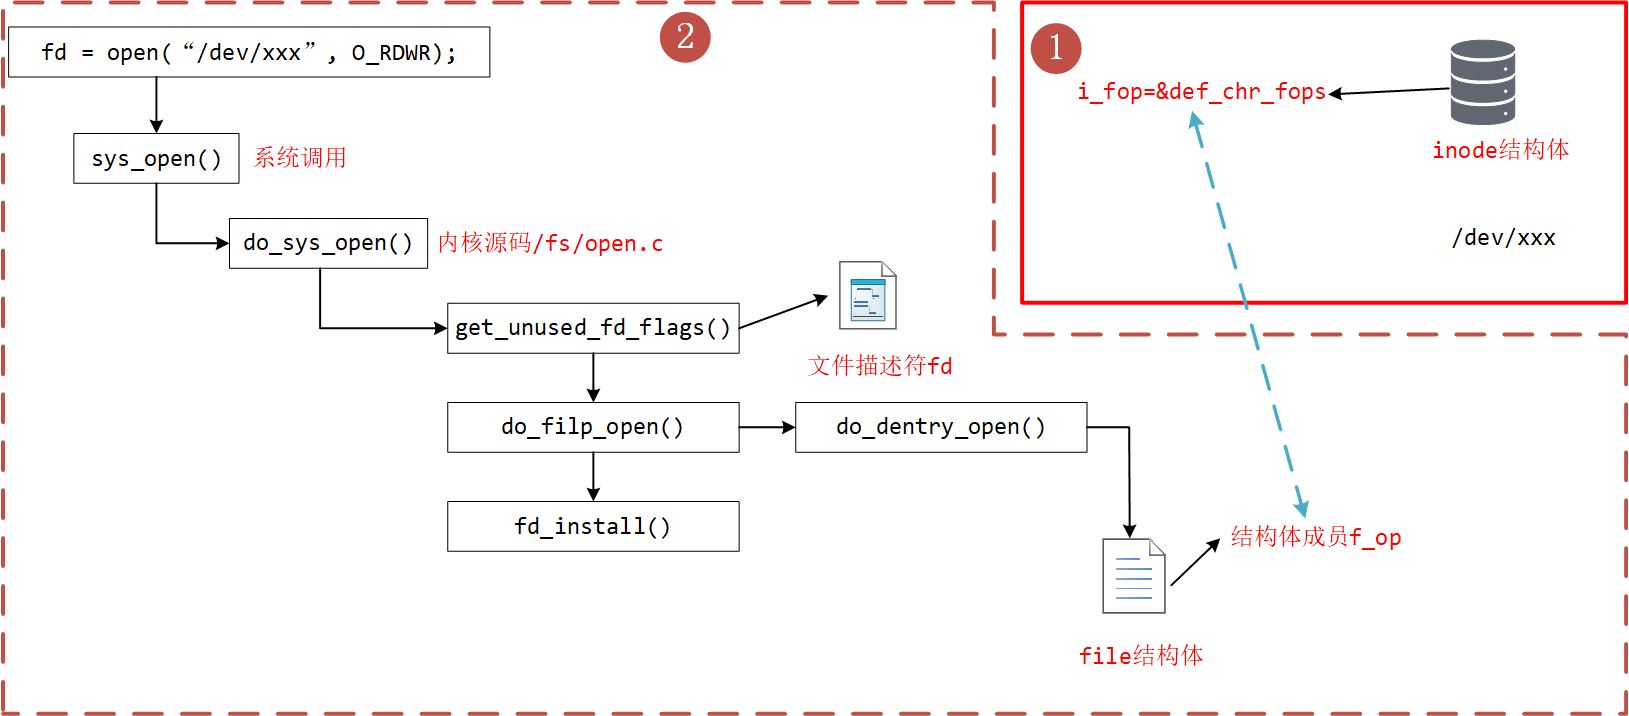
2. 过程分析
我们使用的 open 函数在内核中对应的是 sys_open 函数,sys_open 函数又会调用 do_sys_open 函数。在 do_sys_open 函数中, 首先调用函数 get_unused_fd_flags 来获取一个未被使用的文件描述符 fd,该文件描述符就是我们最终通过 open 函数得到的值。 紧接着,又调用了 do_filp_open 函数,该函数通过调用函数 get_empty_filp 得到一个新的 file 结构体,之后的代码做了许多复杂的工作, 如解析文件路径,查找该文件的文件节点 inode 等,直接来到了函数 do_dentry_open 函数,这个函数定义在 open.c - fs/open.c - do_dentry_open:
static int do_dentry_open(struct file *f,
			  struct inode *inode,
			  int (*open)(struct inode *, struct file *))
{
	// ......
	f->f_op = fops_get(inode->i_fop);
	if (unlikely(WARN_ON(!f->f_op))) {
		error = -ENODEV;
		goto cleanup_all;
	}
	// ......
	if (!open)
		open = f->f_op->open;
	if (open) {
		error = open(inode, f);
		if (error)
			goto cleanup_all;
	}
	// ......
}- 第 6 行:使用 fops_get 函数来获取该文件节点 inode 的成员变量 i_fop,在前面我们使用 mknod 创建字符设备文件时,将 def_chr_fops 结构体赋值给了该设备文件 inode 的 i_fop 成员。
- 第 13 行:到了这里,我们新建的 file 结构体的成员 f_op 就指向了 def_chr_fops。
def_chr_fops 结构体定义在 char_dev.c - fs/char_dev.c - def_chr_fops:
/*
 * Dummy default file-operations: the only thing this does
 * is contain the open that then fills in the correct operations
 * depending on the special file...
 */
const struct file_operations def_chr_fops = {
	.open = chrdev_open,
	.llseek = noop_llseek,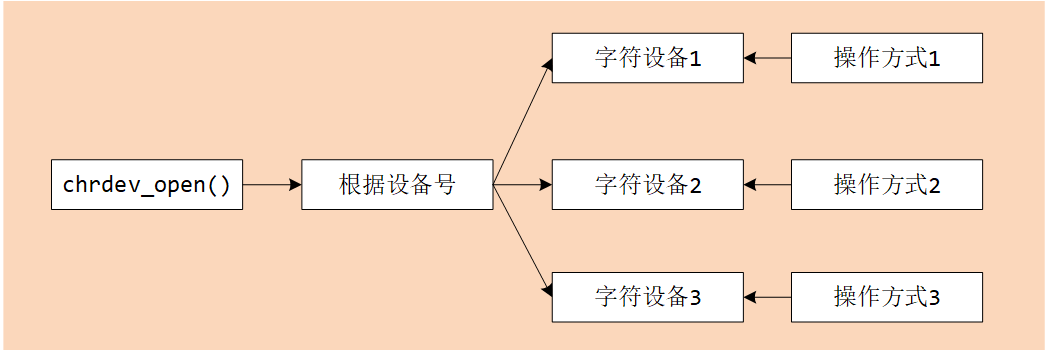
};最终,会执行 def_chr_fops 中的 open 函数,也就是 chrdev_open 函数,可以理解为一个字符设备的通用初始化函数,根据字符设备的设备号, 找到相应的字符设备,从而得到操作该设备的方法:
chrdev_open 函数定义在 char_dev.c - fs/char_dev.c - chrdev_open:
/*
 * Called every time a character special file is opened
 */
static int chrdev_open(struct inode *inode, struct file *filp)
{
	const struct file_operations *fops;
	struct cdev *p;
	struct cdev *new = NULL;
	int ret = 0;

	spin_lock(&cdev_lock);
	p = inode->i_cdev;
	if (!p) {
		struct kobject *kobj;
		int idx;
		spin_unlock(&cdev_lock);
		kobj = kobj_lookup(cdev_map, inode->i_rdev, &idx);
		if (!kobj)
			return -ENXIO;
		new = container_of(kobj, struct cdev, kobj);
		spin_lock(&cdev_lock);
		/* Check i_cdev again in case somebody beat us to it while
		   we dropped the lock. */
		p = inode->i_cdev;
		if (!p) {
			inode->i_cdev = p = new;
			list_add(&inode->i_devices, &p->list);
			new = NULL;
		} else if (!cdev_get(p))
			ret = -ENXIO;
	} else if (!cdev_get(p))
		ret = -ENXIO;
	spin_unlock(&cdev_lock);
	cdev_put(new);
	if (ret)
		return ret;

	ret = -ENXIO;
	fops = fops_get(p->ops);
	if (!fops)
		goto out_cdev_put;

	replace_fops(filp, fops);
	if (filp->f_op->open) {
		ret = filp->f_op->open(inode, filp);
		if (ret)
			goto out_cdev_put;
	}

	return 0;

 out_cdev_put:
	cdev_put(p);
	return ret;
}在 Linux 内核中,使用结构体 cdev 来描述一个字符设备。
- 第 12 行:inode→ i_rdev 中保存了字符设备的设备编号,
- 第 17 行:通过函数 kobj_lookup 函数便可以找到该设备文件 cdev 结构体的 kobj 成员,
- 第 20 行:再通过函数 container_of 便可以得到该字符设备对应的结构体 cdev。函数 container_of 的作用就是通过一个结构变量中一个成员的地址找到这个结构体变量的首地址。同时,将 cdev 结构体记录到文件节点 inode 中的 i_cdev,便于下次打开该文件。
- 第 43 ~ 48 行:函数 chrdev_open 最终将该文件结构体 file 的成员 f_op 替换成了 cdev 对应的 ops 成员,并执行 ops 结构体中的 open 函数。
最后,调用上图的 fd_install 函数,完成文件描述符和文件结构体 file 的关联,之后我们使用对该文件描述符 fd 调用 read、write 函数, 最终都会调用 file 结构体对应的函数,实际上也就是调用 cdev 结构体中 ops 结构体内的相关函数。
3. 总结
总结一下整个过程,当我们使用 open 函数,打开设备文件时,会根据该设备的文件的设备号找到相应的设备结构体, 从而得到了操作该设备的方法。也就是说如果我们要添加一个新设备的话,我们需要提供一个设备号, 一个设备结构体以及操作该设备的方法(file_operations 结构体)。
参考资料: