
LV105-内核怎么处理的
一、设备树的处理过程
从源代码文件 dts 文件开始,设备树的处理过程为:

(1)dts 在 PC 机上被编译为 dtb 文件;
(2)u-boot 把 dtb 文件传给内核;
(3)内核解析 dtb 文件,把每一个节点都转换为 struct device_node 结构体;
(4)对于某些 struct device_node 结构体,会被转换为 struct platform_device 结构体。
二、dtb 展开成 device_node
dtb 中每一个节点都会被转换为 device_node 结构体。
1. 展开流程
dtb 展开流程图如下:
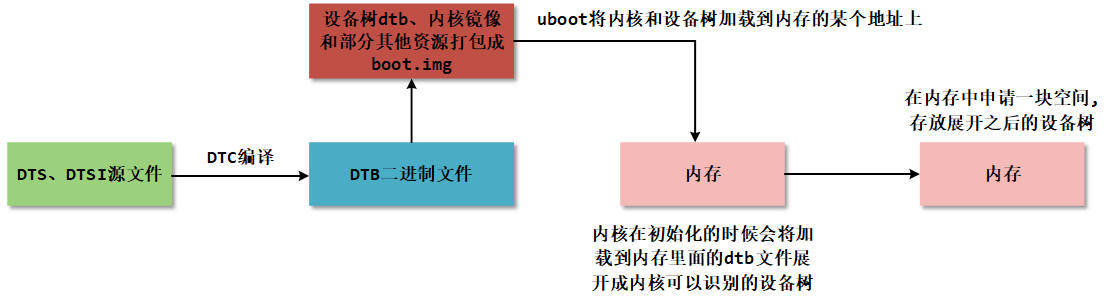
(1) 设备树源文件编写: 根据设备树的基本语法和相关知识编写符合规范的设备树。
(2) 设备树编译: 设备树源文件经过设备树编译器(dtc) 进行编译, 生成设备树二进制文件(.dtb) 。 设备树编译器会检查源文件的语法和语义, 并将其转换为二进制格式, 以便内核能够解析和使用。
(3) boot.img 镜像生成: boot.img 是一个包含内核镜像、 设备树二进制文件和其他一些资源文件的镜像文件(目前只是适用于瑞芯微的 soc 上, 其他厂商的 soc 需要具体问题具体分析) 。 在生成 boot.img 时, 通常会将内核镜像、 设备树二进制文件和其他一些资源文件打包在一起。 这个过程可以使用特定的工具或脚本完成。但是这里其实可以内核和设备树分开,内核是内核,设备树是设备树,然后配置 uboot 为从 tftp 下载内核和设备树,然后加载内核和设备树,这样有利于我们调试。
(4) U-Boot 加载: U-Boot(Universal Bootloader) 是一种常用的开源引导加载程序, 用于引导嵌入式系统。 在系统启动过程中, U-Boot 会将 boot.img 中的内核和设备树的二进制文件加载到系统内存的特定地址。或者可以设置为从 tftp 服务器下载设备树和内核。
( 5) 内核初始化: U-Boot 将内核和设备树的二进制文件加载到系统内存的特定地址后,控制权会转交给内核。 在内核初始化的过程中, 会解析设备树二进制文件, 将其展开为内核可以识别的数据结构, 以便内核能够正确地初始化和管理硬件资源。
( 6) 设备树展开: 设备树展开是指将设备树二进制文件解析成内核中的设备节点(device_node) 的过程。 内核会读取设备树二进制文件的内容, 并根据设备树的描述信息,构建设备树数据结构, 例如设备节点、 中断控制器、 寄存器、 时钟等。 这些设备树数据结构将在内核运行时用于管理和配置硬件资源。
2. 相关数据结构
dtb 中每一个节点都被转换为 struct device_node 结构体。根节点被保存在全局变量 of_root 中(这个全局变量在__unflatten_device_tree()函数中使用),从 of_root 开始可以访问到任意节点。
2.1 struct device_node
struct device_node 结构体定义如下:
struct device_node {
	const char *name;
	const char *type;
	phandle phandle;
	const char *full_name;
	struct fwnode_handle fwnode;

	struct	property *properties;
	struct	property *deadprops;	/* removed properties */
	struct	device_node *parent;
	struct	device_node *child;
	struct	device_node *sibling;
	//......
};2.2 struct property
struct property 定义如下:
struct property {
	char	*name;
	int	length;
	void	*value;
	struct property *next;
#if defined(CONFIG_OF_DYNAMIC) || defined(CONFIG_SPARC)
	unsigned long _flags;
#endif
#if defined(CONFIG_OF_PROMTREE)
	unsigned int unique_id;
#endif
#if defined(CONFIG_OF_KOBJ)
	struct bin_attribute attr;
#endif
};3. 展开过程源码分析
Linux 内核在启动的时候会解析 DTB 文件,然后在/proc/device-tree 目录下生成相应的设备树节点文件。 Linux 内核解析 DTB 文件的函数调用关系如下:
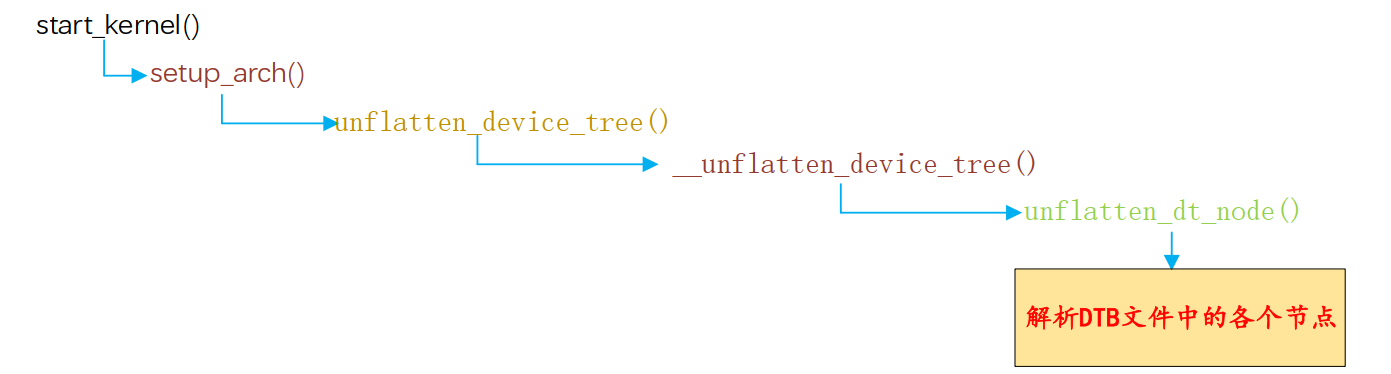
可以看出,在 start_kernel 函数中完成了设备树节点解析的工作,最终实际工作的函数为 unflatten_dt_nodes。
3.1 start_kernel()
首先来到源码目录下的 main.c - init/main.c 文件, 找到其中的 start_kernel() 函数, start_kernel() 函数是 Linux 内核启动的入口点, 它是 Linux 内核的核心函数之一, 负责完成内核的初始化和启动过程:
asmlinkage __visible void __init start_kernel(void)
{
    // ......
	setup_arch(&command_line);// 架构相关的初始化
    // ......
}其中跟设备树相关的函数为 setup_arch(&command_line);。
3.2 setup_arch()
setup_arch() 函数与架构有关,像 RK3568 平台是定义在 arch/arm64/kernel/setup.c 中,imx6ull 的话是定义在 arch/arm64/kernel/setup.c 中:
void __init setup_arch(char **cmdline_p)
{
	//......
	mdesc = setup_machine_fdt(__atags_pointer);// 设置机器的 FDT(平台设备树)
	//......
	unflatten_device_tree();// 展开设备树
	//......
}setup_machine_fdt() 函数是用于在内核启动过程中设置机器的设备树。 __atags_pointer是 dtb 二进制文件加载到内存的地址。具体是怎么传过来的,这里就没有深入研究了,这里知道是设备树的地址就可以了。可以简单看一下这个函数:
// 初始化设置机器的设备树
const struct machine_desc * __init setup_machine_fdt(unsigned int dt_phys)
{
	const struct machine_desc *mdesc, *mdesc_best = NULL;
	//......
	// phys_to_virt() 将设备树物理地址映射到内核虚拟地址空间
    // early_init_dt_verify() 验证设备树有效性
	if (!dt_phys || !early_init_dt_verify(phys_to_virt(dt_phys)))
		return NULL;
	// 匹配 machine_desc: 遍历所有 machine_desc,与设备树根节点的 compatible 字符串进行匹配
	mdesc = of_flat_dt_match_machine(mdesc_best, arch_get_next_mach);
	//......
	return mdesc;
}具体的就没有再深入去了解了,以后有需要再说吧。这里主要还是要了解设备树的展开:unflatten_device_tree()
3.3 unflatten_device_tree()
unflatten_device_tree() 函数用于解析设备树, 将紧凑的设备树数据结构转换为树状结构的设备树
/**
 * unflatten_device_tree - create tree of device_nodes from flat blob
 *
 * unflattens the device-tree passed by the firmware, creating the
 * tree of struct device_node. It also fills the "name" and "type"
 * pointers of the nodes so the normal device-tree walking functions
 * can be used.
 */
void __init unflatten_device_tree(void)
{
    // 解析设备树,解析后的设备树将使用 of_root 指针进行存储。
	__unflatten_device_tree(initial_boot_params, NULL, &of_root,
				early_init_dt_alloc_memory_arch, false);
	// 获取指向 "/chosen" 和 "/aliases" 节点的指针,并为它们分配内存。 以供全局使用
	/* Get pointer to "/chosen" and "/aliases" nodes for use everywhere */
	of_alias_scan(early_init_dt_alloc_memory_arch);
	// 运行设备树的单元测试
	unittest_unflatten_overlay_base();
}3.4 __unflatten_device_tree()
__unflatten_device_tree()函数的重点在两次设备树的扫描上, 第一遍扫描的目的是计算展开设备树所需的内存大小,第二遍扫描的目的是实际展开设备树, 并填充设备节点的名称、 类型和属性等信息。 我们来看一下这个函数:
void *__unflatten_device_tree(const void *blob,
			      struct device_node *dad,
			      struct device_node **mynodes,
			      void *(*dt_alloc)(u64 size, u64 align),
			      bool detached)
{
	// 第一遍扫描, 计算大小
	/* First pass, scan for size */
	size = unflatten_dt_nodes(blob, NULL, dad, NULL);
	if (size < 0)
		return NULL;

	size = ALIGN(size, 4);
	pr_debug("  size is %d, allocating...\n", size);
	// 为展开的设备树分配内存
	/* Allocate memory for the expanded device tree */
	mem = dt_alloc(size + 4, __alignof__(struct device_node));
	//......
	// 第二遍扫描, 实际展开设备树
	/* Second pass, do actual unflattening */
	unflatten_dt_nodes(blob, mem, dad, mynodes);
	if (be32_to_cpup(mem + size) != 0xdeadbeef)
		pr_warning("End of tree marker overwritten: %08x\n",
			   be32_to_cpup(mem + size));
	//......
}第 470 行:unflatten_dt_nodes() 函数的作用是递归地遍历设备树数据块, 并计算展开设备树所需的内存大小。 它接受四个参数: blob(设备树数据块指针) 、 start(当前节点的起始地址,初始为 NULL) 、 dad(父节点指针) 和 mynodes(用于存储节点指针数组的指针, 初始为 NULL)。第一遍扫描完成后, unflatten_dt_nodes() 函数会返回展开设备树所需的内存大小, 然后在对大小进行对齐操作, 并为展开的设备树分配内存。
第 489 行:再次调用了 unflatten_dt_nodes() 函数进行第二遍扫描。 通过这样的过程, 第二遍扫描会将设备树数据块中的节点展开为真正的设备节点, 并填充节点的名称、 类型和属性等信息。 这样就完成了设备树的展开过程。
3.5 unflatten_dt_nodes()
unflatten_dt_nodes() 函数定义如下:
static int unflatten_dt_nodes(const void *blob,
			      void *mem,
			      struct device_node *dad,
			      struct device_node **nodepp)
{
	struct device_node *root;                     // 根节点
	int offset = 0, depth = 0, initial_depth = 0; // 偏移量、 深度和初始深度
#define FDT_MAX_DEPTH	64                        // 最大深度
	struct device_node *nps[FDT_MAX_DEPTH];       // 设备节点数组
	void *base = mem;     // 基地址, 用于计算偏移量
	bool dryrun = !base;  // 是否只是模拟运行, 不实际处理

	if (nodepp)
		*nodepp = NULL;   // 如果指针不为空, 将其置为空指针

	/*
	 * We're unflattening device sub-tree if @dad is valid. There are
	 * possibly multiple nodes in the first level of depth. We need
	 * set @depth to 1 to make fdt_next_node() happy as it bails
	 * immediately when negative @depth is found. Otherwise, the device
	 * nodes except the first one won't be unflattened successfully.
	 */
    // 如果 @dad 有效, 则表示正在展开设备子树。在第一层深度可能有多个节点。
    //将 @depth 设置为 1, 以使 fdt_next_node() 正常工作。当发现负的 @depth 时, 该函数会立即退出。否则, 除第一个节点外的设备节点将无法成功展开。
	if (dad)
		depth = initial_depth = 1;

	root = dad;       // 根节点为 @dad
	nps[depth] = dad; // 将根节点放入设备节点数组

	for (offset = 0;
	     offset >= 0 && depth >= initial_depth;
	     offset = fdt_next_node(blob, offset, &depth)) {
		if (WARN_ON_ONCE(depth >= FDT_MAX_DEPTH))
			continue;
		// 如果未启用 CONFIG_OF_KOBJ 并且节点不可用, 则跳过该节点
		if (!IS_ENABLED(CONFIG_OF_KOBJ) &&
		    !of_fdt_device_is_available(blob, offset))
			continue;
		// 填充节点信息, 并将子节点添加到设备节点数组
		if (!populate_node(blob, offset, &mem, nps[depth],
				   &nps[depth+1], dryrun))
			return mem - base;
		// 将子节点指针赋值给 @nodepp
		if (!dryrun && nodepp && !*nodepp)
			*nodepp = nps[depth+1];
        // 如果根节点为空, 则将子节点设置为根节点
		if (!dryrun && !root)
			root = nps[depth+1];
	}

	if (offset < 0 && offset != -FDT_ERR_NOTFOUND) {
		pr_err("Error %d processing FDT\n", offset);
		return -EINVAL;
	}

	/*
	 * Reverse the child list. Some drivers assumes node order matches .dts
	 * node order
	 */

	// 反转子节点列表。 一些驱动程序假设节点顺序与 .dts 文件中的节点顺序一致
	if (!dryrun)
		reverse_nodes(root);

	return mem - base; // 返回处理的字节数
}第 393 行:fdt_next_node() 函数用来遍历设备树的节点。 从偏移量为 0 开始, 只要偏移量大于等于 0 且深度大于等于初始深度, 就执行循环。 循环中的每次迭代都会处理一个设备树节点。在每次迭代中, 首先检查深度是否超过了最大深度 FDT_MAX_DEPTH, 如果超过了, 则跳过该节点。如果未启用 CONFIG_OF_KOBJ 并且节点不可用( 通过 of_fdt_device_is_available() 函数判断) , 则跳过该节点。
第 401 行:调用 populate_node() 函数填充节点信息,并将子节点添加到设备节点数组 nps 中。 populate_node() 函数定义如下所示:
static bool populate_node(const void *blob,
			  int offset,
			  void **mem,
			  struct device_node *dad,
			  struct device_node **pnp,
			  bool dryrun)
{
	struct device_node *np; // 设备节点指针
	const char *pathp;      // 节点路径字符串指针
	unsigned int l, allocl; // 路径字符串长度和分配的内存大小

	pathp = fdt_get_name(blob, offset, &l); // 获取节点路径和长度
	if (!pathp) {
		*pnp = NULL;
		return false;
	}

	allocl = ++l; // 分配内存大小为路径长度加一, 用于存储节点路径字符串

	np = unflatten_dt_alloc(mem, sizeof(struct device_node) + allocl,
				__alignof__(struct device_node)); // 分配设备节点内存
	if (!dryrun) {
		char *fn;
		of_node_init(np); // 初始化设备节点
		np->full_name = fn = ((char *)np) + sizeof(*np); // 设置设备节点的完整路径名

		memcpy(fn, pathp, l); // 将节点路径字符串复制到设备节点的完整路径名中

		if (dad != NULL) {
			np->parent = dad;        // 设置设备节点的父节点
			np->sibling = dad->child;// 设置设备节点的兄弟节点
			dad->child = np;         // 将设备节点添加为父节点的子节点
		}
	}

	populate_properties(blob, offset, mem, np, pathp, dryrun);// 填充设备节点的属性信息
	if (!dryrun) {
		np->name = of_get_property(np, "name", NULL);// 获取设备节点的名称属性
		np->type = of_get_property(np, "device_type", NULL);// 获取设备节点的设备类型属性

		if (!np->name)
			np->name = "<NULL>";// 如果设备节点没有名称属性, 则设置为 "<NULL>"
		if (!np->type)
			np->type = "<NULL>";// 如果设备节点没有设备类型属性, 则设置为 "<NULL>"
	}

	*pnp = np;// 将设备节点指针赋值给*pnp
	return true;
}在 populate_node() 函数中首先会调用第 299 行的 unflatten_dt_alloc() 函数分配设备节点内存。分配的内存大小 为 sizeof(struct device_node) + allocl 字 节 , 并 使 用 __alignof__(struct device_node) 对齐。 然后调用 populate_properties() 函数填充设备节点的属性信息。 该函数会解析设备节点的属性, 并根据需要分配内存来存储属性值。
三、 device_node 转换成 platform_device
在上一节中, 我们学习了 dtb 二进制文件展开成 device_node 的具体流程, 而 device_node 这时候还并不能跟内核中的 platform_driver 进行对接, 而为了让操作系统能够识别和管理设备, 需要将设备节点转换为平台设备。
1. 转换规则
在之前学习的平台总线模型中, device 部分是用 platform_device 结构体来描述硬件资源的, 所以内核最终会将内核认识的 device_node 树转换 platform_device, 但是并不是所有的 device_node 都会被转换成 platform_ device, 只有满足要求的才会转换成 platform_device,转换成 platform_device 的节点可以在 /sys/bus/platform/devices 下查看, 那 device_node 节点要满足什么要求才会被转换成 platform_device 呢?
- 规则 1:根节点下包含 compatible 属性的子节点。
对于每个根节点下含有 compatible 属性的子节点, 创建一个对应的 platform_device。
- 规则 2:含 有特定 compatible 属性的节点的子节点。
节点中 compatible 属性含有 "simple-bus"、 "simple-mfd" 或 "isa" 的节点,如果它们的子节点包含 compatible 属性值,则会为这个子节点创建一个对应的 platform_device。
规则 3:节点的 compatible 属性包含 "arm" 或 "primecell", 则 不将该节点转换 为 platform_device, 而是将其识别为 AMBA 设备。
规则 4:总线 I2C、 SPI 节点下的子节点, 不转换 为 platform_device 。某个总线下的子节点, 应该交给对应的总线驱动程序来处理, 它们不应该被转换为 platform_device。
2. 转换示例
2.1 示例 1
/{
    mytest {
        compatile = "mytest", "simple-bus";
        mytest@0 {
            compatile = "mytest_0";
        };
    };
    i2c {
        compatile = "samsung,i2c";
        at24c02 {
        	compatile = "at24c02";
    	};
    };
    spi {
        compatile = "samsung,spi";
        flash@0 {
            compatible = "winbond,w25q32dw";
            spi-max-frequency = <25000000>;
            reg = <0>;
        };
    };
}- /mytest 会被转换为 platform_device, 因为它兼容 "simple-bus"; 它的子节点/mytest/mytest@0 也会被转换为 platform_device
- /i2c 节点一般表示 i2c 控制器, 它会被转换为 platform_device, 在内核中有对应的 platform_driver;
- /i2c/at24c02 节点不会被转换为 platform_device, 它被如何处理完全由父节点的 platform_driver 决定, 一般是被创建为一个 i2c_client。
- 类似的也有/spi 节点, 它一般也是用来表示 SPI 控制器, 它会被转换为 platform_device, 在内核中有对应的 platform_driver;
- /spi/flash@0 节点不会被转换为 platform_device, 它被如何处理完全由父节点的 platform_driver 决定, 一般是被创建为一个 spi_device。
2.2 示例 2
/dts-v1/;
/ {
    model = "This is my devicetree!";
    #address-cells = <1>;
    #size-cells = <1>;
    chosen {
        bootargs = "root=/dev/nfs rw nfsroot=192.168.1.1 console=ttyS0, 115200";
    };
    cpu1: cpu@1 {
        device_type = "cpu";
        compatible = "arm,cortex-a35", "arm,armv8";
        reg = <0x0 0x1>;
    };
    aliases {
        led1 = "/gpio@22020101";
    };
    node1 {
        #address-cells = <1>;
        #size-cells = <1>;
        gpio@22020102 {
            reg = <0x20220102 0x40>;
        };
    };
    node2 {
        node1-child {
            pinnum = <01234>;
        };
    };
    gpio@22020101 {
        compatible = "led";
        reg = <0x20220101 0x40>;
        status = "okay";
    };
};总共有 chosen、 cpu1: cpu@1、 aliases、 node1、 node2、 gpio@22020101 这六个节点, 其中前五个节点都没有 compatible 属性, 所以并不会被转换为 platform_device,而最后一个 gpio@22020101 节点符合规则一, 在根节点下, 且有 compatible 属性, 所以最后会转换为 platform_device。
2.3 示例 3
/dts-v1/;
/ {
    model = "This is my devicetree!";
    #address-cells = <1>;
    #size-cells = <1>;
    chosen {
        bootargs = "root=/dev/nfs rw nfsroot=192.168.1.1 console=ttyS0, 115200";
    };
    cpu1: cpu@1 {
        device_type = "cpu";
        compatible = "arm,cortex-a35", "arm,armv8";
        reg = <0x0 0x1>;
    };
    aliases {
        led1 = "/gpio@22020101";
    };
    node1 {
        #address-cells = <1>;
        #size-cells = <1>;
        compatible = "simple-bus";
        gpio@22020102 {
            reg = <0x20220102 0x40>;
        };
    };
    node2 {
        node1-child {
            pinnum = <01234>;
        };
    };
    gpio@22020101 {
        compatible = "led";
        reg = <0x20220101 0x40>;
        status = "okay";
    };
};相较于示例 2 的设备树, 这里在 node1 节点中添加了 compatible 属性, 但是这个 compa tible 属性值为 simple-bus, 我们需要继续看他的子节点, 子节点 gpio@22020102 并没有 comp atible 属性值, 所以这里的 node1 节点不会被转换。
2.4 示例 4
/dts-v1/;
/ {
    model = "This is my devicetree!";
    #address-cells = <1>;
    #size-cells = <1>;
    chosen {
        bootargs = "root=/dev/nfs rw nfsroot=192.168.1.1 console=ttyS0, 115200";
    };
    cpu1: cpu@1 {
        device_type = "cpu";
        compatible = "arm,cortex-a35", "arm,armv8";
        reg = <0x0 0x1>;
    };
    aliases {
        led1 = "/gpio@22020101";
    };
    node1 {
        #address-cells = <1>;
        #size-cells = <1>;
        compatible = "simple-bus";
        gpio@22020102 {
            compatible = "gpio";
            reg = <0x20220102 0x40>;
        };
    };
    node2 {
        node1-child {
            pinnum = <01234>;
        };
    };
    gpio@22020101 {
        compatible = "led";
        reg = <0x20220101 0x40>;
        status = "okay";
    };
};相较于示例 3 的设备树, 这里在 node1 节点的子节点 gpio@22020102 中添加了 compati ble 属性, node1 节点的 compatible 属性值为 simple-bus, 然后需要继续看他的子节点, 子节点 gpio@22020102 的 compatible 属性值为 gpio, 所以这里的 gpio@22020102 节点会被转换成 platform_device。
2.5 示例 5
/dts-v1/;
/ {
    model = "This is my devicetree!";
    #address-cells = <1>;
    #size-cells = <1>;
    chosen {
        bootargs = "root=/dev/nfs rw nfsroot=192.168.1.1 console=ttyS0,115200";
    };
    cpul: cpu@1 {
        device_type = "cpu";
        compatible = "arm,cortex-a35", "arm,armv8";
        reg = <0x0 0x1>;
        amba {
            compatible = "simple-bus";
            #address-cells = <2>;
            #size-cells = <2>;
            ranges;
            dmac_peri: dma-controller@ff250000 {
                compatible = "arm,p1330", "arm,primecell";
                reg = <0x0 0xff250000 0x0 0x4000>;
                interrupts = <GIC_SPI 2 IRQ_TYPE_LEVEL_HIGH>,
                <GIC_SPI 3 IRQ_TYPE_LEVEL_HIGH>;
                #dma-cells = <1>;
                arm,pl330-broken-no-flushp;
                arm,p1330-periph-burst;
                clocks = <&cru ACLK DMAC_PERI>;
                clock-names = "apb_pclk";
            };
            dmac_bus: dma-controller@ff600000 {
                compatible = "arm,p1330", "arm,primecell";
                reg = <0x0 0xff600000 0x0 0x4000>;
                interrupts = <GIC_SPI 0 IRQ_TYPE_LEVEL_HIGH>,
                <GIC_SPI 1 IRQ_TYPE_LEVEL_HIGH>;
                #dma-cells = <1>;
                arm,pl330-broken-no-flushp;
                arm,pl330-periph-burst;
                clocks = <&cru ACLK_DMAC_BUS>;
                clock-names = "apb_pclk";
            };
        };
    };
};amba 节点的 compatible 值为 simple-bus, 不会被转换为 platform_device, 而是作为父节点用于组织其他设备, 所以需要来查看他的子节点。
dmac_peri: dma-controller@ff250000 节点: 该节点的 compatible 属性包含 "arm, p1330" 和 "arm, primecell", 根据规则 3, 该节点不会被转换为 platform_device, 而是被识别为 AMBA 设备。
dmac_bus: dma-controller@ff600000 节点: 该节点的 compatible 属性包含 "arm, p1330" 和 "arm, primecell", 根据规则 3, 该节点不会被转换为 platform_device, 而是被识别为 AMBA 设备。
3. 转换流程分析
3.1 arch_initcall_sync()
事实上,如果从 C 语言的开始函数 start_kernel() 进行追溯,是找不到 platform device 这一部分转换的源头的,事实上,这个转换过程的函数是 of_platform_default_populate_init(),它被调用的方式是这样一个声明:
arch_initcall_sync(of_platform_default_populate_init);这行在 platform.c - drivers/of/platform.c 中,先来看 arch_initcall_sync() 函数,它是一个宏:
#ifdef CONFIG_HAVE_ARCH_PREL32_RELOCATIONS
#define ___define_initcall(fn, id, __sec)			\
	__ADDRESSABLE(fn)					\
	asm(".section	\"" #__sec ".init\", \"a\"	\n"	\
	"__initcall_" #fn #id ":			\n"	\
	    ".long	" #fn " - .			\n"	\
	    ".previous					\n");
#else
#define ___define_initcall(fn, id, __sec) \
	static initcall_t __initcall_##fn##id __used \
		__attribute__((__section__(#__sec ".init"))) = fn;
#endif

#define __define_initcall(fn, id) ___define_initcall(fn, id, .initcall##id)

#define arch_initcall_sync(fn) __define_initcall(fn, 3s)最终是调用__define_initcall(fn, id),这个 id 代表系统启动时被调用的优先级,数字越小,优先级越低,用这一系列宏声明一个新的函数就是将这个函数指针放入内存中一个指定的段(即放入到 ".init" 中,n 代表优先级,当系统启动时,会依次调用这些段中的函数)内。
它用于在内核初始化过程中执行架构相关的初始化函数。 它属于内核的初始化调用机制, 用于确保在系统启动过程中适时地调用特定架构的初始化函数。
在 Linux 内核的初始化过程中, 各个子系统和架构会注册自己的初始化函数。 这些初始化函数负责完成特定子系统或架构相关的初始化工作, 例如初始化硬件设备、 注册中断处理程序、设置内存映射等。 而 arch_initcall_sync() 函数则用于调用与当前架构相关的初始化函数。
3.2 of_platform_default_populate_init()
当内核启动,在初始化过程中,arch_initcall_sync() 函数会被调用, 以确保所有与当前架构相关的初始化函数按照正确的顺序执行。 这样可以保证在启动过程中, 特定架构相关的初始化工作得到正确地完成。
而 of_platform_default_populate_init() 函数的作用是在内核初始化过程中自动解析设备树,并根据设备树中的设备节点创建对应的 platform_device 结构。 它会遍历设备树中的设备节点,并为每个设备节点创建一个对应的 platform_device 结构, 然后将其注册到内核中, 使得设备驱动程序能够识别和操作这些设备。
static int __init of_platform_default_populate_init(void)
{
	struct device_node *node;
	// 检查设备树是否已经被填充。 如果设备树尚未填充, 则返回错误码
	if (!of_have_populated_dt())
		return -ENODEV;

	/*
	 * Handle certain compatibles explicitly, since we don't want to create
	 * platform_devices for every node in /reserved-memory with a
	 * "compatible",
	 */
    // 遍历设备树中与 reserved_mem_matches 匹配的节点。 这些节点是 /reserved-memory 中具有 "compatible" 属性的节点。
    //reserved-memory 中匹配的节点创建 platform_device 结构。 不会为每个具有“compatible”的节点节点都创建 platform_device, 而是根据需要进行显式处理。
	for_each_matching_node(node, reserved_mem_matches)
		of_platform_device_create(node, NULL, NULL);
	// 查找节点 "/firmware"
	node = of_find_node_by_path("/firmware");
	if (node) {
        // 使用找到的节点填充设备树中的平台设备。 这些节点可能包含与固件相关的设备。
		of_platform_populate(node, NULL, NULL, NULL);
		of_node_put(node);
	}
	// 填充其他设备
	/* Populate everything else. */
	of_platform_default_populate(NULL, NULL, NULL);

	return 0;
}
arch_initcall_sync(of_platform_default_populate_init);3.3 of_platform_default_populate()
我们来看一下 of_platform_default_populate_init() 函数的 542 行,这里调用了 of_platform_default_populate(),这个函数定义如下:
int of_platform_default_populate(struct device_node *root,
				 const struct of_dev_auxdata *lookup,
				 struct device *parent)
{
	return of_platform_populate(root, of_default_bus_match_table, lookup,
				    parent);
}该函数的作用是调用 of_platform_populate() 函数来填充设备树中的平台设备, 并使用默认的设备匹配表 of_default_bus_match_table, 设备匹配表内容如下所示:
const struct of_device_id of_default_bus_match_table[] = {
	{ .compatible = "simple-bus", },
	{ .compatible = "simple-mfd", },
	{ .compatible = "isa", },
#ifdef CONFIG_ARM_AMBA
	{ .compatible = "arm,amba-bus", },
#endif /* CONFIG_ARM_AMBA */
	{} /* Empty terminated list */
};上述的设备匹配表就是我们第 2 条规则, 函数将自动根据设备树节点的属性匹配相应的设备驱动程序, 并填充内核的平台设备列表。
3.4 of_platform_populate()
接下来看 of_platform_populate() 函数:
int of_platform_populate(struct device_node *root,
			const struct of_device_id *matches,
			const struct of_dev_auxdata *lookup,
			struct device *parent)
{
	struct device_node *child;
	int rc = 0;
	// 如果 root 不为空, 则增加 root 节点的引用计数; 否则, 在设备树中根据路径查找 root 节点
	root = root ? of_node_get(root) : of_find_node_by_path("/");
	if (!root)
		return -EINVAL;

	pr_debug("%s()\n", __func__);
	pr_debug(" starting at: %pOF\n", root);
	// 遍历设备树节点的子节点, 查找与平台设备相关的节点。 这些节点通常具有 compatible 属性, 用于匹配设备驱动程序。
	for_each_child_of_node(root, child) {
        // 创建平台设备并添加到设备树总线, 对于每个找到的平台设备节点, 创建一个 platform_device 结构, 并根据设备树节点的属性设置该结构的各个字段。
		rc = of_platform_bus_create(child, matches, lookup, parent, true);
		if (rc) {
			of_node_put(child);//将创建的 platform_device 添加到内核的平台设备列表中, 以便设备驱动程序能够识别和操作这些设备。
			break;
		}
	}
    // 设置 root 节点的 OF_POPULATED_BUS 标志
	of_node_set_flag(root, OF_POPULATED_BUS);
	// 释放 root 节点的引用计数
	of_node_put(root);
	return rc;
}
EXPORT_SYMBOL_GPL(of_platform_populate);3.5 of_platform_bus_create
接下来看一下 of_platform_bus_create() 函数:
static int of_platform_bus_create(struct device_node *bus,
				  const struct of_device_id *matches,
				  const struct of_dev_auxdata *lookup,
				  struct device *parent, bool strict)
{
	const struct of_dev_auxdata *auxdata;
	struct device_node *child;
	struct platform_device *dev;
	const char *bus_id = NULL;
	void *platform_data = NULL;
	int rc = 0;

	/* Make sure it has a compatible property */
    // 确保设备节点具有 compatible 属性
	if (strict && (!of_get_property(bus, "compatible", NULL))) {
		pr_debug("%s() - skipping %pOF, no compatible prop\n",
			 __func__, bus);
		return 0;
	}

	/* Skip nodes for which we don't want to create devices */
    // 跳过不想创建设备的节点
	if (unlikely(of_match_node(of_skipped_node_table, bus))) {
		pr_debug("%s() - skipping %pOF node\n", __func__, bus);
		return 0;
	}

	if (of_node_check_flag(bus, OF_POPULATED_BUS)) {
		pr_debug("%s() - skipping %pOF, already populated\n",
			__func__, bus);
		return 0;
	}

	auxdata = of_dev_lookup(lookup, bus);
	if (auxdata) {
		bus_id = auxdata->name;
		platform_data = auxdata->platform_data;
	}

	if (of_device_is_compatible(bus, "arm,primecell")) {
		/*
		 * Don't return an error here to keep compatibility with older
		 * device tree files.
		 */
        // 在此处不返回错误以保持与旧设备树文件的兼容性。
		of_amba_device_create(bus, bus_id, platform_data, parent);
		return 0;
	}

	dev = of_platform_device_create_pdata(bus, bus_id, platform_data, parent);
	if (!dev || !of_match_node(matches, bus))
		return 0;

	for_each_child_of_node(bus, child) {
		pr_debug("   create child: %pOF\n", child);
		rc = of_platform_bus_create(child, matches, lookup, &dev->dev, strict);
		if (rc) {
			of_node_put(child);
			break;
		}
	}
	of_node_set_flag(bus, OF_POPULATED_BUS);
	return rc;
}第 365 行: 如果 strict 为真且设备节点 bus 没有兼容性属性, 则输出调试信息并返回 0。 这个条件判断确保设备节点具有 compatible 属性, 因为 compatible 属性用于匹配设备驱动程序,对应第 1 条规则。
第 372 行: 如果设备节点 bus 在被跳过的节点表中, 则输出调试信息并返回 0。 这个条件判断用于跳过不想创建设备的节点。
第 377 行: 如果设备节点 bus 的 OF_POPULATED_BUS 标志已经设置, 则输出调试信息并返回 0。 这个条件判断用于避免重复创建已经填充的设备节点。
第 383 行: 使用 lookup 辅助数据结构查找设备节点 bus 的特定配置信息, 并将其赋值给变量 bus_id 和 platform_data。 这个步骤用于获取设备节点的特定配置信息, 以便在创建平台设备时使用, 由于这里传入的参数为 NULL, 所以下面的条件判断并不会被执行。
第 389 行: 如果设备节点 bus 兼容于 "arm, primecell", 则调用 of_amba_device_create() 函数创建 AMBA 设备, 并返回 0, 对应第 3 条规则。
第 398 行: 调用 of_platform_device_create_pdata() 函数创建平台设备, 并将其赋值给变量 dev。 然后, 检查设备节点 bus 是否与给定的匹配表 matches 匹配。 如果平台设备创建失败或者设备节点不匹配, 那么返回 0。
第 402 行 - 第 409 行: 遍历设备节点 bus 的每个子节点 child, 并递归调用 of_platform_bus_create() 函数来创建子节点的平台设备。
3.6 of_platform_device_create_pdata()
再来看一下 of_platform_device_create_pdata() 函数:
static struct platform_device *of_platform_device_create_pdata(
					struct device_node *np,
					const char *bus_id,
					void *platform_data,
					struct device *parent)
{
	struct platform_device *dev;
	// 检查设备节点是否可用或已填充
	if (!of_device_is_available(np) ||
	    of_node_test_and_set_flag(np, OF_POPULATED))
		return NULL;
	// 分配平台设备结构体
	dev = of_device_alloc(np, bus_id, parent);
	if (!dev)
		goto err_clear_flag;
	// 设置平台设备的一些属性
	dev->dev.coherent_dma_mask = DMA_BIT_MASK(32);
	if (!dev->dev.dma_mask)
		dev->dev.dma_mask = &dev->dev.coherent_dma_mask;
	dev->dev.bus = &platform_bus_type;
	dev->dev.platform_data = platform_data;
	of_msi_configure(&dev->dev, dev->dev.of_node);
	// 将平台设备添加到设备模型中
	if (of_device_add(dev) != 0) {
		platform_device_put(dev);
		goto err_clear_flag;
	}

	return dev;

err_clear_flag:
    //清除设备节点的已填充标志
	of_node_clear_flag(np, OF_POPULATED);
	return NULL;
}第 180 行: 函数会检查设备节点的可用性, 即检查设备树对应节点的 status 属性。 如果设备节点不可用或已经被填充, 则直接返回 NULL。
第 184 行: 函数调用 of_device_alloc 分配一个平台设备结构体, 并将设备节点指针、 设备标识符和父设备指针传递给它。 如果分配失败, 则跳转到 err_clear_flag 标签处进行错误处理。
第 188 - 193 行, 函数设置平台设备的一些属性。 它将 coherent_dma_mask 属性设置为 32 位的 DMA 位掩码, 并检查 dma_mask 属性是否为 NULL。 如果 dma_mask 为 NULL, 则将其指向 coherent_dma_mask。 然后, 函数设置平台设备的总线类型为 platform_bus_type, 并将平台数据指针存储在 platform_data 属性中。 接着, 函数调用 of_msi_configure 来配置设备的 MSI 信息。
第 195 行: 函数调用 of_device_add 将平台设备添加到设备模型中。 如果添加失败, 则释放已分配的平台设备, 并跳转到 err_clear_flag 标签处进行错误处理。
3.7 总结
of_platform_default_populate_init();
   |__ of_platform_default_populate(NULL,NULL,NULL);
        |__ of_platform_populate(root, of_default_bus_match_table, lookup, parent);
           |__ of_platform_bus_create(child, matches, lookup, parent, true);
|__ of_platform_device_create_pdata(bus, bus_id, platform_data, parent);参考资料:
Device Tree (二) - dtb 格式_dtb 文件-CSDN 博客
设备树处理之——device_node 转换成 platform_device【转】 - Sky&Zhang - 博客园