
LV060-Buildroot构建
一、文件系统
我们回顾一下文件系统的概念:
我们先来看一下 Linux 是如何存储数据的。一般情况下,字符设备以串行方式存储和获取数据,串口是最典型的字符设备;而块设备会一次存取或者获取大小相同的一块区域内的数据。例如,一个硬 盘控制器可以向物理存储介质上指定可寻址地址,一次传送或接收 512 字节的数据,文件系统正是建立在块设备之上的。
文件系统是存在于一个物理设备的逻辑分区之上的。分区就是对一个物理介质(磁盘、闪存)的逻辑划分,该物理介质上的数据在给定分区类型上按照特定的规则进行组织,物理设备可以只有一个独立分区包含所有可用空间,也可以被划分为多个分区以满足特定需要,就好比我们电脑的磁盘,划分为多个分区以用于不同的需求。
简单了解了文件系统的概念,那么接下来我们就动手制作一个文件系统。
二、Buildroot 构建简介
文件系统通常要包含很多第三方软件,比如 busybox,tslib,qt,vim,交叉编译工具等,为了避免繁杂的移植工作,buildroot 应运而生。用户可以直接通过 make menuconfig 配置自己需要的功能,把不需要的功能去掉,再执行 make 指令编译,buildroot 就会自动从指定的服务器上下载源码包,自动编译,自动搭建成我们所需要的嵌入式根文件系统。
buildroot 的文件系统(rootfs)构建流程有一个框架,有些部分是 buildroot 本身就集成的,但还是有些细节需要自己来实现,我们需要按照格式写脚本,提供必要的构建细节,并且配置整个系统,总之,rootfs 是 Buildroot 中最为复杂的部分。
一般来说,buildroot 构建文件系统的运作过程如下:
(1)buildroot 将 system/skeleton/目录下的内容拷贝到 output/target 目录下下作为 rootfs 的模板。
(2)将 output/staging/目录下的工具链中动态库拷贝到 output/target/对应的目录下。
(3)分别编译每一个应用的 package,并将生成的动态库和 bin 文件 install 到 output/target/对应的目录下。
(4)将 package/initscripts/目录下的系统启动脚本 install 到 output/target/对应的目录下。
(5)构建 fakeroot 环境,在 fakeroot 环境下修改 output/target/中对应的目录文件权限,制作 dev 节点,并根据用户的配置制作出 rootfs 镜像。
fakeroot 是一个主机上使用的软件包,它会被 buildroot 下载编译,用于为构建 rootfs 提供一个虚拟的 root 权限环境,只有在 root 权限下,才能把 output/target/中的目录和文件变成 root 用户,并创建 dev 节点。有了 fakeroot 环境,系统构建者无需获取主机的 root 权限, 也能在 fakeroot 下把文件改为 root 用户,并制作 root 方式。
这一节使用的是 buildroot-2023.05.1 这个版本的 Buildroot,后面有提到,有一个报错没解决就暂时切换更早版本了。
三、Buildroot 配置
1. 打开配置界面
buildroot 和 uboot、 Linux kernel 一样也支持图形化配置,输入如下命令即可打开图形化配置界:
make ARCH=arm CROSS_COMPILE=arm-linux-gnueabihf- menuconfig
make menuconfig # 好像也可以这样用,因为这里只是配置,后边编译的话会自动使用交叉编译工具链2. 配置 buildboot
2.1 配置 Target options
首先配置 Target options 选项,需要配置的项目和其对应的内容如下(“=”号后面是配置项要选择的内容 ):
Target options
    -> Target Architecture = ARM (little endian)
    -> Target Architecture Variant = cortex-A7
    -> Target ABI = EABIhf
    -> Floating point strategy = NEON/VFPv4
    -> ARM instruction set = ARM
-> Target Binary Format = ELF如下所示:
 /home/sumu/7Linux/buildroot-2023.05.1/.config - Buildroot 2023.05.1 Configurati
o→ Target options ─────────────────────────────────────────────────────────────
  ┌──────────────────────────── Target options ─────────────────────────────┐
  │  Arrow keys navigate the menu.  <Enter> selects submenus ---> (or empty │
  │  submenus ----).  Highlighted letters are hotkeys.  Pressing <Y>        │
  │  selects a feature, while <N> excludes a feature.  Press <Esc><Esc> to  │
  │  exit, <?> for Help, </> for Search.  Legend: [*] feature is selected   │
  │ ┌─────────────────────────────────────────────────────────────────────┐ │
  │ │        Target Architecture (ARM (little endian))  --->              │ │
  │ │        Target Architecture Variant (cortex-A7)  --->                │ │
  │ │        Target ABI (EABIhf)  --->                                    │ │
  │ │        Floating point strategy (NEON/VFPv4)  --->                   │ │
  │ │        ARM instruction set (ARM)  --->                              │ │
  │ │        Target Binary Format (ELF)  --->                             │ │
  │ └─────────────────────────────────────────────────────────────────────┘ │
  ├─────────────────────────────────────────────────────────────────────────┤
  │        <Select>    < Exit >    < Help >    < Save >    < Load >         │
└─────────────────────────────────────────────────────────────────────────┘2.2 配置 Toolchain
此配置项用于配置交叉编译工具链,也就是交叉编译器,这里设置为我们自己所使用的交叉编译器即可。 buildroot 其实是可以自动下载交叉编译器的,但是都是从国外服务器下载的,鉴于国内的网络环境,强烈建议设置成自己所使用的交叉编译器。需要配置的项目和其对应的内容如下:
Toolchain
    -> Toolchain type = External toolchain
    -> Toolchain = Custom toolchain # 用户自己的交叉编译器
    -> Toolchain origin = Pre-installed toolchain # 预装的编译器
    -> Toolchain path =/home/hk/2software/gcc-linaro-4.9.4
    -> Toolchain prefix = $(ARCH)-linux-gnueabihf  # 前缀
    -> External toolchain gcc version = 4.9.x
    -> External toolchain kernel headers series = 4.1.x
    -> External toolchain C library = glibc/eglibc
    -> [*] Toolchain has SSP support? (NEW) # 选中
    -> [*] Toolchain has RPC support? (NEW) # 选中
    -> [*] Toolchain has C++ support?       # 选中
-> [*] Enable MMU support (NEW) # 选中Toolchain 下几个比较重要的选项需要说明一下,如下所示:
Toolchain:设置为 Custom toolchain,表示使用用户自己的交叉编译器。
Toolchain origin:设置为 Pre-installed toolchain,表示使用预装的交叉编译器。
Toolchain path:设置自己安装的交叉编译器绝对路径! buildroot 要用到。
Toolchain prefix:设置交叉编译器前缀,要根据自己实际所使用的交叉编译器来设置,比如我们使用的是 arm-linux-gnueabihf-gcc,因此前缀就是$(ARCH)-linux-gnueabihf,其中 ARCH 我们前面已经设置为了 arm。
配置完后图形界面如下所示:
 /home/sumu/7Linux/buildroot-2023.05.1/.config - Buildroot 2023.05.1 Configurati
o→ Toolchain ──────────────────────────────────────────────────────────────────
  ┌─────────────────────────────── Toolchain ───────────────────────────────┐
  │  Arrow keys navigate the menu.  <Enter> selects submenus ---> (or empty │
  │  submenus ----).  Highlighted letters are hotkeys.  Pressing <Y>        │
  │  selects a feature, while <N> excludes a feature.  Press <Esc><Esc> to  │
  │  exit, <?> for Help, </> for Search.  Legend: [*] feature is selected   │
  │ ┌─────────────────────────────────────────────────────────────────────┐ │
  │ │        Toolchain type (External toolchain)  --->                    │ │
  │ │        *** Toolchain External Options ***                           │ │
  │ │        Toolchain (Custom toolchain)  --->                           │ │
  │ │        Toolchain origin (Pre-installed toolchain)  --->             │ │
  │ │    (/home/sumu/2software/gcc-arm-linux-gnueabihf-8.3.0) Toolchain pa│ │
  │ │    ($(ARCH)-linux-gnueabihf) Toolchain prefix                       │ │
  │ │        External toolchain gcc version (8.x)  --->                   │ │
  │ │        External toolchain kernel headers series (4.19.x)  --->      │ │
  │ │        External toolchain C library (glibc)  --->                   │ │
  │ │    [*] Toolchain has SSP support?                                   │ │
  │ │    [*]   Toolchain has SSP strong support?                          │ │
  │ │    [*] Toolchain has RPC support?                                   │ │
  │ │    [*] Toolchain has C++ support?                                   │ │
  │ │    [ ] Toolchain has D support?                                     │ │
  │ │    [ ] Toolchain has Fortran support?                               │ │
  │ │    [ ] Toolchain has OpenMP support?                                │ │
  │ │    [ ] Copy gdb server to the Target                                │ │
  │ │        *** Host GDB Options ***                                     │ │
  │ │    [ ] Build cross gdb for the host                                 │ │
  │ │        *** Toolchain Generic Options ***                            │ │
  │ │    [ ] Copy gconv libraries                                         │ │
  │ │    ()  Extra toolchain libraries to be copied to target             │ │
  │ │    ()  Target Optimizations                                         │ │
  │ │    ()  Target linker options                                        │ │
  │ └─────────────────────────────────────────────────────────────────────┘ │
  ├─────────────────────────────────────────────────────────────────────────┤
  │        <Select>    < Exit >    < Help >    < Save >    < Load >         │
└─────────────────────────────────────────────────────────────────────────┘需要注意一下我后来升级了交叉编译工具链版本和内核版本,这里界面菜单中的东西就跟着改了一下。
2.3 配置 System configuration
此选项用于设置一些系统配置,比如开发板名字、欢迎语、用户名、密码等。需要配置的项目和其对应的内容如下:
System configuration
    -> System hostname = alpha_imx6ull # 平台名字,自行设置
    -> System banner = Welcome to alpha i.mx6ull # 欢迎语
    -> Init system = BusyBox                     # 使用 busybox
    -> /dev management = Dynamic using devtmpfs + mdev # 使用 mdev
    -> [*] Enable root login with password (NEW)       # 使能登录密码
-> Root password = 123456 # 登录密码为 123456在 System configuration 选项中可以配置平台名字,登录密码等信息。如下所示:
 /home/sumu/7Linux/buildroot-2023.05.1/.config - Buildroot 2023.05.1 Configurati
o→ System configuration ───────────────────────────────────────────────────────
  ┌───────────────────────── System configuration ──────────────────────────┐
  │  Arrow keys navigate the menu.  <Enter> selects submenus ---> (or empty │
  │  submenus ----).  Highlighted letters are hotkeys.  Pressing <Y>        │
  │  selects a feature, while <N> excludes a feature.  Press <Esc><Esc> to  │
  │  exit, <?> for Help, </> for Search.  Legend: [*] feature is selected   │
  │ ┌─────────────────────────────────────────────────────────────────────┐ │
  │ │        Root FS skeleton (default target skeleton)  --->             │ │
  │ │    (alpha-imx6ull) System hostname                                  │ │
  │ │    (Welcome to Alpha IMX6ULL) System banner                         │ │
  │ │        Passwords encoding (sha-256)  --->                           │ │
  │ │        Init system (BusyBox)  --->                                  │ │
  │ │        /dev management (Dynamic using devtmpfs + mdev)  --->        │ │
  │ │    (system/device_table.txt) Path to the permission tables          │ │
  │ │    [ ] support extended attributes in device tables                 │ │
  │ │    [ ] Use symlinks to /usr for /bin, /sbin and /lib                │ │
  │ │    [*] Enable root login with password                              │ │
  │ │    ()    Root password                                              │ │
  │ │        /bin/sh (busybox' default shell)  --->                       │ │
  │ │    [*] Run a getty (login prompt) after boot  --->                  │ │
  │ │    [*] remount root filesystem read-write during boot               │ │
  │ │    ()  Network interface to configure through DHCP                  │ │
  │ │    (/bin:/sbin:/usr/bin:/usr/sbin) Set the system's default PATH    │ │
  │ │    [*] Purge unwanted locales                                       │ │
  │ │    (C en_US) Locales to keep                                        │ │
  │ │    ()  Generate locale data                                         │ │
  │ │    [ ] Enable Native Language Support (NLS)                         │ │
  │ │    [ ] Install timezone info                                        │ │
  │ │    ()  Path to the users tables                                     │ │
  │ │    ()  Root filesystem overlay directories                          │ │
  │ │    ()  Custom scripts to run before commencing the build            │ │
  │ │    ()  Custom scripts to run before creating filesystem images      │ │
  │ │    ()  Custom scripts to run inside the fakeroot environment        │ │
  │ │    ()  Custom scripts to run after creating filesystem images       │ │
  │ └─────────────────────────────────────────────────────────────────────┘ │
  ├─────────────────────────────────────────────────────────────────────────┤
  │        <Select>    < Exit >    < Help >    < Save >    < Load >         │
└─────────────────────────────────────────────────────────────────────────┘2.4 配置 Filesystem images
此选项配置我们最终制作的根文件系统为什么格式的,配置如下:
-> Filesystem images
    -> [*] ext2/3/4 root filesystem # 如果是 EMMC 或 SD 卡的话就用 ext3/ext4
    -> ext2/3/4 variant = ext4      # 选择 ext4 格式
-> [*] ubi image containing an ubifs root filesystem # 如果使用 NAND 的话就用 ubifs对于 I.MX6U 来说此选项不用配置,因为我们是通过 Mfgtool 工具将根文件系统烧写到开发板上的 EMMC/SD 卡中,烧写的时候需要自己对根文件系统进行打包。
 /home/sumu/7Linux/buildroot-2023.05.1/.config - Buildroot 2023.05.1 Configurati
o→ Filesystem images ──────────────────────────────────────────────────────────
  ┌─────────────────────────── Filesystem images ───────────────────────────┐
  │  Arrow keys navigate the menu.  <Enter> selects submenus ---> (or empty │
  │  submenus ----).  Highlighted letters are hotkeys.  Pressing <Y>        │
  │  selects a feature, while <N> excludes a feature.  Press <Esc><Esc> to  │
  │  exit, <?> for Help, </> for Search.  Legend: [*] feature is selected   │
  │ ┌─────────────────────────────────────────────────────────────────────┐ │
  │ │    [ ] axfs root filesystem                                         │ │
  │ │    [ ] btrfs root filesystem                                        │ │
  │ │    [ ] cloop root filesystem for the target device                  │ │
  │ │    [ ] cpio the root filesystem (for use as an initial RAM filesyste│ │
  │ │    [ ] cramfs root filesystem                                       │ │
  │ │    [ ] erofs root filesystem                                        │ │
  │ │    [*] ext2/3/4 root filesystem                                     │ │
  │ │          ext2/3/4 variant (ext4)  --->                              │ │
  │ │    (rootfs) filesystem label                                        │ │
  │ │    (60M) exact size                                                 │ │
  │ │    (0)   exact number of inodes (leave at 0 for auto calculation)   │ │
  │ │    (256) inode size                                                 │ │
  │ │    (5)   reserved blocks percentage                                 │ │
  │ │    (-O ^64bit) additional mke2fs options                            │ │
  │ │          Compression method (no compression)  --->                  │ │
  │ │    [ ] f2fs root filesystem                                         │ │
  │ │        *** initramfs needs a Linux kernel to be built ***           │ │
  │ │    [ ] jffs2 root filesystem                                        │ │
  │ │    [ ] oci image                                                    │ │
  │ │    [ ] romfs root filesystem                                        │ │
  │ │    [ ] squashfs root filesystem                                     │ │
  │ │    [*] tar the root filesystem                                      │ │
  │ │          Compression method (no compression)  --->                  │ │
  │ │    ()    other random options to pass to tar                        │ │
  │ │    [*] ubi image containing an ubifs root filesystem                │ │
  │ │    (0x20000) physical eraseblock size                               │ │
  │ │    (512) sub-page size                                              │ │
  │ │    [ ]   Use custom config file                                     │ │
  │ │    ()    Additional ubinize options                                 │ │
  │ │    -*- ubifs root filesystem                                        │ │
  │ │    (0x1f800) logical eraseblock size                                │ │
  │ │    (0x800) minimum I/O unit size                                    │ │
  │ │    (2048) maximum logical eraseblock count                          │ │
  │ │          ubifs runtime compression (lzo)  --->                      │ │
  │ │          Compression method (no compression)  --->                  │ │
  │ │    ()    Additional mkfs.ubifs options                              │ │
  │ │    [ ] yaffs2 root filesystem                                       │ │
  │ └─────────────────────────────────────────────────────────────────────┘ │
  ├─────────────────────────────────────────────────────────────────────────┤
  │        <Select>    < Exit >    < Help >    < Save >    < Load >         │
└─────────────────────────────────────────────────────────────────────────┘2.5 禁止编译 Linux 内核和 uboot
buildroot 不仅仅能构建根文件系统,也可以编译 linux 内核和 uboot。当配置 buildroot,使能 linux 内核和 uboot 以后 buildroot 就会自动下载最新的 linux 内核和 uboot 源码并编译。但是我们一般都不会使用 buildroot 下载的 linux 内核和 uboot,因为 buildroot 下载的 linux 和 uboot 官方源码,里面会缺少很多驱动文件,而且最新的 linux 内核和 uboot 会对编译器版本号有要求,可能导致编译失败。因此我们需要配置 buildroot,关闭 linux 内核和 uboot 的编译,只使用 buildroot 来构建根文件系统, 首先是禁止 Linux 内核的编译, 配置如下:
-> Kernel
	-> [ ] Linux Kernel # 不要选择编译 Linux Kernel 选项!
-> Bootloaders
-> [ ] U-Boot # 不要选择编译 U-Boot 选项!- Kernel
 /home/sumu/7Linux/buildroot-2023.05.1/.config - Buildroot 2023.05.1 Configurati
o→ Kernel ─────────────────────────────────────────────────────────────────────
  ┌──────────────────────────────── Kernel ─────────────────────────────────┐
  │  Arrow keys navigate the menu.  <Enter> selects submenus ---> (or empty │
  │  submenus ----).  Highlighted letters are hotkeys.  Pressing <Y>        │
  │  selects a feature, while <N> excludes a feature.  Press <Esc><Esc> to  │
  │  exit, <?> for Help, </> for Search.  Legend: [*] feature is selected   │
  │ ┌─────────────────────────────────────────────────────────────────────┐ │
  │ │    [ ] Linux Kernel                                                 │ │
  │ │                                                                     │ │
  │ └─────────────────────────────────────────────────────────────────────┘ │
  ├─────────────────────────────────────────────────────────────────────────┤
  │        <Select>    < Exit >    < Help >    < Save >    < Load >         │
└─────────────────────────────────────────────────────────────────────────┘- Bootloaders
 /home/sumu/7Linux/buildroot-2023.05.1/.config - Buildroot 2023.05.1 Configurati
o→ Bootloaders ────────────────────────────────────────────────────────────────
  ┌────────────────────────────── Bootloaders ──────────────────────────────┐
  │  Arrow keys navigate the menu.  <Enter> selects submenus ---> (or empty │
  │  submenus ----).  Highlighted letters are hotkeys.  Pressing <Y>        │
  │  selects a feature, while <N> excludes a feature.  Press <Esc><Esc> to  │
  │  exit, <?> for Help, </> for Search.  Legend: [*] feature is selected   │
  │ ┌─────────────────────────────────────────────────────────────────────┐ │
  │ │    [ ] afboot-stm32                                                 │ │
  │ │    [ ] AT91 Bootstrap 3+                                            │ │
  │ │    [ ] ARM Trusted Firmware (ATF)                                   │ │
  │ │    [ ] Barebox                                                      │ │
  │ │    [ ] grub2                                                        │ │
  │ │    [ ] optee_os                                                     │ │
  │ │    [ ] s500-bootloader                                              │ │
  │ │    [ ] shim                                                         │ │
  │ │    [ ] U-Boot                                                       │ │
  │ │                                                                     │ │
  │ └─────────────────────────────────────────────────────────────────────┘ │
  ├─────────────────────────────────────────────────────────────────────────┤
  │        <Select>    < Exit >    < Help >    < Save >    < Load >         │
└─────────────────────────────────────────────────────────────────────────┘2.6 配置 Target packages
此选项用于配置要选择的第三方库或软件、比如 alsa-utils、 ffmpeg、 iperf 等工具,但是现在我们先不选择第三方库,防止编译不下去!先编译一下最基本的根文件系统,如果没有问题的话再重新配置选择第三方库和软件。一次性配置太多的花,编译出问题的时候都不知道怎么找问题。
3. 编译 buildroot
配置完成以后就可以编译 buildroot 了,编译完成以后 buildroot 就会生成编译出来的根文件系统压缩包,我们可以直接使用。输入如下命令开始编译:
sudo make # 注意,一定要加 sudo,而且不能通过-jx 来指定多核编译!!!buildroot 编译的时候会先从网上下载所需的软件源码,有些软件源码可能下载不下来,这个时候就需要我们自行处理,这个后边再说。 buildroot 编译过程会很耗时,可能需要几个小时,这个时候耐心等待!buildroot 因为要从网上下载源码,因此可能存在有些源码无法下载或下载很慢的情况。
3.1 下载出错怎么办?
如下所示:
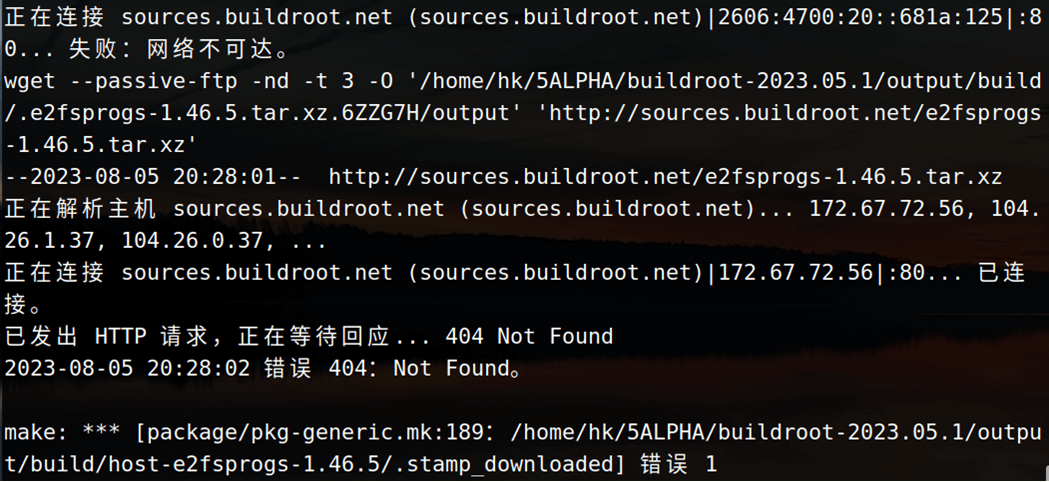
比如说这个,就会下载失败,出现下载失败或者下载很慢怎么办?我们可以根据下载链接,自己科学上网一下,下载好放到 buildroot 源码目录的 dl 目录下,dl 文件夹专用用于存放下载下来的源码。 就比如上边的这个,我们可以点击这个链接:
http://sources.buildroot.net/e2fsprogs/e2fsprogs-1.46.5.tar.xz直接下载好压缩包,将它放到 buildroot-2023.05.1/dl 目录下,然后我们再重新执行 make 命令就可以了。
3.2 kernel headers 报错

当时采用的解决办法就是修改配置:
Toolchain
-> External toolchain kernel headers series = 4.0.x修改这里的 External toolchain kernel headers series 版本,改成了 4.0.x。
3.3 新版本的一个问题
之前下载了一个 2024.8-rc3 的版本,执行 make 命令:
sudo make需要加 sudo,否则报错:

然后还会有这样一个报错:

说是要这样解决:
echo "export set FORCE_UNSAFE_CONFIGURE=1"  >> /etc/profile
source /etc/profile但是还是有问题,没解决掉,后来换回这个版本了:
https://buildroot.org/downloads/buildroot-2023.05.1.tar.gz3.4 编译成功
不出意外的话应该是可以编译成功的,没有什么特别的提示信息,只要不报错即可。
3.5 根文件系统测试
3.5.1 解压根文件系统
编译结束后,会在 buildroot 源码目录的 output 目录中生成根文件系统:

可以看出,编译出来了多种格式的 rootfs,比如 ext2、 ext4、 ubi 等。其中 rootfs.tar 就是打包好的根文件系统,我们就使用 rootfs.tar 进行测试。在 nfs 目录下新建一个名为 buildrootfs 的文件夹 ,然后将 rootfs.tar 拷贝到 buildrootfs 目录下并解压,命令如下:
mkdir -p ~/4nfs/buildroot
cp ~/7Linux/buildroot-2023.05.1/output/images/rootfs.tar ~/4nfs/buildroot
cd ~/4nfs/buildroot
tar -xf rootfs.tar
rm rootfs.tar3.5.2 从nfs挂载文件系统
然后修改 uboot 的 bootargs 参数:
=> setenv bootargs 'console=ttymxc0,115200 root=/dev/nfs nfsroot=192.168.10.101:/home/sumu/4nfs/buildroot,proto=tcp rw ip=192.168.10.102:192.168.10.101:192.168.10.1:255.255.255.0::eth0:off init=/linuxrc'
=> saveenv3.5.3 启动开发板
然后重启就可以啦,要是制作没问题的话,是可以挂载成功的。
会发现有一个报错,首先要进入到/lib/modules 目录,但是默认没有,因此需要我们自行创建此目录。 buildroot 构建的根文件系统启动以后会输出我们前面设置的欢迎语“Welcome to alphai.mx6ull”。然后需要输入用户名和密码,用户名是“root”,密码就是我们前面配置 buildroot 的时候设置的 “123456” 。输入用户名和密码以后就可以进入系统中:
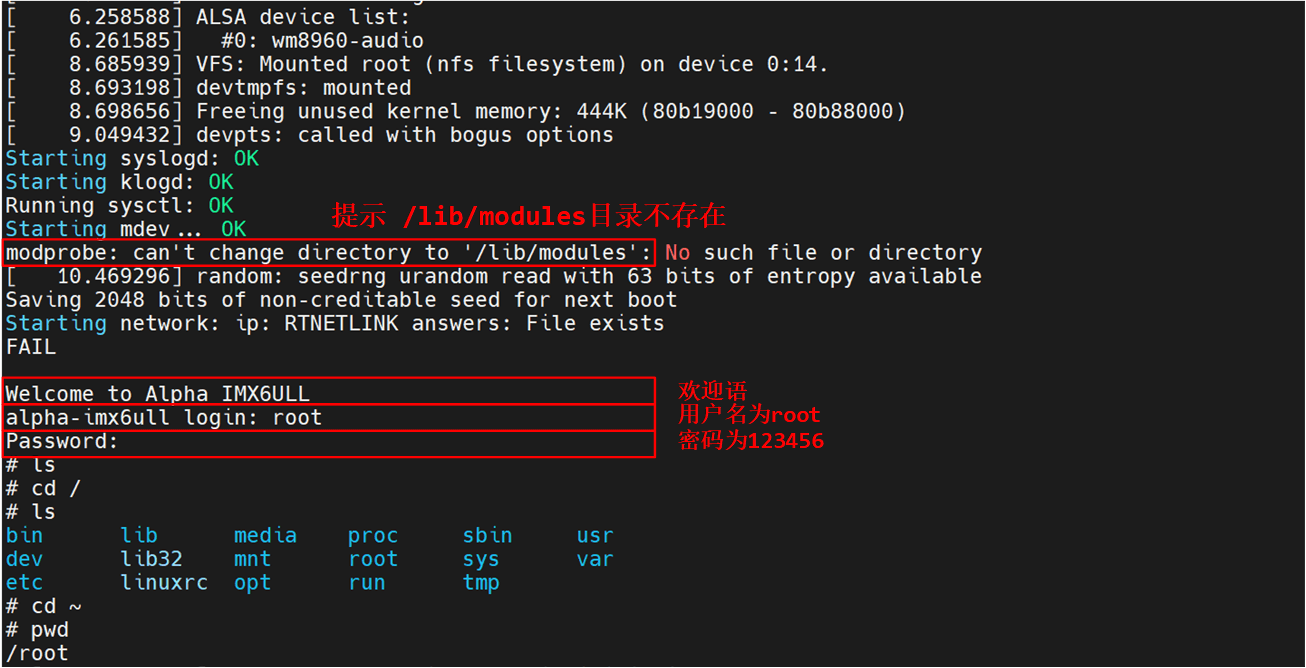
可以看出的 buildroot 构建的根文件系统运行基本没有问题,但是这个根文件系统是最简单的,我们并没有在 buildroot 里面配置任何第三方的库和软件,接下来我们就配置 buildroot,使能一些常见的第三方软件。
四、buildroot 下的 busybox
1. busybox 配置
buildroot 在构建根文件系统的时候也是要用到 busybox 的,既然用到了 busybox 那么就涉及到 busybox 的配置。 buildroot 会自动下载 busybox 压缩包, buildroot 下载的源码压缩包都存放在/dl 目录下,在 dl 目录下就有一个叫做“busybox”的文件夹,此目录下保存着 busybox 压缩包 :

可以看出, buildroot 下载的 busybox 版本为 1.36.1。要想编译 busybox,必须对图中的压缩包进行解压缩, buildroot 将所有解压缩后的软件保存在 buildroot 源码目录的 output/build 中,我们可以在找到 output/build/busybox-1.36.1 这个文件夹,此文件夹就是解压后的 busybox 源码,文件内容如下:
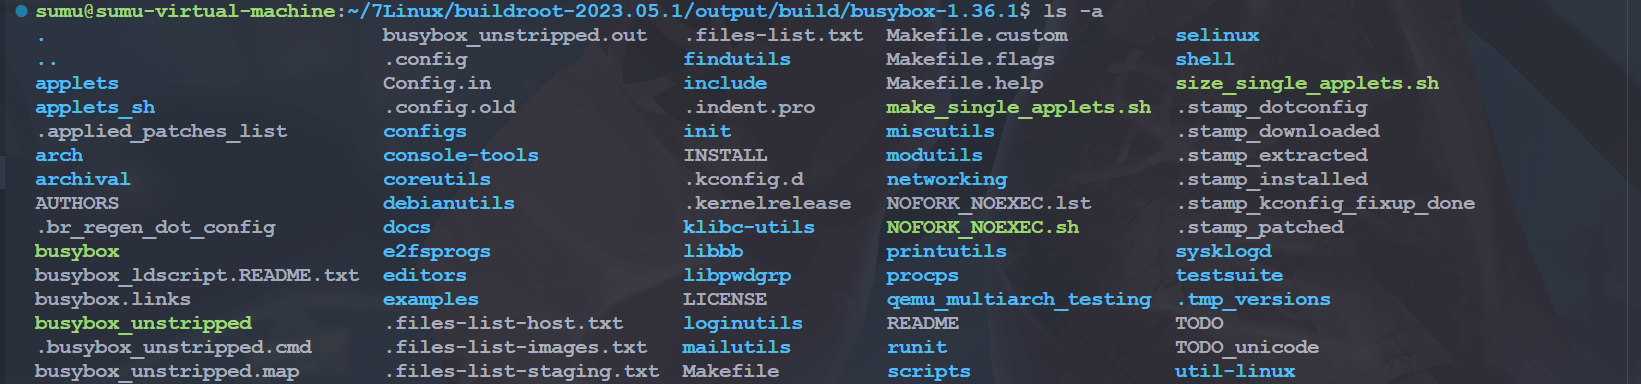
如果想要修改 busybox 源码的话就直接在图中找到相应的文件,然后修改即可。我们现在是要配置 buildroot 下的 busybox,因此肯定要打开 busybox 的配置界面,在 buildroot 下打开 busybox 的配置界面输入如下命令:
cd ~/7Linux/buildroot-2023.05.1
sudo make busybox-menuconfig然后就会打开 busybox 的配置界面:
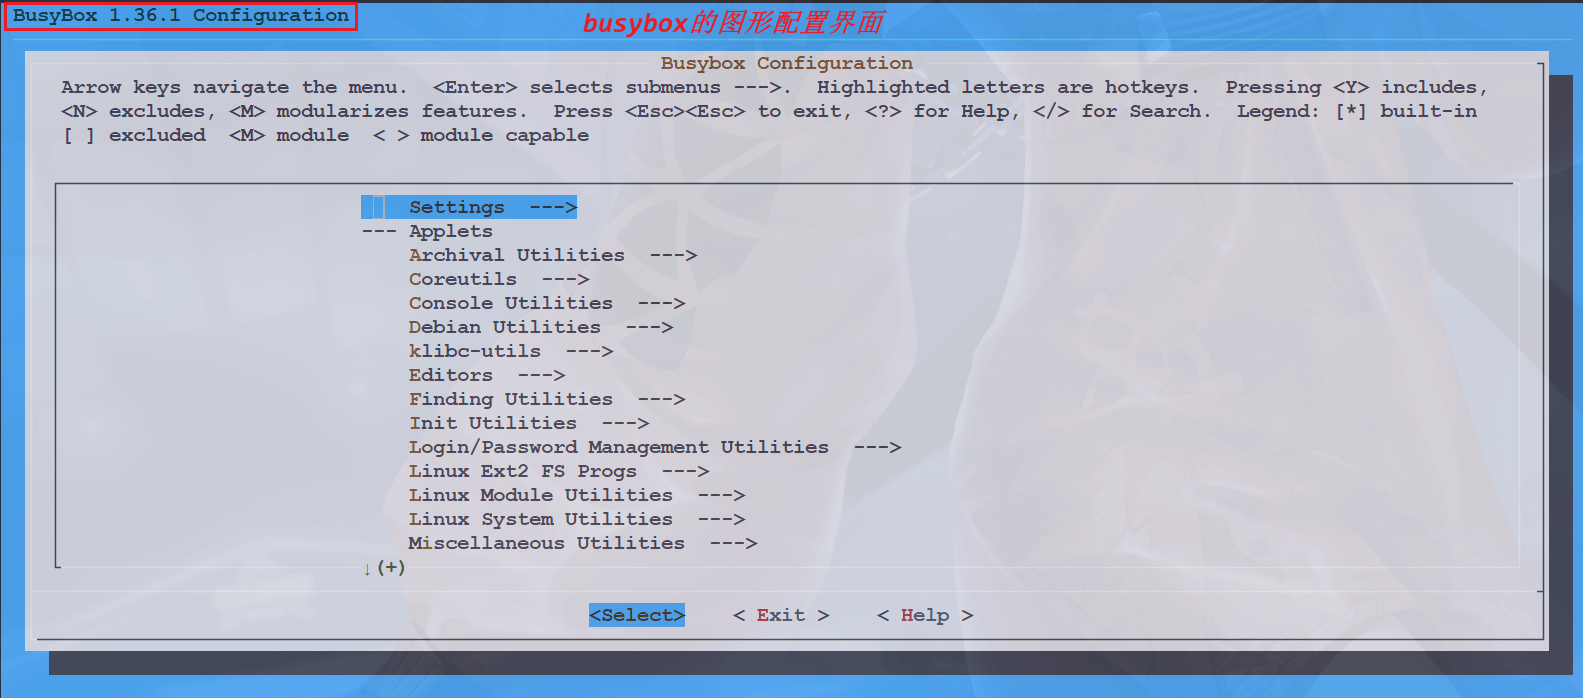
想要怎么配置直接参考前边的 busybox 构建根文件系统的笔记即可。
2. 中文支持
用 buildroot 编译出来的根文件系统也是不支持中文的,但是由于它其实使用的是 busybox,所以我们可以直接修改 busybox 的源码,使其支持中文,这个可以看后面 busybox 相关的笔记。
3. 编译 busybox
配置好以后就可以重新编译 buildroot 下的 busybox,进入到 buildroot 源码目录下,输入如下命令查看当前 buildroot 所有配置了的目标软件包,也就是 packages:
sudo make show-targets
图中列出了当前 buildroot 中所有使能了的 packages 包,其中就包括 busybox,如果我们想单独编译并安装 busybox 的话执行下面命令即可:
sudo make busybox上述命令就会重新编译 busybox。编译完成以后重新编译 buildroot,主要是对其进行打包,输入如下命令:
sudo make重新编译完成以后查看一下 output/images 目录下 rootfs.tar 的创建时间是否为刚刚编译的,如果不是的话就删除掉 rootfs.tar,然后重新执行“sudo make”重新编译一下即可。最后我们使用新的 rootfs.tar 启动 Linux 系统。
五、终端配置
1. 终端提示符
buildroot 构建的根文件系统中的命令提示符前边也是不会显示当前路径的:
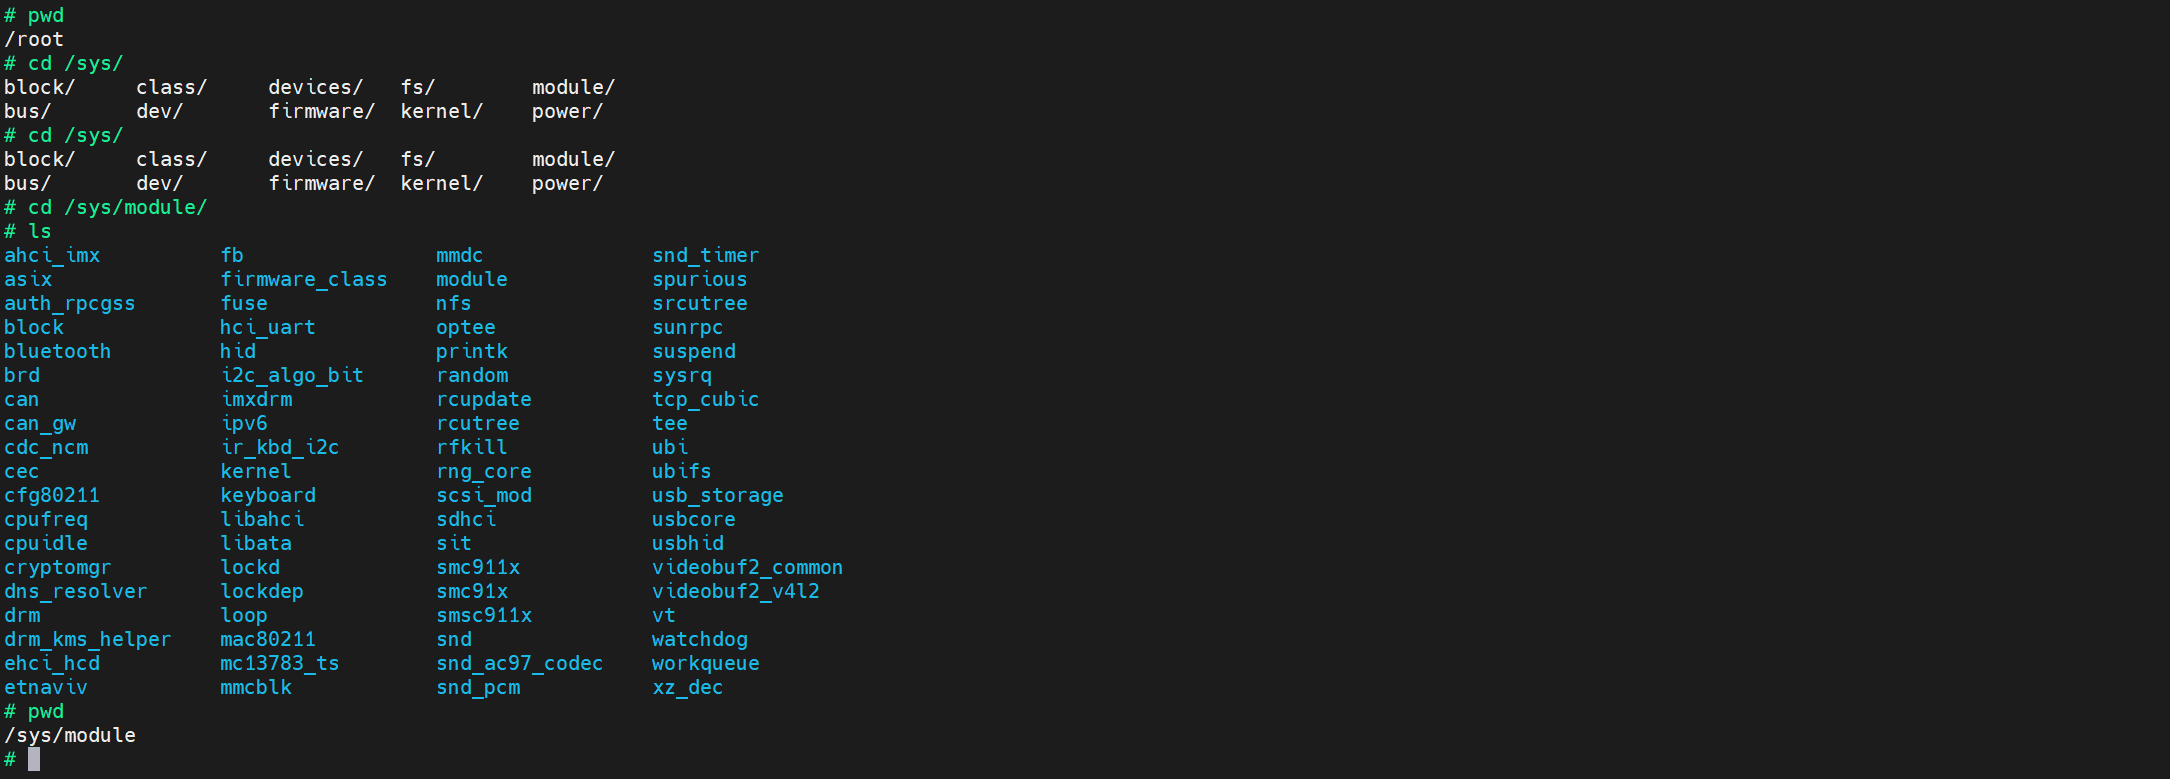
我们可以,修改一下 PS1 变量,我们打开 buildroot 构建出来的根文件系统的 etc/profile 文件,找到如下代码:
if [ "$PS1" ]; then
        if [ "`id -u`" -eq 0 ]; then
                export PS1='# '
        else
                export PS1='$ '
        fi
fi我们把它修改成如下的样子:
PS1='[\u@\h]:\w$:'
export PS1
然后我们再重启开发板就会看到命令提示符前边有显示路径啦:

这里有一个网站可以帮助我们生成 PS1 变量的代码:Easy Bash Prompt Generator,例如这样:
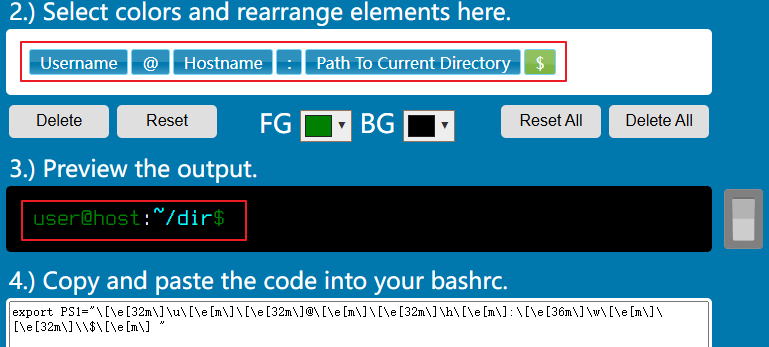
export PS1="\[\e[32m\]\u\[\e[m\]\[\e[32m\]@\[\e[m\]\[\e[32m\]\h\[\e[m\]:\[\e[36m\]\w\[\e[m\]\[\e[32m\]\\$\[\e[m\] "重新修改后就可以得到这样的一个终端啦:

2. 终端宽度
当我们输入过长的命令的时候会出现换行的情况:

这是终端的默认长度有问题,可以参考《05-开发环境/10-相关工具/05-Terminal/LV010-默认终端长度.md》解决。我们打开开发板的/etc/init.d/rcS 文件,去掉这两行:
shopt -s checkwinsize
resize没有的话就不管了。然后打开环境变量文件/etc/profile,添加如下内容:
shopt -s checkwinsize
resize然后在开机的时候会有如下打印:
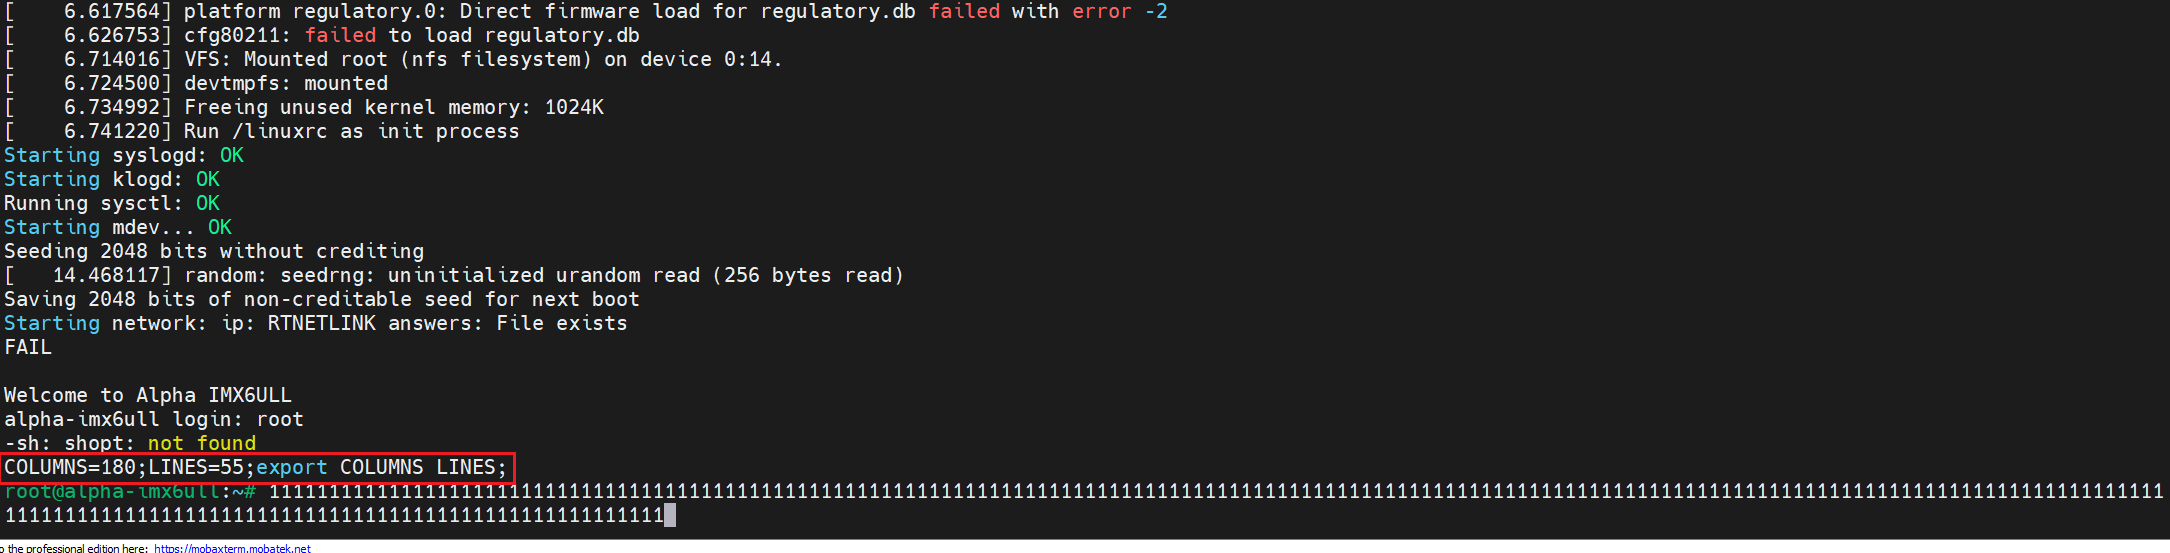
然后输入很长的命令也不会有问题啦。可以看到上面其实出现了报错,主要是因为我们制作的根文件系统没有 shopt 命令,后来我试了,只写这个也没问题:
resize这样也可以重新设置默认终端长度。