
LV210-U-Boot的GPIO命令
这一节,来学习一下,怎么在 uboot 下使用命令来控制 gpio。
一、硬件原理图
我们先看底板原理图("阿尔法 Linux 开发板(A 盘)-基础资料/02、开发板原理图/IMX6ULL_ALPHA_V2.2(底板原理图).pdf"
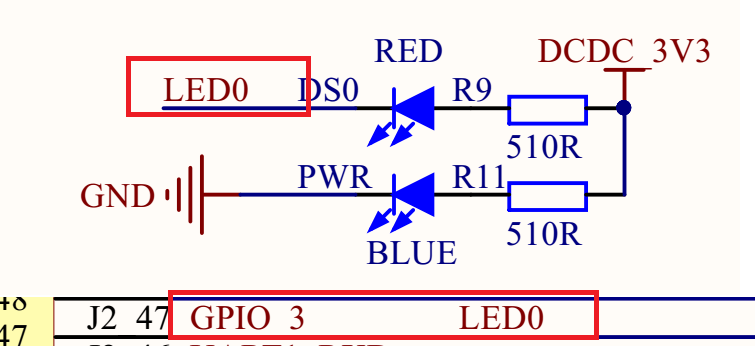
可以看到 LED0 接到了 GPIO_3 上, 这个 GPIO_3 是哪个引脚?感觉这里标的有问题,我们搜索一下,会发现这里接在一个 BTB 连接器母座上,所以我们再去搜一些核心板原理图 "阿尔法 Linux 开发板(A 盘)-基础资料/02、开发板原理图/IMX6ULL_CORE_V1.6(核心板原理图).pdf":

就会发现 GPIO_3 就是 GPIO1_IO03,根据底板原理图,当 GPIO1_IO03 输出低电平(0)的时候发光二极管 LED0 就会导通点亮,GPIO1_IO03 输出高电平(1)的时候发光二极管 LED0 不会导通,因此 LED0 也就不会点亮。所以 LED0 的亮灭取决于 GPIO1_IO03 的输出电平,输出 0 就亮,输出 1 就灭。
二、uboot 的 gpio 控制命令
1. 命令格式
我使用的 uboot 2019.04 中是自带一个 gpio 命令的:
=> gpio
gpio - query and control gpio pins

Usage:
gpio <input|set|clear|toggle> <pin>
    - input/set/clear/toggle the specified pin
gpio status [-a] [<bank> | <pin>] - show [all/claimed] GPIOs这里可以控制某一个 GPIO 为输入模式、输出模式,为输出的时候可以使用 set 命令配置引脚输出高电平,使用 clear 命令配置引脚输出低电平,使用 toggle 命令来反转 GPIO 的输出电平。还可以通过 status 来查看 GPIO 的引脚状态。
2. 使用实例
2.1 配置 GPIO 输出高
=> gpio set GPIO1_3
gpio: pin GPIO1_3 (gpio 3) value is 12.2 配置 GPIO 输出低
=> gpio clear GPIO1_3
gpio: pin GPIO1_3 (gpio 3) value is 02.3 翻转 GPIO 电平
=> gpio toggle GPIO1_3
gpio: pin GPIO1_3 (gpio 3) value is 0
=> gpio toggle GPIO1_3
gpio: pin GPIO1_3 (gpio 3) value is 12.4 查看 GPIO 状态
=> gpio status -a
Bank GPIO1_:
GPIO1_0: input: 1 [ ]
# ......
GPIO1_3: output: 1 [ ]
# ......
GPIO1_7: input: 0 [ ]
GPIO1_8: output: 1 [x] backlight
GPIO1_9: output: 1 [x] regulator@1.gpio
GPIO1_10: input: 0 [ ]
# ......
GPIO1_19: input: 0 [x] usdhc@02190000.cd-gpios从这里可以看到这个 GPIO 是输入还是释出模式以及是否使用了复用功能。
三、gpio 命令的定义
这里需要先回顾一下 C 语言宏定义中的#和##:
(1)#的作用是转换为字符串。
(2)##的作用是连接前后的内容。
1. gpio 命令变量的定义
我们先看一下 gpio 命令的定义,定义在 gpio.c - cmd/gpio.c 中:
U_BOOT_CMD(gpio, 4, 0, do_gpio,
	   "query and control gpio pins",
	   "<input|set|clear|toggle> <pin>\n"
	   "    - input/set/clear/toggle the specified pin\n"
"gpio status [-a] [<bank> | <pin>] - show [all/claimed] GPIOs");毫无疑问,下一步就是把这个 U_BOOT_CMD 宏展开,看看这段代码到底干了什么。
2. U_BOOT_CMD
2.1 相关的几个宏定义
2.1.1 U_BOOT_CMD
先来看一下 U_BOOT_CMD 这个宏,它定义在 command.h - include/command.h 中:
/*
 * name      :命令名,非字符串,但在 U_BOOT_CMD 中用“#”符号转化为字符串
 * _maxargs  :命令的最大参数个数
 * _rep      :是否自动重复(按 Enter 键是否会重复执行)
 * _cmd      :该命令对应的响应函数指针
 * _usage    :简短的使用说明(字符串)
 * _help     :较详细的使用说明(字符串)
 */
#define U_BOOT_CMD(_name, _maxargs, _rep, _cmd, _usage, _help)		\
U_BOOT_CMD_COMPLETE(_name, _maxargs, _rep, _cmd, _usage, _help, NULL)这里下面还嵌套了一个宏 U_BOOT_CMD_COMPLETE。
2.1.2 U_BOOT_CMD_COMPLETE
我们再找一下这个宏的位置,在 uboot 2019.14 的版本中,这个宏有两个定义,都定义在 command.h - include/command.h 文件中:
#ifdef CONFIG_CMDLINE
//......
#define U_BOOT_CMD_MKENT_COMPLETE(_name, _maxargs, _rep, _cmd,		\
				_usage, _help, _comp)			\
		{ #_name, _maxargs,					\
		 _rep ? cmd_always_repeatable : cmd_never_repeatable,	\
		 _cmd, _usage, _CMD_HELP(_help) _CMD_COMPLETE(_comp) }

#define U_BOOT_CMD_COMPLETE(_name, _maxargs, _rep, _cmd, _usage, _help, _comp) \
	ll_entry_declare(cmd_tbl_t, _name, cmd) =			\
		U_BOOT_CMD_MKENT_COMPLETE(_name, _maxargs, _rep, _cmd,	\
						_usage, _help, _comp);
//......
#else
//......
#define U_BOOT_CMD_COMPLETE(_name, _maxargs, _rep, _cmd, _usage, _help,	\
			    _comp)				\
	_CMD_REMOVE(sub_ ## _name, _cmd)
//......
#endif /* CONFIG_CMDLINE */那么用的是哪一个?我们需要去搜一下 CONFIG_CMDLINE 这个宏定义,这个宏我们需要将 uboot 编译一遍,编译命令嘛,我们就用之前 NXP 的哪个评估板的配置文件的编译命令吧:
make ARCH=arm CROSS_COMPILE=arm-linux-gnueabihf- distclean
make ARCH=arm CROSS_COMPILE=arm-linux-gnueabihf- mx6ull_14x14_evk_defconfig
make V=0 ARCH=arm CROSS_COMPILE=arm-linux-gnueabihf- -j16编译之后在源码顶层目录下会生成.config 文件,在这个文件中有它的定义:
CONFIG_CMDLINE=y所以 U_BOOT_CMD_COMPLETE 使用的是上面的定义,也就是:
#define U_BOOT_CMD_COMPLETE(_name, _maxargs, _rep, _cmd, _usage, _help, _comp) \
	ll_entry_declare(cmd_tbl_t, _name, cmd) =			\
		U_BOOT_CMD_MKENT_COMPLETE(_name, _maxargs, _rep, _cmd,	\
_usage, _help, _comp);可以看到里面还有一层 U_BOOT_CMD_MKENT_COMPLETE。我们继续找。
2.1.3 U_BOOT_CMD_MKENT_COMPLETE
它也是根据 CONFIG_CMDLINE 有不同的定义,这里的定义是 command.h - include/command.h:
#define U_BOOT_CMD_MKENT_COMPLETE(_name, _maxargs, _rep, _cmd,		\
				_usage, _help, _comp)			\
		{ #_name, _maxargs,					\
		 _rep ? cmd_always_repeatable : cmd_never_repeatable,	\
_cmd, _usage, _CMD_HELP(_help) _CMD_COMPLETE(_comp) }然后就发现这里还有一层_CMD_HELP 和_CMD_COMPLETE。
2.1.4 _CMD_HELP
这个宏也定义在 command.h - include/command.h:
#ifdef CONFIG_SYS_LONGHELP
# define _CMD_HELP(x) x,
#else
# define _CMD_HELP(x)
#endif可以看到具体的定义是 CONFIG_SYS_LONGHELP 控制,还是去.config 文件找,会发现这个配置项为 y,所以这里对应的宏为:
# define _CMD_HELP(x) x,2.1.5 _CMD_COMPLETE
这个同样是定义在 command.h - include/command.h:
#ifdef CONFIG_AUTO_COMPLETE
# define _CMD_COMPLETE(x) x,
#else
# define _CMD_COMPLETE(x)
#endif这里一样的方式,最后确定 CONFIG_AUTO_COMPLETE = y,所以这里就是:
# define _CMD_COMPLETE(x) x,2.1.6 ll_entry_declare
接下来看一下 ll_entry_declare 是什么,它也是一个宏,它定义在 linker_lists.h - include/linker_lists.h:
/**
 * ll_entry_declare() - Declare linker-generated array entry
 * @_type:	Data type of the entry
 * @_name:	Name of the entry
 * @_list:	name of the list. Should contain only characters allowed
 *		in a C variable name!
 *
 * This macro declares a variable that is placed into a linker-generated
 * array. This is a basic building block for more advanced use of linker-
 * generated arrays. The user is expected to build their own macro wrapper
 * around this one.
 *
 * A variable declared using this macro must be compile-time initialized.
 *
 * Special precaution must be made when using this macro:
 *
 * 1) The _type must not contain the "static" keyword, otherwise the
 *    entry is generated and can be iterated but is listed in the map
 *    file and cannot be retrieved by name.
 *
 * 2) In case a section is declared that contains some array elements AND
 *    a subsection of this section is declared and contains some elements,
 *    it is imperative that the elements are of the same type.
 *
 * 3) In case an outer section is declared that contains some array elements
 *    AND an inner subsection of this section is declared and contains some
 *    elements, then when traversing the outer section, even the elements of
 *    the inner sections are present in the array.
 *
 * Example:
 *
 * ::
 *
 *   ll_entry_declare(struct my_sub_cmd, my_sub_cmd, cmd_sub) = {
 *           .x = 3,
 *           .y = 4,
 *   };
 */
#define ll_entry_declare(_type, _name, _list)				\
	_type _u_boot_list_2_##_list##_2_##_name __aligned(4)		\
			__attribute__((unused,				\
section(".u_boot_list_2_"#_list"_2_"#_name)))这里是在做什么?我们可以看上面的注释,翻译一下就是:该宏声明了一个变量,该变量放置在链接器生成的数组中。这是更高级地使用链接器生成的数组的基本构建块。用户需要围绕这个宏包装器构建自己的宏包装器。使用此宏声明的变量必须在编译时初始化。好像没怎么看懂,其实就是声明一个_type 类型的变量是这样的:
_type                              // 变量类型
_u_boot_list_2_##_list##_2_##_name // 变量名
__aligned(4)                       // 这个变量四字节对齐
__attribute__((unused, section(".u_boot_list_2_"#_list"_2_"#_name))) // 这个变量有两个属性
// unused 属性:这个变量如果没有被使用,编译器不会报“变量从未使用“的警告
// section 属性:会将这个变量放置到可执行程序的 ".u_boot_list_2_"#_list "_2_"#_name 字段下,与.text 段或.data 等其他段独立出来使用此宏声明的变量必须在编译时初始化。使用此宏时必须特别注意:
(1)_type 不能包含“static”关键字,否则生成的条目可以被迭代,但会列在 map 文件中,不能通过名称检索。
(2)如果声明一个 section 包含一些数组元素,并且声明该 section 的一个子节包含一些元素,则这些元素必须具有相同的类型。
(3)如果声明了包含一些数组元素的外部分段,并且声明了该分段的内部分段并包含一些元素,则遍历外部分段时,甚至内部分段的元素都存在于数组中。
2.2 展开这几个宏
我们一层一层向上展开。
2.2.1 U_BOOT_CMD_MKENT_COMPLETE
有这两个宏:
# define _CMD_HELP(x) x,
# define _CMD_COMPLETE(x) x,我们可以展开 U_BOOT_CMD_MKENT_COMPLETE:
/* U_BOOT_CMD_MKENT_COMPLETE */
#define U_BOOT_CMD_MKENT_COMPLETE(_name, _maxargs, _rep, _cmd,		\
				_usage, _help, _comp)			\
		{ #_name, _maxargs,					\
		 _rep ? cmd_always_repeatable : cmd_never_repeatable,	\
		 _cmd, _usage, _CMD_HELP(_help) _CMD_COMPLETE(_comp) }

// U_BOOT_CMD_MKENT_COMPLETE 展开之后是
#define U_BOOT_CMD_MKENT_COMPLETE(_name, _maxargs, _rep, _cmd,		\
				_usage, _help, _comp)			\
		{ #_name, _maxargs,					\
		 _rep ? cmd_always_repeatable : cmd_never_repeatable,	\
_cmd, _usage, _help, _comp,}2.2.2 U_BOOT_CMD_COMPLETE
接下来是 U_BOOT_CMD_COMPLETE,有上面的 U_BOOT_CMD_MKENT_COMPLETE 可以得到:
/* U_BOOT_CMD_COMPLETE */
#define U_BOOT_CMD_COMPLETE(_name, _maxargs, _rep, _cmd, _usage, _help, _comp) \
	ll_entry_declare(cmd_tbl_t, _name, cmd) =			\
		U_BOOT_CMD_MKENT_COMPLETE(_name, _maxargs, _rep, _cmd,	\
						_usage, _help, _comp);
// U_BOOT_CMD_COMPLETE 展开之后就是
#define U_BOOT_CMD_COMPLETE(_name, _maxargs, _rep, _cmd, _usage, _help, _comp) \
	ll_entry_declare(cmd_tbl_t, _name, cmd) =			\
		{ #_name, _maxargs,					\
		 _rep ? cmd_always_repeatable : cmd_never_repeatable,	\
_cmd, _usage, _help, _comp,}2.2.3 ll_entry_declare
我们吧这个 ll_entry_declare 也展开:
// ll_entry_declare
#define ll_entry_declare(_type, _name, _list)				\
	_type _u_boot_list_2_##_list##_2_##_name __aligned(4)		\
			__attribute__((unused,				\
			section(".u_boot_list_2_"#_list"_2_"#_name)))
// 通过 ll_entry_declare(cmd_tbl_t, _name, cmd)传入的三个参数
// _type = cmd_tbl_t
// _name = _name
// _list = cmd 注意这里 cmd 不是_cmd,cmd 就只是在下面被替换成字符串,_cmd 依赖上层传入
// 将 ll_entry_declare 内部的变量替换一下可以得到
#define ll_entry_declare(cmd_tbl_t, _name, cmd)				\
	cmd_tbl_t _u_boot_list_2_cmd_2_##_name __aligned(4)		\
			__attribute__((unused,				\
			section(".u_boot_list_2_""cmd""_2_"#_name)))

// 这里可以对 U_BOOT_CMD_COMPLETE 进一步展开之后就是
#define U_BOOT_CMD_COMPLETE(_name, _maxargs, _rep, _cmd, _usage, _help, _comp) \
	cmd_tbl_t _u_boot_list_2_cmd_2_##_name __aligned(4)		\
			__attribute__((unused,				\
			section(".u_boot_list_2_""cmd""_2_"#_name))) =			\
		{ #_name, _maxargs,					\
		 _rep ? cmd_always_repeatable : cmd_never_repeatable,	\
_cmd, _usage, _help, _comp,}2.2.4 U_BOOT_CMD
最后一步就是把 U_BOOT_CMD 展开了,根据前面的 U_BOOT_CMD_MKENT_COMPLETE 展开形式,可以得到:
/* U_BOOT_CMD */
#define U_BOOT_CMD(_name, _maxargs, _rep, _cmd, _usage, _help)		\
	U_BOOT_CMD_COMPLETE(_name, _maxargs, _rep, _cmd, _usage, _help, NULL)
// U_BOOT_CMD 最终展开后就是
#define U_BOOT_CMD(_name, _maxargs, _rep, _cmd, _usage, _help)		\
	cmd_tbl_t _u_boot_list_2_cmd_2_##_name __aligned(4)		\
			__attribute__((unused,				\
			section(".u_boot_list_2_""cmd""_2_"#_name))) =			\
		{ #_name, _maxargs,					\
		 _rep ? cmd_always_repeatable : cmd_never_repeatable,	\
_cmd, _usage, _help, NULL,}我们知道#就是转换为字符串,这个时候可以进一步把#替换掉:
#define U_BOOT_CMD(_name, _maxargs, _rep, _cmd, _usage, _help)		\
	cmd_tbl_t _u_boot_list_2_cmd_2_##_name __aligned(4)		\
			__attribute__((unused,				\
			section(".u_boot_list_2_""cmd""_2_""_name"))) =			\
		{ "_name", _maxargs,					\
		 _rep ? cmd_always_repeatable : cmd_never_repeatable,	\
		 _cmd, _usage, _help, NULL,}

// 整理一下就是
#define U_BOOT_CMD(_name, _maxargs, _rep, _cmd, _usage, _help)		\
	cmd_tbl_t _u_boot_list_2_cmd_2_##_name __aligned(4)		        \
			__attribute__((unused, section(".u_boot_list_2_""cmd""_2_""_name"))) = \
		{                  \
			"_name",       \
            _maxargs,      \
            _rep ? cmd_always_repeatable : cmd_never_repeatable, \
            _cmd,          \
            _usage,        \
            _help,         \
NULL,}2.3 gpio 命令变量
2.3.1 变量定义展开
上面已经把 U_BOOT_CMD 展开了,我们现在根据 gpio 命令变量的定义,对变量进行替换,前面已经看到了 gpio 命令的定义,定义在 gpio.c - cmd/gpio.c 中:
U_BOOT_CMD(gpio, 4, 0, do_gpio,
	   "query and control gpio pins",
	   "<input|set|clear|toggle> <pin>\n"
	   "    - input/set/clear/toggle the specified pin\n"
"gpio status [-a] [<bank> | <pin>] - show [all/claimed] GPIOs");里面的各个变量对应关系是这样的:
/*
 * name = gpio, 命令名,非字符串,但在 U_BOOT_CMD 中用“#”符号转化为字符串
 * _maxargs = 4, 命令的最大参数个数
 * _rep = 0, 是否自动重复(按 Enter 键是否会重复执行)
 * _cmd = do_gpio, 该命令对应的响应函数指针
 * _usage = "query and control gpio pins", 简短的使用说明(字符串)
 * _help = "<input|set|clear|toggle> <pin>\n"
 		 "    - input/set/clear/toggle the specified pin\n"
	     "gpio status [-a] [<bank> | <pin>]  - show [all/claimed] GPIOs", 较详细的使用说明(字符串)
*/然后我们完全展开,可以得到 gpio 命令变量的定义:
//      U_BOOT_CMD(_name, _maxargs, _rep, _cmd, _usage, _help)
#define U_BOOT_CMD(gpio, 4, 0, do_gpio, "usage", "help")		\
	cmd_tbl_t _u_boot_list_2_cmd_2_##_name __aligned(4)		        \
			__attribute__((unused, section(".u_boot_list_2_""cmd""_2_""_name"))) = \
		{                  \
			"_name",       \
            _maxargs,      \
            _rep ? cmd_always_repeatable : cmd_never_repeatable, \
            _cmd, _usage, _help, NULL,}
// 替换后就是
#define U_BOOT_CMD(gpio, 4, 0, do_gpio, "usage", "help")		\
	cmd_tbl_t _u_boot_list_2_cmd_2_gpio __aligned(4)		        \
			__attribute__((unused, section(".u_boot_list_2_""cmd""_2_""gpio"))) = \
		{                 \
			"gpio",       \
            4,            \
            0 ? cmd_always_repeatable : cmd_never_repeatable,                \
            do_gpio,                                                         \
			"query and control gpio pins",                                   \
			"<input|set|clear|toggle> <pin>\n"                               \
            "    - input/set/clear/toggle the specified pin\n"               \
	        "gpio status [-a] [<bank> | <pin>]  - show [all/claimed] GPIOs", \
NULL,}把宏的标识去掉,就是
// 这里的 ".u_boot_list_2_" "cmd" "_2_" "gpio" 其实可以把中间的 " 去掉的
// 那个条件判断的运算符也可以去掉
// 最后整理一下那就是
cmd_tbl_t _u_boot_list_2_cmd_2_gpio __aligned(4)
			__attribute__((unused, section(".u_boot_list_2_cmd_2_gpio"))) = {
			"gpio",
            4,
            cmd_never_repeatable,
            do_gpio,
			"query and control gpio pins",
			"<input|set|clear|toggle> <pin>\n"
            "    - input/set/clear/toggle the specified pin\n"
	        "gpio status [-a] [<bank> | <pin>]  - show [all/claimed] GPIOs",
NULL,};我们可以去看一个 u-boot.map 文件(编译后就会生成),搜索关键字就会发现里面有这个命令在:

这也可以证明前面宏展开是正确的。
2.3.2 cmd_tbl_t 类型
可以看到上面的变量类型是 cmd_tbl_t,它是一个结构体类型,定义在 command.h - include/command.h:
typedef struct cmd_tbl_s cmd_tbl_t;最终的定义是在这里 command.h - include/command.h:
struct cmd_tbl_s {
	char		*name;		/* Command Name			*/
	int		maxargs;	/* maximum number of arguments	*/
					/*
					 * Same as -> cmd() except the command
					 * tells us if it can be repeated.
					 * Replaces the old -> repeatable field
					 * which was not able to make
					 * repeatable property different for
					 * the main command and sub-commands.
					 */
	int		(*cmd_rep)(struct cmd_tbl_s *cmd, int flags, int argc,
				   char * const argv[], int *repeatable);
					/* Implementation function	*/
	int		(*cmd)(struct cmd_tbl_s *, int, int, char * const []);
	char		*usage;		/* Usage message	(short)	*/
#ifdef	CONFIG_SYS_LONGHELP
	char		*help;		/* Help  message	(long)	*/
#endif
#ifdef CONFIG_AUTO_COMPLETE
	/* do auto completion on the arguments */
	int		(*complete)(int argc, char * const argv[], char last_char, int maxv, char *cmdv[]);
#endif
};前面分析过,CONFIG_SYS_LONGHELP 和 CONFIG_AUTO_COMPLETE 都有定义,所以这里就是:
struct cmd_tbl_s {
	char *name;		/* Command Name			*/
	int  maxargs;	/* maximum number of arguments	*/
	int  (*cmd_rep)(struct cmd_tbl_s *cmd, int flags, int argc, char * const argv[], int *repeatable); /* Implementation function	*/
	int  (*cmd)(struct cmd_tbl_s *, int, int, char * const []);
	char *usage; /* Usage message	(short)	*/
	char *help;  /* Help  message	(long)	*/
	int  (*complete)(int argc, char * const argv[], char last_char, int maxv, char *cmdv[]);/* do auto completion on the arguments */
};可以看到这里有三个函数指针,其中 complete 指针由于 U_BOOT_CMD_COMPLETE 宏中固定为 NULL,这里可以不用关心。还有两个函数指针 cmd_rep 和 cmd,我们接着看一下。
2.4 两个函数指针
2.4.1 cmd_rep
2.4.1.1 函数指针定义
这个函数指针定义为:
int (*cmd_rep)(struct cmd_tbl_s *cmd, int flags, int argc, char * const argv[], int *repeatable); /* Implementation function */这个函数指针含有 5 个形参,返回值为 int 类型。它主要控制是否自动重复(按 Enter 键是否会重复执行)命令。在命令定义的时候这里主要是根据_rep 的值来决定调用哪个函数。
#define U_BOOT_CMD(_name, _maxargs, _rep, _cmd, _usage, _help)		\
	cmd_tbl_t _u_boot_list_2_cmd_2_##_name __aligned(4)		        \
			__attribute__((unused, section(".u_boot_list_2_""cmd""_2_""_name"))) = \
		{                  \
			"_name",       \
            _maxargs,      \
            _rep ? cmd_always_repeatable : cmd_never_repeatable, \
            _cmd,          \
            _usage,        \
            _help,         \
NULL,}2.4.1.2 cmd_always_repeatable()
看一下 cmd_always_repeatable,它定义在 command.c - common/command.c
int cmd_always_repeatable(cmd_tbl_t *cmdtp, int flag, int argc,
			  char * const argv[], int *repeatable)
{
	*repeatable = 1;

	return cmdtp->cmd(cmdtp, flag, argc, argv);
}2.4.1.3 cmd_never_repeatable()
cmd_never_repeatable 定义在 command.c - common/command.c:
int cmd_never_repeatable(cmd_tbl_t *cmdtp, int flag, int argc,
			 char * const argv[], int *repeatable)
{
	*repeatable = 0;

	return cmdtp->cmd(cmdtp, flag, argc, argv);
}从 gpio 的命令变量定义来看,这里调用的就是这个函数了。
2.4.2 cmd
2.4.2.1 函数指针定义
这个函数指针定义为:
int (*cmd)(struct cmd_tbl_s *, int, int, char * const []);它有四个参数,返回值为 int 类型。这个函数指针就是命令的实现过程,我么敲了这个命令之后要执行什么,就在这个函数指针指向的函数中实现。
2.4.2.2 do_gpio()
前面展开的时候可以看到这个 cmd 函数指针指向的是 do_gpio 函数,它定义在 gpio.c - cmd/gpio.c
static int do_gpio(cmd_tbl_t *cmdtp, int flag, int argc, char * const argv[]);3. 总结一下吧
这里总结一下吧,总的来说上面那么多就是分析了一条语句:
U_BOOT_CMD(gpio, 4, 0, do_gpio,
	   "query and control gpio pins",
	   "<input|set|clear|toggle> <pin>\n"
	   "    - input/set/clear/toggle the specified pin\n"
"gpio status [-a] [<bank> | <pin>] - show [all/claimed] GPIOs");这条语句经过层层展开之后,实际上是定义了一个结构体变量:
cmd_tbl_t _u_boot_list_2_cmd_2_gpio __aligned(4)
			__attribute__((unused, section(".u_boot_list_2_cmd_2_gpio"))) = {
			"gpio",
            4,
            cmd_never_repeatable,
            do_gpio,
			"query and control gpio pins",
			"<input|set|clear|toggle> <pin>\n"
            "    - input/set/clear/toggle the specified pin\n"
	        "gpio status [-a] [<bank> | <pin>]  - show [all/claimed] GPIOs",
NULL,};这个结构体变量名是 _u_boot_list_2_cmd_2_gpio,类型是 cmd_tbl_t,这个变量在内存中是四字节对齐的,通过 __attribute__ 给这个结构体变量设置了两个属性:
- unused 属性:这个变量如果没有被使用,编译器不会报“变量从未使用“的警告
- section 属性:
".u_boot_list_2_cmd_2_gpio"属性会将这个变量放置到可执行程序的".u_boot_list_2_cmd_2_gpio"字段下,与.text 段或.data 等其他段独立出来
参考资料:
petalinux - u-boot 中操作 gpio_uboot gpio 操作-CSDN 博客
6. Uboot 的 GPIO 控制 — [野火] 嵌入式 Linux 镜像构建与部署——基于 LubanCat-i.MX6ULL 开发板 文档 (embedfire.com)
u-boot 的命令实现(添加自定义命令)_uboot 自定义 函数-CSDN 博客
Linux 下 uboot 添加自定义命令(详细)实例及原理解析_怎么修改 uboot 指令-CSDN 博客
9.uboot 命令体系 源码解读并从中添加命令_uboot 让参数等于命令返回值-CSDN 博客